You are currently browsing the category archive for the ‘Bonsai Maintenence’ category.
This year has seen some dramatic changes to my bonsai. The most major of these was moving house and gaining some backyard space. My trees previously were kept in amongst a lush garden. On one hand this was good in that my bonsai were quite sheltered and there was a good micro climate in which to grow amongst. The down side was that I could never really rid my trees of pests as once the garden was infected everything was. As a result my trees ended up with a number of pest problems. Now I have moved I hope to rid them of these problems, which brings me to the subject of this post, my Trident Maple.
Earlier this spring I defoliated the maple and posted the results HERE. I repeated this defoliation process twice more during the season and was rewarded with much increased ramification.
As it began to change into its Autumn colours I set about doing the final defoliation. Usually I would leave the leaves on a little longer in order to see the full range of colours they would turn but I wanted to remove them before they dropped so I could dispose of them along with any insect eggs that may have been laid on them.
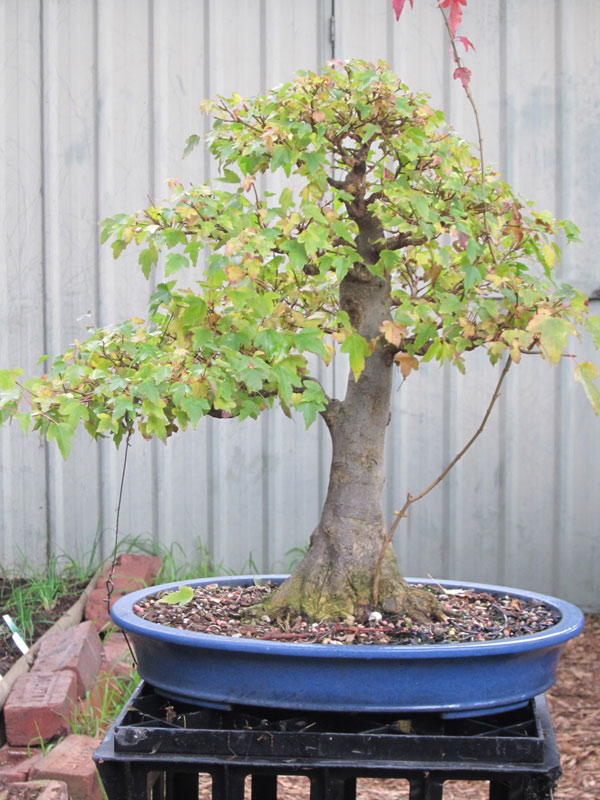
The trident at the beginning of autumn just beginning to show signs of it changing colour.

Starting to turn
I removed all the leaves which revealed the structure of the branches and all the new ramification. All the leaves that were removed were put into the household garbage to ensure that any eggs on them would not end up anywhere near my bonsai.

Defoliated.
Once the tree was naked I was able to carefully look over the tree to assess the amount of pruning that would be required. I wanted to spray the tree with lime sulphur to kill any remaining pests so I did not prune at this stage. I don’t like the idea of lime sulphur getting into fresh cuts. I am not sure if it is actually a problem or not but I choose to avoid it where I can.
What I did prune off was some insect eggs. I found what I first thought were fungal blooms on dead twigs.

If you look closely you can see the small white tufts of damage.
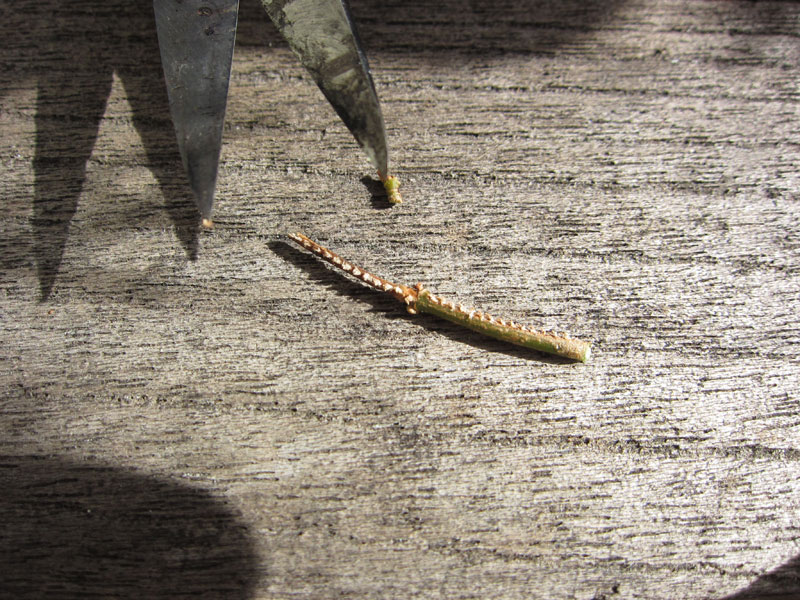
A close up of a damaged twig
Upon further investigation I realised that the tufts lead to a hollow channel within the twig which was filled with eggs around 0.5mm in size. I did a quick search on the net and realised they were the eggs of Passion Hoppers which lay their eggs in channels they make within small twigs. The twigs die soon after the eggs are laid so cutting the twig off and destroying it is a good way to tackle them.
I then went over the tree with a pair of scissors and removed every twig I could find that exhibited signs of damage.
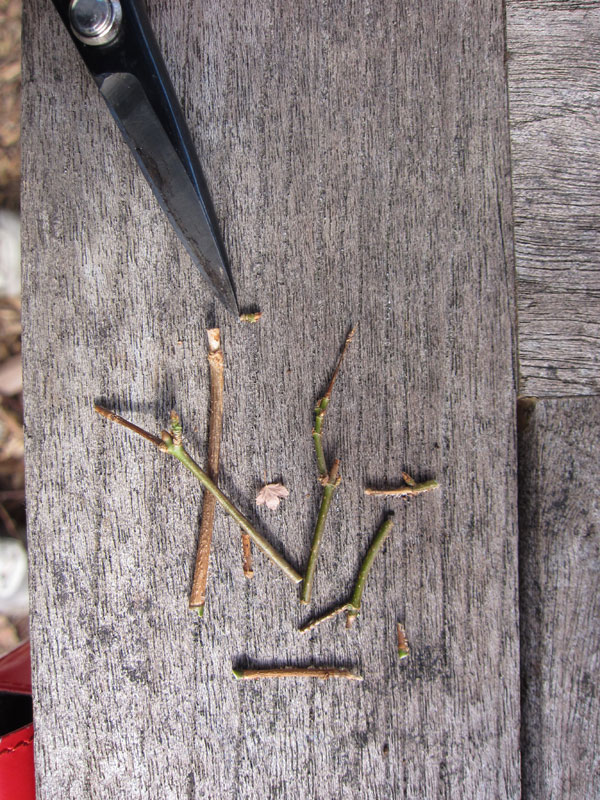
A pile of some of the damaged twigs.
After removing what I can only guess was hundreds of insect eggs I sprayed the tree with a diluted solution of lime sulphur to prepare the bonsai for winter.
It was a satisfying days work. I hope that the work will pay off next season with a dramatic reduction of insects in my collection. Fingers crossed.
It’s that time of the year again.
It’s a time of the year that I both look forward to and dread. Once you amass a certain number of pines you begin to realise just how much time you need to set aside to give each tree its seasonal maintenance. This year, I have moved house and as a result some of the trees I would have normally have worked on earlier in the month were left until now, so the back log of tasks compounded the time I needed to spend on them. That being said, once I began the work I really enjoyed getting to see just how each tree had been growing over the season. When you thin needles you get to inspect very closely every branch of the tree and evaluate each new bud, needle and twig. You really get to know your trees while doing these tasks.
Why do you thin needles? You should thin needles at this time of year for a few reasons.
- By removing last season needles you let more light and air into the canopy which in turn encourages back-budding.
- By removing some of this seasons needles on strong areas you are able to balance strength across the tree foliage.
- By removing surplus needles you also reduce the amount of places that insects and other pests are able to hide.
I like to think that needle reduction for pines works a little like defoliation does for deciduous trees. I figure that the pine realises it suddenly has less foliage and as a result sets new buds which will grow the following spring to replace the needles that you removed. As pines cannot simply grow new needles they have to throw new buds. Most of these new buds will be dormant buds back within the canopy. These are the buds you want. This back-budding is what will give you foliage to cut back to in the future and which will prevent branches becoming leggy.
This year I have left a few more pairs of needles then I usually may on some trees as I plan to re-pot them come spring and figure they could benefit from the extra strength more needles will provide.

A Formal upright Black Pine in the making. This image was taken prior to beginning needle thinning.

The same tree after thinning. It is still very much in developement but after a few years of work i hope to have a more complete looking tree.

This is another JBP from the same batch as the above pine. It has developed much better than the above pine. It avoided many of the mistakes the other tree had to endure as i was learning. Photo was taken before thinning.

The same tree after thinning. It needs the apex developed but otherwise is on the right track. I am also planning to graft a back branch or two into the upper section this spring which may be the topic of a future post.
I also thinned my large Radiata. I again left more needles on it that i usually might for two reasons. The first reason is because I will be re-potting it this spring and I want it to be strong. The second reason is because I am experimenting with leaving more foliage on it much like you would on a white pine. We will have to see how that works out.

A Radiata branch prior to thinning.

And the same foliage after a light thinning.
The tree below is one I worked on a couple of years ago. It is a large Shimpaku Juniper that had some great deadwood. When I was working on it, it was in the process of having some new roots grafted onto it. Because of this the styling was kept to just main branches, leaving the tips somewhat free so as not to stress the tree too much.
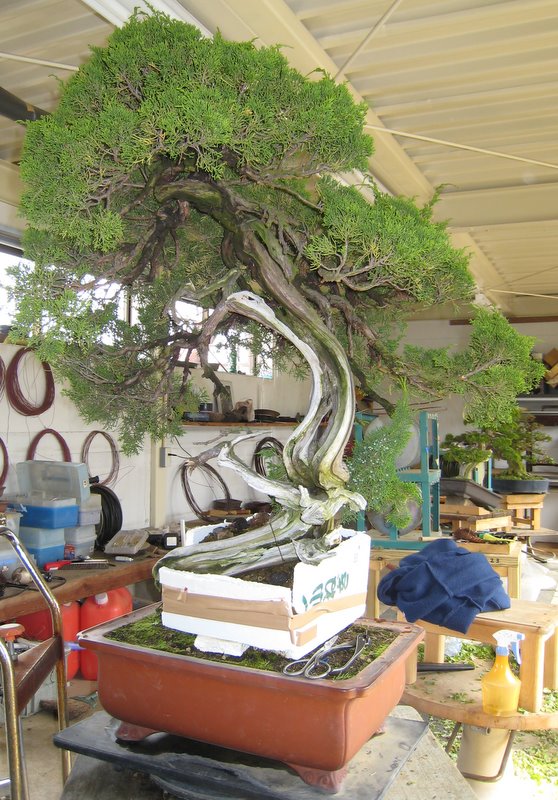
The tree before any work May 2009. There is a foam box that is holding soil for the grafts at the base. The layer was on the tree so that the deadwood would be brought closer to the soil surface and give the tree a more solid base.

After several hours wiring.
On my latest trip to Japan I re-visited Taisho-en and was reaquainted with this tree. The grafts had been a success and the tree had found a new home in a new bonsai pot.
It’s always nice to see trees you have worked on after some time apart. I get a similar feeling to that of seeing an old friend. When I saw this tree in the nursery I took my time looking over it and revisiting the familiar curves and lines of the trunk and branches.

The tree as of January 2011. The angle of the tree is a little more upright now and the base appears much more solid now it is lower in the pot. If you look closely you can see a tuft of foliage at the base that is still attached to the root graft.
I wonder if we will cross paths again.
The following bonsai is one of the first trees I collected a number of years ago.
It is a radiata or Monterey pine (Pinus radiata). I quite like the species to work with but i am still trying to really get a grip on how to best grow and refine them. Perhaps i should make a future post on this subject.
Before it began its life as a bonsai it was located on the edge of a pine plantation where it had grown on a road batter. It had a very interesting curve in the trunk which was either from machinery running it over at some stage of its life or from it trying to seek the light through the long, tangled grass in which it was growing.
After collecting it took a couple of seasons for it to recover and become strong enough to be styled.

The tree before is life as a bonsai. It was needle plucked and readied for its first styling.
I styled is initially at a club night as part of a demonstration. At this time i wrapped the trunk in electrical tape as a substitute for raffia and put a second large bend in the trunk. The bend seemed quite severe to those watching at the time but the little pine bent easily. I then wired it fully and placed the foliage.

The first branch bent into position before the major bend was made.

A top view taken some time after the first styling. The dotted line shows the trunk line. The second bend is the one made during the first styling.
The tree recovered well and I lived with its style for some years while working on ramifying the branches. I didn’t mind the style but, I always thought there was something not quite right about it.

The bonsai was growing well after its first styling. It was un-wired and soon needed work.

The back side. I had often looked at it from this side and thought about a possible front.

The front after a re-wire. It was around this time that the shari seen in the next images started to develop.
Even after a re-wire the style still was not sitting well with me so, i decided to take it to a critique session by a visiting Japanese Professional, Hirotoshi saito. He suggested that we do re-style and stand the tree up roughly 90 degrees. So, a few days later the tree was styled. It was quite a dramatic change but definitely one for the better.

The results after the second re-style.
That was back in July. The tree was very healthy and had grown strongly, as a result there were multiple places where wire was cutting in.

The pine after its spring growth.
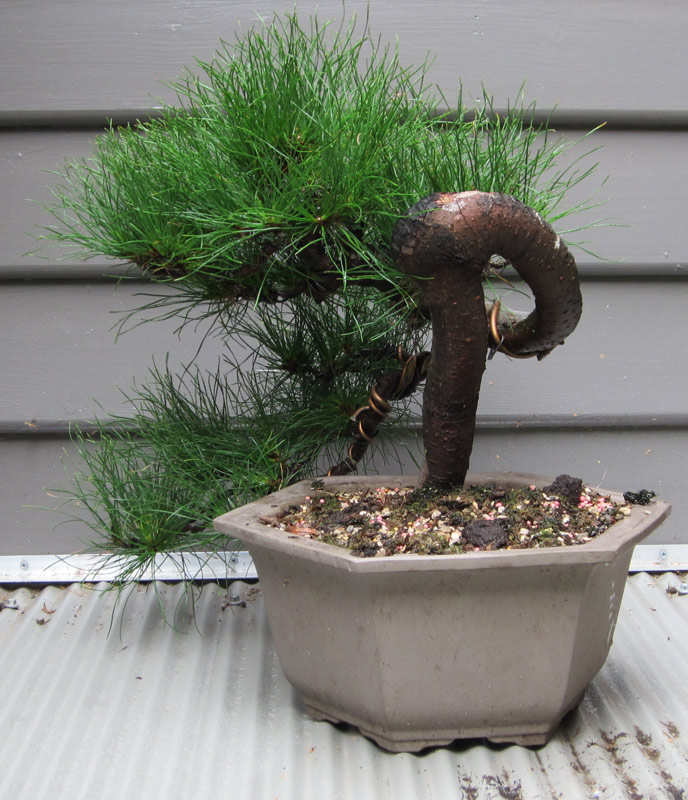
A side view.
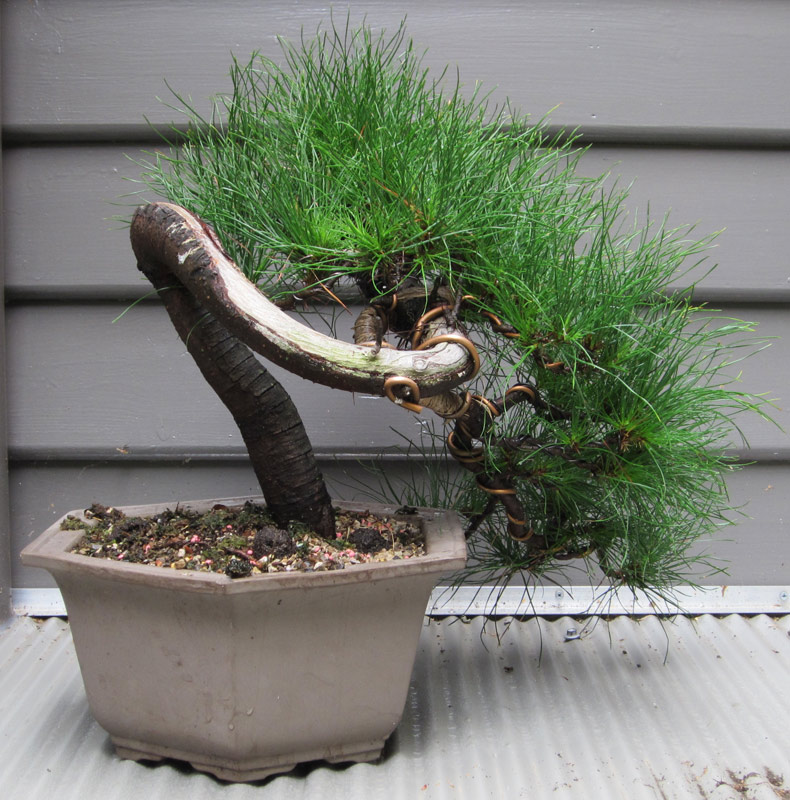
The back. From this view you can get an idea of the extent of the shari that naturally developed. Hopefully i can extend this over time to the front of the lower trunk.
It was time for some work. I plucked and cut needles to allow more light and air into the interior of the tree and also removed most of the wire. I was happy to see that most of the branches had set in position.
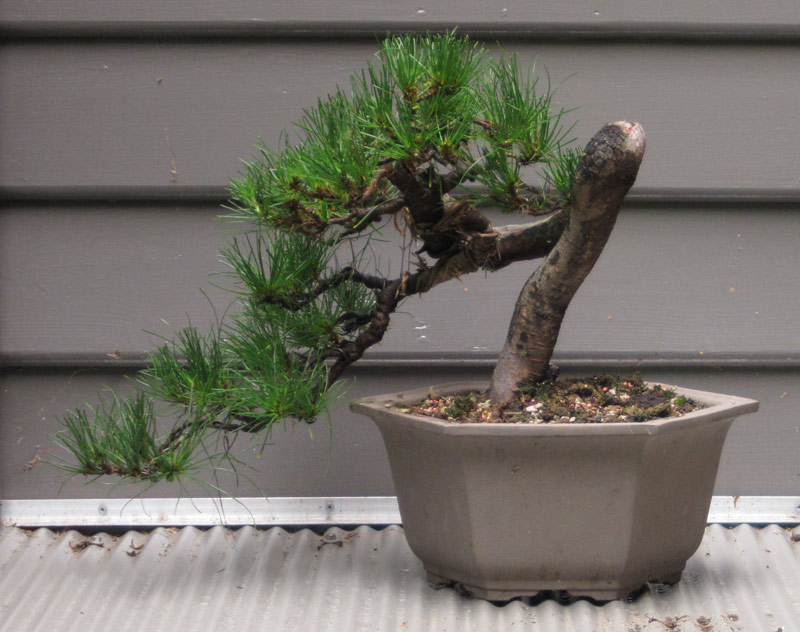
The tree after the work.
The tree is far from finished and i will need to re-wire it again this winter. Pines with movement such as this are common in collected pines in europe but you rarely see them in Australia.
Hopefully if everything goes to plan it will have a bright future in its new upright style.
I just thought I would add a quick before and after of a large white pine I styled while at Taisho-en.
It one of the largest trees i have worked on to date. It had quite a good canopy of foliage to work with and some nice features such as the shari on the lower trunk and the interesting kink in the first branch.
It was a big undertaking and took the best part of two days to fully wire. The planting angle was changed and the foliage was adjusted to suit. Some heavy bending was needed to compact the first branch as can be seen from the reenforcing bar next to the trunk.
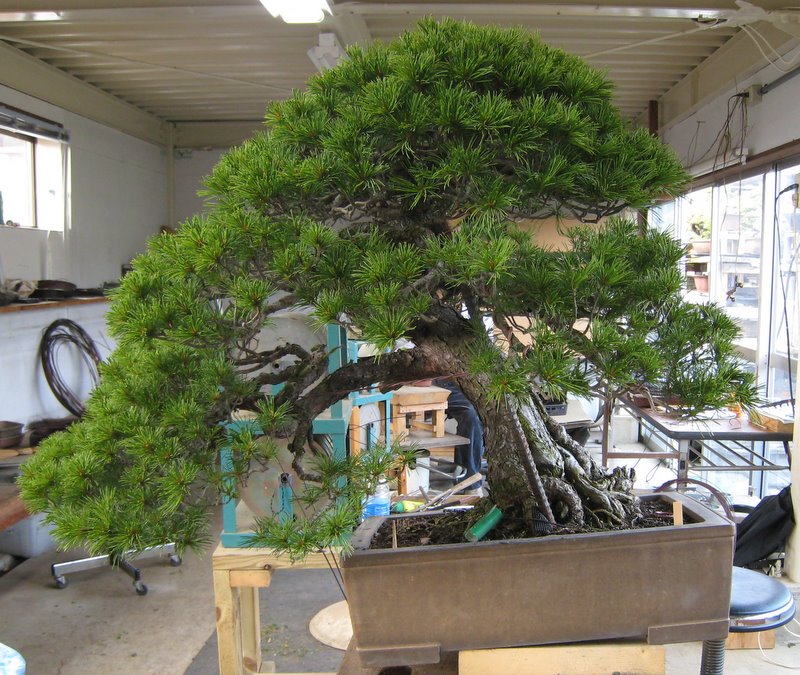
Before
Working on large trees is a little bit strange. You have to work very closely to the tree in order to apply wire and position branches but due to their size you cannot get a true understanding of how it looks in connection with the rest of the tree. When working on smaller sized trees often all it takes to see the tree in the whole is just leaning back in your chair.
When working on larger material you end up regularly walking a few paces away to look at what you have done in conjunction with the rest of the tree’s form.

After the work
You can get an idea of the size of this tree by looking at my fingers at the top of the blue screen. I was holding the screen above my head with arms close to full stretch.
The below picture is of a branch I wired in Japan. It was actually the first piece of material i was allowed to place wire on.
When I first arrived at Taisho-en my duties were watering, sweeping/ cleaning and preparing hot water for the days tea. I did this for a few days as well as helping move the odd tree or other general task around the nursery. I also watched a lot. I watched people styling, pruning and working on a range of different tasks. I was actually enjoying the whole process even though i hadn’t really touched a bonsai yet.
One day Oyakata (Mr. Urushibata) brought me a branch that had just been cut off a white pine that was undergoing a re-styling and instructed me to ‘do wiring’. I was given a small space in the studio and was given some aluminium wire. I proceeded to wire that branch as well as i could. At the time it was the most advanced branch i had ever wired. Previously i had only seen pine ramification like that in books. Looking back at it now all i can see is errors in my wiring but at the time i was pretty happy with the result.
Oyakata was a little surprised. He seemed pleased with what I had achieved, although he said i had wired the branch too flatly. He then proceeded to adjust my work and explained how important volume within a branch was. I learnt a lot from that one cut off branch.

The first branch i was allowed to wire.
I passed my first test and that afternoon i was given my first tree to wire. A small Ezo spruce. It was a tree that was hidden up the back of the nursery. It didn’t look like much to start with but i was excited.
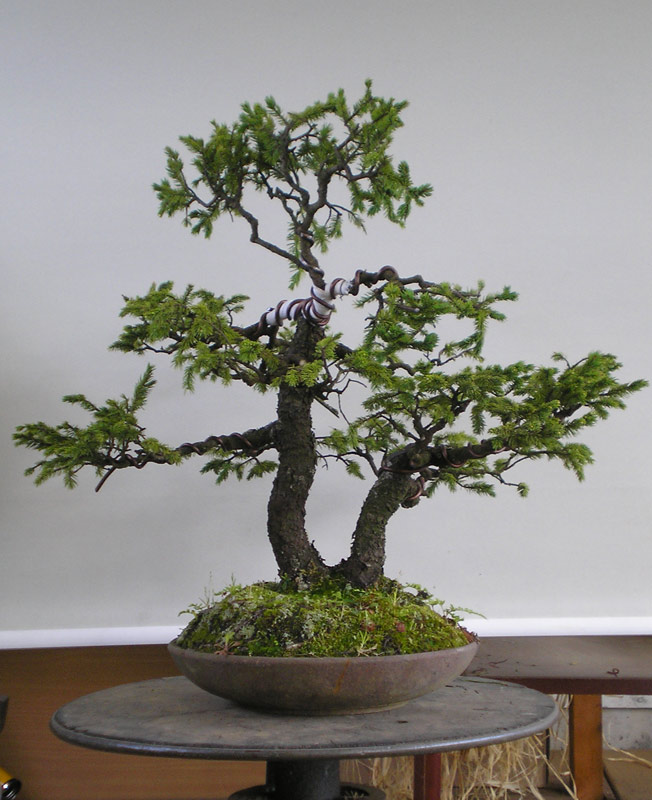
The Ezo Spruce before the work.
The apex was pruned out and a lower branch was wrapped in cloth (we couldn’t find rafia) with the intention of bringing it up to form a new crown.

The Ezo Spruce after the work
The tree was wired to the tips and I positioned all the branches and foliage. I then showed the results to Oyakata.
He again adjusted my work and explained why he was doing so. This was how my learning was to progress through out my stay. I would work on a tree without much help and then Oyakata would adjust my work and explain why. I learnt a lot over the course of my stay and every new tree I worked on had less and less adjustments made by Mr. Urushibata. Sometimes he would lower a branch a little or adjust some foliage, sometimes he would cut off some branches and sometimes he would make me cut off wire and re-apply it. Some trees had a lot of adjustments made others had none.
This process of working taught me a huge amount and I am very grateful that I was able to do it.
The Spruce and branch above were the beginnings of a very steep learning curve. I look back at them now and see a few things that I would do differently now as I am sure i will do when looking back at my current collecting sometime in the future. Although i may not be on as steep a learning curve as i was on my first visit, i am constantly learning from those around me and from my observations of my own bonsai. Hopefully i can spend some more time at taisho-en in the future and continue to improve.
The tree in this post was another i worked on while in Japan. It arrived at the nursery one day and was in need of a re-think and re-style.
The major change was to stand it up.

Before the work.
I first wired the tree, keeping the small second trunk and then re-potted it into its new upright position.
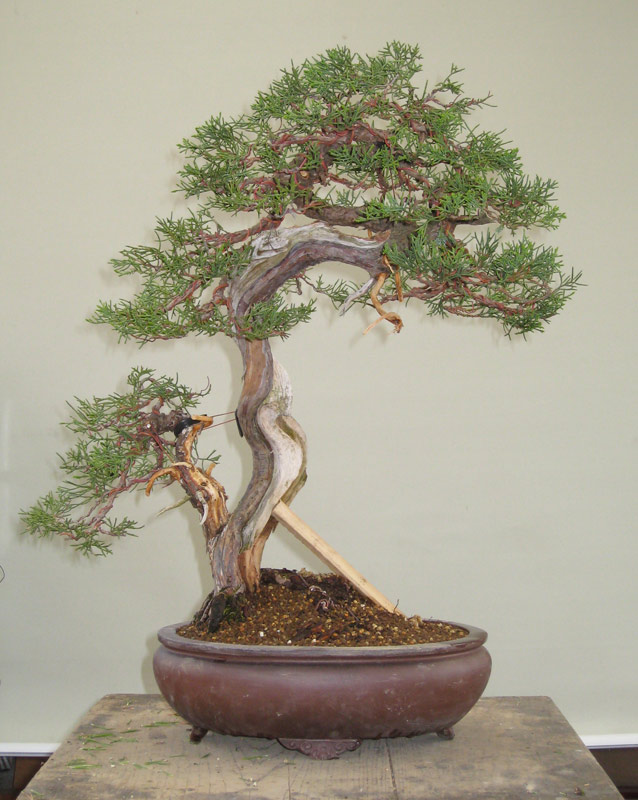
After the work
As the tree had its angle changed so dramatically it needed time to re-establish a new rootball that could support it in its new position. In the mean time a bamboo prop was used to take the weight of the tree while the rootball became stable enough to support itself.
Unfortunately some of the lower shari had been buried in the previous potting angle and as a result had rotted. I feel that the base would have appeared much more impressive had it still had deadwood at its base.
It was a nice tree to work on, but at the time i guess it got lost amongst all the other high quality trees in the nursery.
This was by no means a top tree but looking back at it now I would kill to work on material such as this in Australia.
I guess I will have to sharpen the shovel and keep an eye open for urban junipers in friends gardens.
The tree below is a very nice old hinoki (False cypress) that i worked on while i was in Japan. This tree had been shown in Kokufu, so i was very honored to get to work on such a nice tree. (If any one reading this can find it in an old album please let me know what number)
The tree had been grown out without much maintenance for a number of years and as a result the it had grown very dense and had lost some inner branching.

This is the tree after the first branch had been pruned.
My job was to thin out the entire canopy, remove un-needed branches and reduce the remaining branches back to a more manageable structure. This work was intended to stimulate back-budding prior to a future wiring.

The pruning is half done.
As the tree was large, it took me a full day just to prune it from bottom to top.

The pruning is finished.
After the work the structure of the tree started to become apparent. Although it still has a long way to go, it is now easy to imagine it future .
The tree had the most amazing twisting bark that i am sure will add to its chances of one day again being shown in Kokufu.
Unfortunately i was unable to work out what species of Chamaecyparis it was. I am guessing Chamaecyparis obtusa but i am not 100% sure. It had fine foliage that i had not seen before. If anyone reads this and can identify the species from the pics below please add a comment or send me an email.

The foliage up close.
It was a great tree to work on and taught me a lot about pruning. At the start of the process i was concentrating too much on the tip density. Mr. Urushibata spent some time explaining how you often you have to look deep within a branch structure and cut out some secondary branches rather than thinning the tips. It was a concept that like many in bonsai seemed simple enough but was not apparent until someone pointed it out.
Although there are many forestry species of pine planted around Australia, Pinus radiata is by far the most prolific. Known as radiata in Australia it is also known as the Monterey pine in places such as America where it is indigenous to.
As it has been planted on mass it is one of the few coniferous species that you can find to dig. They produce seed well and generally anywhere you find a plantation you will also find feral seedlings. This is so much of a problem in some areas that they are declared weed species.
The up side of all this is there are many opportunities to dig and grow these pine as bonsai.
The below pine is a radiata that i obtained through a friend. He had sourced it from an old grower who had no longer been able to care for it.
When i received it, it had a lot going for it; old bark, nice nebari and a trunk with some movement and age. These were all factors that encouraged me to pursue its future.
That said it also had a whole host of problems.
It was quite sick and all the needles were yellow. It had lost most of the lower branches and those that remained all were angled upwards and had foliage mainly at the tips. When I cut the tie wires in the pot it fell over because it had barely any roots.
I re-potted and fed the tree back to health over the corse of a year and then began to think about styling.
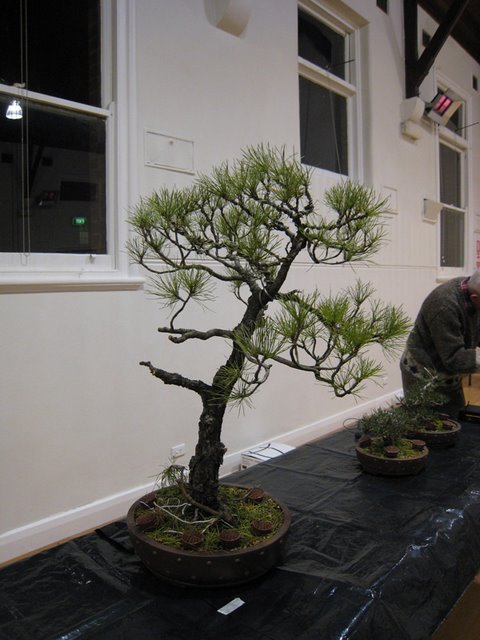
This was the tree before styling began
As the branches were all old with quite old bark i was reluctant to bend them into their future downward position in one go as i was pretty sure they were going to be brittle.
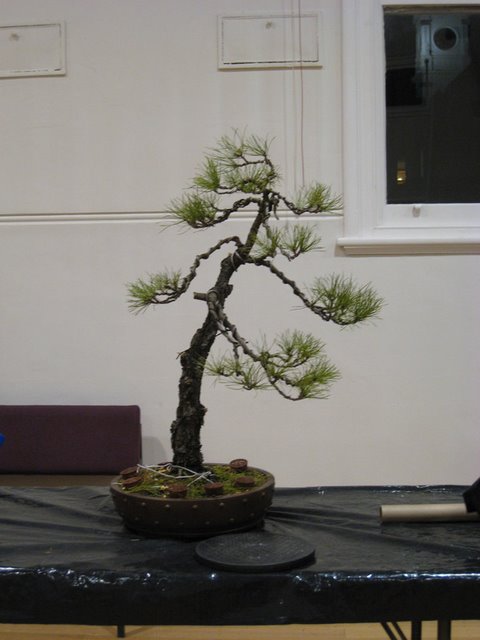
After the first round of bending
After bending the branches into the above positions almost every branch had began to crack. It was now a matter of letting the tree grow out and recover before completing the bending.
A year later the tree had been growing strongly and was ready for round two. I had slowly increased the downward angle of some of the branches over the course of the growing season but they had not yet reached their final possitions.

The tree had recovered well and it was time to make some decisions.
I had decided that the first branch would be removed and i would fill this visual position with a ‘Nozoki no eda’ or peeping branch. This type of branch is basically a first or main branch that originates from behind the tree but occupies the space a first branch would. This style of branch is often seen is junipers.

The branch removed
I removed the branch and began to wire the tree. You can see the result of this first real styling in the image below.

After the first styling
The tree was fully wired into shape and some jin was created at the base of the removed branch. I left it long for future use as a guy wire attachment point and still have not removed it. I will probably get around to shortening it and refining it this winter.
Since the above photo the tree has grown strongly and has had one re-wiring. It was starting to take shape and was ready to be un-wired.
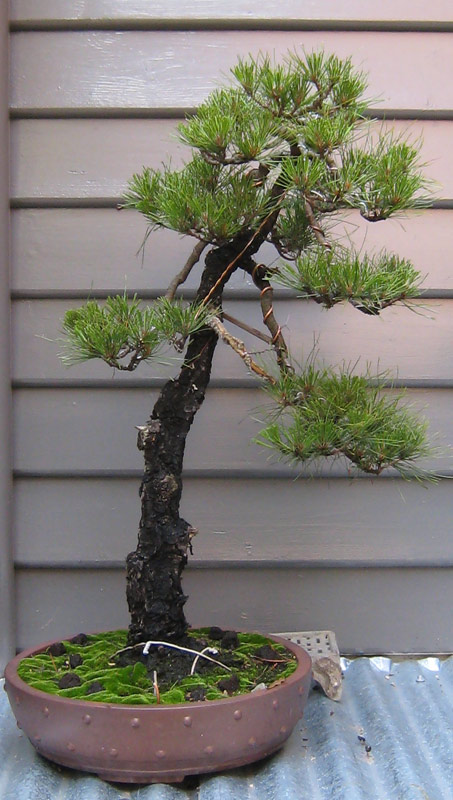
After some strong growth.
I un-wired the tree and did a small amount of re-wiring mainly to the tips of the branches.
It is nice to reach a stage with a tree where you no longer have to wire every main branch.

After a basic wiring.
Above is how the tree ended up after a basic wiring. It really needs a full wiring which i plan to do this coming winter. Hopefully this seasons growth will fill a couple of gaps in the apex and generally give some more weight to some of the foliage and at the same time strengthen some of the weaker buds so i can reduce the branches to them.
The tree is really only beginning its journey to become a refined bonsai but most of the structure is there. Unfortunately the day that i took the above photo it was raining so the bark is dark and it is hard to see just how nice and crackily the bark is.
Radiata’s are a tree that i am still really trying to work out how to grow well. Last year i tried to treat them like a black pine and cut all new growth off around christmas time. It did not respond very well and didn’t really produce any back-budding. This year i am going to grow them a little more like some of the other growers in my area. That is they pinch out strong growth as it appears and continue to do so throughout the growing season.
I was kind of hoping that there would be a calendar bases technique i could use to remove the new growth but at this time it doesn’t seem like there is. Perhaps overtime i will understand them more and then will be able to develop a better method. In the mean time i will just enjoy watching them grow and the work associated with those phases.
If anyone has any techniques that work with these pines, please share them in the comments.
I like growing and working on shohin sized bonsai. This Shimpaku was another that I was lucky enough to style while at Taisho-en, Japan.
It had all the makings of a good bonsai, but had become overgrown and needed to be styled.

This is the small Shimpaku before the work began.
The trunk line had an interesting twist and the shari and live vein had started to contrast with one another nicely.

And this is the tree after styling
This work was really just a wiring exercise. I was able to position most of the foliage into good positions but it really needed a year or twos growth to fill out some of the weaker branches. The foliage was positioned in a way to allow the viewer to see the nice twists in the trunk and shari.
All in all it is a very nice tree that can only improve as it ages. This was definitely a tree I wished I could have put in my suitcase before I left.

