
You are currently browsing the tag archive for the ‘Bonsai technique’ tag.
This is a bit of a different post covering a tree that has found its way back into my collection lately.
I originally grew this as stock from a cutting and put some early bends into the trunk line. Soon after the wiring of the cutting i gave it to a friend who did the bulk of the work in forming it into a tree and growing it on.
As luck would have it, the tree recently found its way back into my collection.
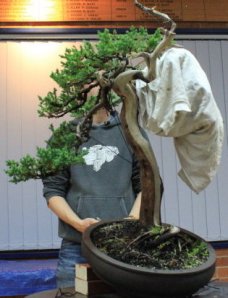
Stupidly, i didn’t take any before pics, but when i received the tree i re-potted it, changing the angle a bit and fully wired the tree removing a branch or two in the process. All in all, building on my friends work, its forming into an interesting little tree!

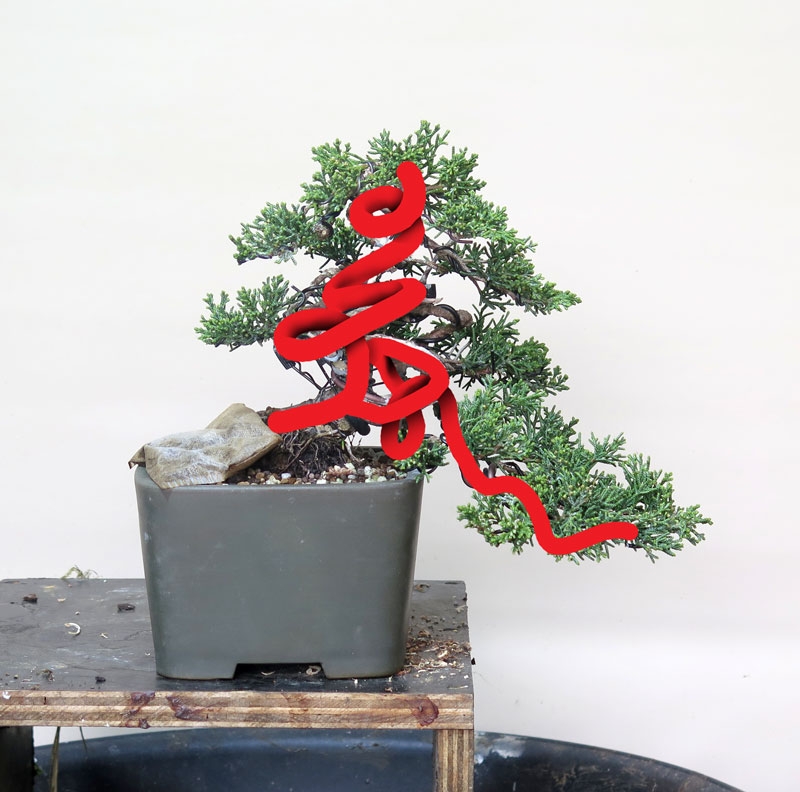
Above: The tree post re-pot and styling.
But…….. it still has a while to go.
Normally a shimpaku of this thickness i would keep as stock and grow hard and fast to thicken the trunk and develop the shari’s and live veins. Luckily we cut shari’s into the trunk last year but i still need to focus on developing trunk thickness and continue to develop the sharis as things thicken.
This is somewhat difficult in a tree that i don’t really want to grow out of shape or get too much larger. What i want is to thicken the trunks and keep the tree’s foliage well managed.
The solution is………. Sacrifice branches.
Above: The two main trunk/branch lines.
The tree is built off two main trunk lines as per the diagram above and ideally i would like to thicken both of these lines. To do this i will likely grow two sacrifice branches.

Above: likely locations of sacrifice branching (shown in pink).
I will locate two sacrifice branches (one per trunk line) but in slightly different locations. The sacrifice branch in the apex will be toward the top of the trunk line as i want the entire upright trunk to thicken.
The second sacrifice will be on the first branches trunk line, It will be located back from the first branch tip though, to avoid the branch holding the foliage from thickening too much, keeping it in scale with the other branches.

Above: the image in my head i am aiming for.
I will likely also wire the sacrifice branches into interesting shapes reinforcing the tree’s movement so i can use them as future jins.
To further facilitate this thickening i will be making a shari on the opposite side of the trunk to the shari’s we have already made. I’ve covered this a bit more in THIS post. I am hoping this speeds up the whole process quite a bit. Also keeping the majority of the foliage trimmed and compact should direct a lot of energy into the sacrifice branches which will be left un-pruned. Hopefully allowing them to grow quickly and do their work.
That said however, i do expect this process to take a number of years to get to the thickness level i am after.
What to do with boring stock? Good stock is out there but often hard to find or expensive. On the flip side, straight, untrained whips are available not only at bonsai nurseries but at almost every general nursery as well not to mention you probably have a number of neglected cuttings that you took years ago struggling along in the ‘ill get to it later’ area of your backyard.
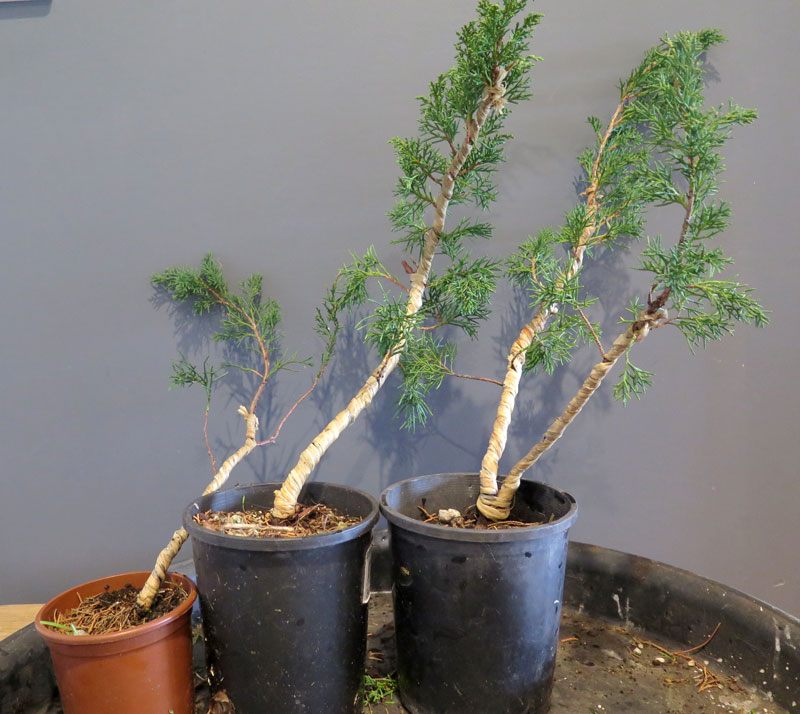
Which gets me to today’s post. After going through the recent batch of stock that came into my garden these 3 plants were by far the least inspiring. Long, leggy, dead foliage and a general lack of interest in the trunks. Essentially material i would usually ignore if i was in the market for bonsai stock.

But material like this can be a good opportunity to begin something that ends up being interesting and potentially great, all at the work of your own hands.
The stock above is getting to the point where most people would give up on the idea of getting a tree with good movement out of the fairly stiff and straight trunk lines. But for certain species, and especially shimpaku juniper material like this can pose a good opportunity if found for the right price.
First you need to clean up the material.

I tend to remove dead shoots, competing trunk lines and thin the branching aiming for a general spread of branches at good intervals along the trunk. In the case of the trees above i also removed strong branches as well i want these to end up more on the Bunjin side of the style spectrum and therefore I only want short compact branches.
I then applied raffia to the trunks. I don’t often use rafia but due to the thickness of these whips and the tight bends i intended, applying the raffia was a worthwhile addition.
Wire goes on next, I ensure that the wire is coiled on in the same direction as the raffia beneath. This is done so that as i bend, i can also twist the wire in the same direction the rafia was applied in. Having the raffia and wire both tighten to the trunk hopefully provides support to the inner fibers, rather than these wrappings loosening off and allowing room for breakage.

I applied two wires up each trunk and spaced the wraps apart rather than doubled them up together. This provides more points of contact along the trunk and more support along the bends, hopefully further reducing the chances of breakage.
Now comes the fun part. The bending.

The trees were bent making sure to twist the trunks in the same direction that the wire and raffia had been applied, essentially tightening it all down against the trunk.

I also wanted to introduce this twisting for the next phase of the process that will happen after the bends have set, Shari.

As the bark on the tree also twists as the trunk and raffia and wire are twisted through the bends, the sap lines will twist and spiral around the trunkline. This means that removing bark along these sap lines will create sharis that also spiral around the trunk as it moves along its length. While you can on young stock force a twist in the live vein via cutting a spiral, the effect you get from twisting the trunk originally is far easier and i think a superior end result. A tree that has been twisted like this will also have the heart wood fibers twist and follow the twist of the shari making any carving via fiber pulling automatically follow the shari lines.

All in all a productive morning, turning some trees with no potential into material i am pretty excited to continue to develop into the future.
All the trees were bent pretty hard with some cracking and complaining heard from each one. I am not worried too much about their survival as they can tolerate this fairly easily and as this is the first time i have worked them i am not loosing much of a time investment if they fail. Nothing risked, nothing gained, and if you are going to do a high risk process on a bonsai it might as well be before it becomes valuable.
I hope the above inspires a few of you. The starting material for this technique can be found in most peoples backyards, most bonsai nurseries and every club sale day. You can grow these whips from cutting fairly quickly and easily also if you are struggling to find it in the wilds.
I would recommend everyone give it a go, its a very easy way to create good material at a very low cost. Why not make a heap and sell some on! People are always after twisty junipers and you will be helping to lift the average of quality stock in this country!
Just a quick update on this tree.
I spent an evening candle cutting the new years growth with the future shape of the canopy in mine, leaving shoots i wanted to extend uncut and trimming back to leave a short section of new growth on areas i didn’t want to extend too much.
Its a bit of a fun process as you are constantly thinking to the future of the tree, what needs filling in, what needs lengthening etc, while at the same time reigning in the new season’s somewhat messy growth. I did wire a couple of branches thinking i could get away with just adjusting a couple of things but as is always the way it just highlighted further things that need adjusting…… likely meaning i need to fully re-wire at some stage.
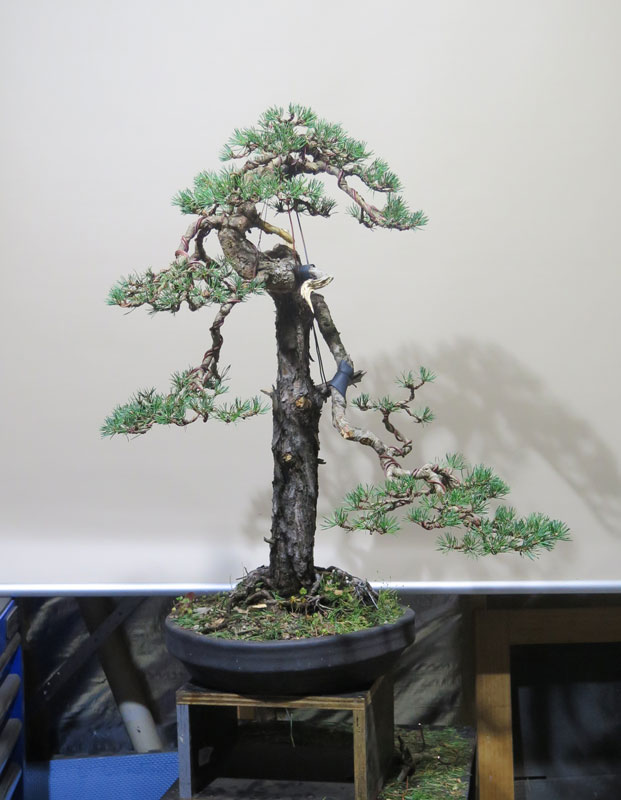
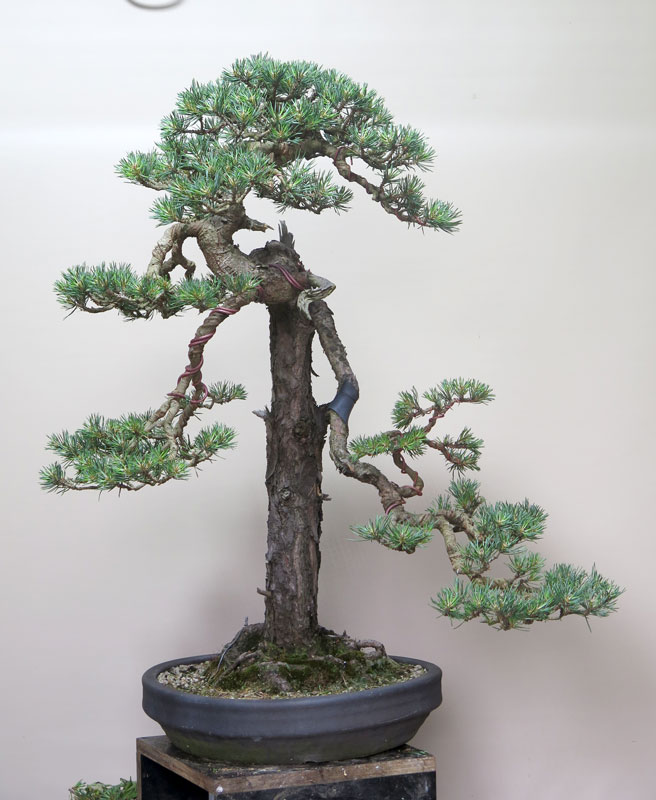
Above: 2021 on the left, 2023 on the right.
Yet another one to add to the ‘needs to be wired list’. This tree has a long way to go but is slowly filling in and improving each time I work it. It’s a strange tree for sure but i think that’s why i often catch myself gazing at it on my benches. I like the weird.
As far as future plans, i think the below badly done photoshop is along the lines of where I’d like to head. That said knowing how i do things, i very likely will change my mind along the way. We will have to see at the next update………..

I often hear people saying they wish they had access to good stock and or that they cant find any stock worth purchasing. Often the journey to find good stock can be difficult but there is definitely good stock available if you know where to look.
A couple of weekends ago I visited a friend on the outskirts of Melbourne to see how his ground grown stock had progressed this year.
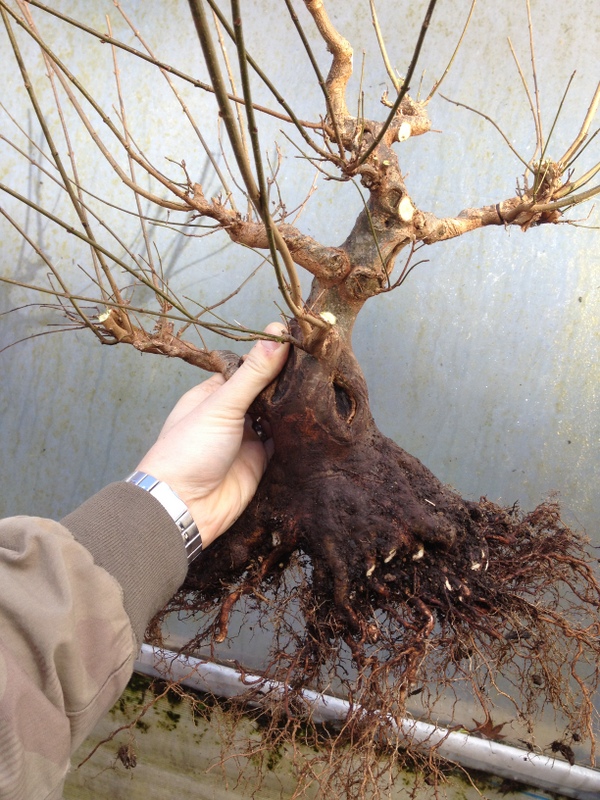
A trident slipped from the grow bed.
As you can see from the above picture, the stock was going very well indeed. There is no real secret about how to produce these results as they are a simple a matter of spending 10 years applying good technique and working the root bases each and every year.

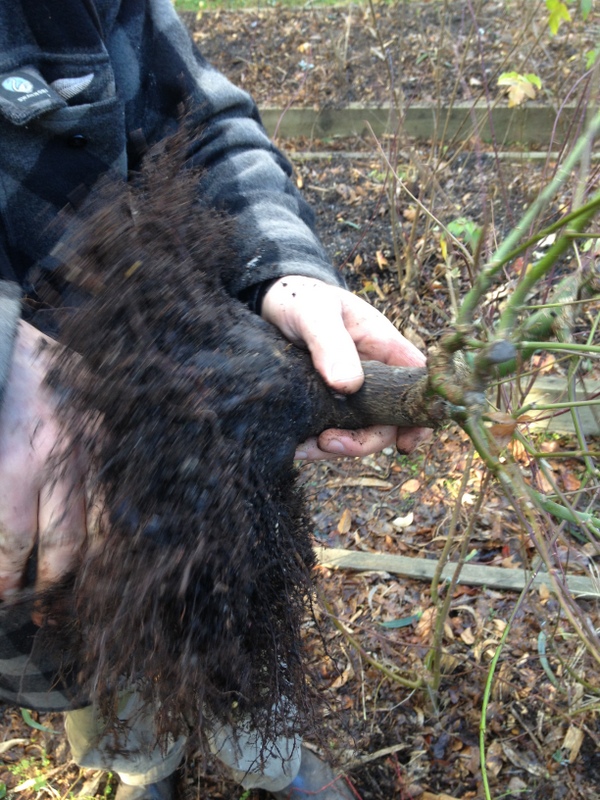
Another great base.
Each year the trees have been dug up and cut back hard to encourage a fine, flat root system. Digging each year coupled with the excellent growing conditions in the grow beds results in good yearly top growth without roots getting too thick and creating faults. This makes for trunks with great base flare and very small scars which in many cases are healed in the ground.

A Japanese maple from the same beds.
When out of the ground, the most important cuts to the roots are in removing those that are downward growing and scarring the base of the trunk to further thicken the base; and with this stock, this has been done with great results. In fact, I was so impressed with the quality of the material I put my name on a couple that might come out of the ground in the next couple of years.
The roots on the underside of the trunk being removed.
For those not willing to spend 5 years working out the techniques and then a further 10 growing trunks luckily this grower also sells some of his stock.
His trident maples are available through Chojo Feature trees in Mount Evelyn. Jeff who runs the place is an extremely nice guy and I am sure could help out those interested in a trunk and or other bonsai related products.
This post follows the progression of 6 months in the life of a Procumbens juniper. Last June i did a demonstration for a local club, Bonsai Northwest Inc. As most of my trees had been worked and I had very little left to do on them it was decided that we purchased some stock for the demo. While digging through all the stock at ‘Baloc Bonsai’ I came across this juniper.
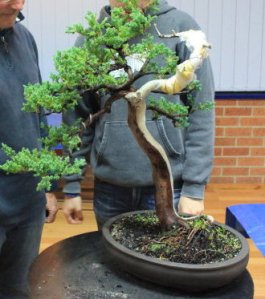
The Juniper before the demonstration but after a bit of a cleanup.
Having looked over the tree for a day or so before hand while it was in my garden I came up with a plan for improvement. From the tree’s original front the foliage mass was not close to the trunk, I thought with a little work I could compact the foliage mass into a denser crown.

The foliage from the original front.
I also thought I could change the front and make use of a more interesting trunk and jin line. This plan created a few issues that I had to deal with in order to complete the re-styling. First was the trunk angle. From the original the trunk needed to be stood up around 30 degrees, which in turn placed most of the foliage pointing out towards the back of the tree.
Most of the bending of the larger branches was completed with the help of a bending jack as seen in the photo.

Jack in place prior to bending.
The other issue was that from the new front the jin did not compliment the movement of the tree so this was bent by means of what is essentially steam bending. I wrapped the jin in wet towels and plastic sandwich film over night to moisten the jin and then used a small gas torch to heat up and soften the wood fibres so that it could be bent into a new direction.
After the jin was repositioned and main branch bent into position.
The next step was compacting the foliage to form the crown and subsequaint branches. This was done with a combination of guy-wires and heavy wiring. The below picture shows the result. A small towel covered some branching that was to be removed once the tree had back budded in that area.
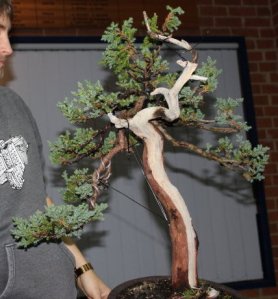
The result at the end of the demo.
If you look from the original front you can see how the foliage has been moved from its original positions to compliment the new front.

The re-styling from the original front.
Since the demo I re-potted the tree into a new container at the new planting angle. It grew out well in early spring with plenty of back-bedding and fresh growth. It was time to work on the foliage.

After some strong spring growth.
All this new growth provided me with the chance to cut out some of the leggy old growth and replace it with more compact fresh shoots.
A leggy branch with tired looking foliage.

The branch cut back so the fresh shoot at its base can replace it.
In this way I was able to improve and remove some of the poorer condition and leggy foliage. I cut more out of the strong areas and left a little more in the weaker areas to balance the growth of the tree.

After the cut back.
I was also able to remove one of the branches on the right side and hopefully in a few months I will be also able to cut back the other right hand branches.
There are a few other thing I want to do, such as lowering the planting position, define the live veins, and work on the shari texture, but for the time being those things can wait.
What the tree desperately needs now is a full wiring, I want to further compact the apex and better form up the crown and branches but unfortunately that will have to wait until my wrist heals. Hopefully I will be able to do it in a few more months. In the mean time I will keep feeding it heavily and keep replacing old growth with new healthy growth so when it does come time to wire, the tree is ready.
It has been a busy couple of weeks. Autumn has begun and with it a range of seasonal tasks. I have been madly plucking Japanese black and Red pine needles. Here in Melbourne we have a convention coming up for which I have to prepare a few trees so I tried to get my needle work out of the way early on.
It took a long time this year. What hadn’t really dawned on me until now was that needle pruning takes more and more time each year. Now this is not a bad thing, its more a by-product of a successful technique. As ramification increases, so does the amount of needles you have to remove. Where last year I was removing needles from one candle there are now two candles at that location that need needles removed from them. Not only are there more needles to pluck, but also the space you have to pluck them in becomes more and more cramped forcing you to use tweezers to negotiate the cramped conditions.

2008

2009

2012

2012 after needle plucking.
The above tree has wholly been grown in Australia and has come great leaps and bounds since I learnt how to properly care for it during my first trip to Japan. It is becoming a nice little tree although it is not perfect and it bears the marks of many of my early mistakes. That being said it has taught me a lot and although I have though about selling it on a couple of occasions I think now I would find it a little hard to part with. After all I have invested a huge amount of time into it.
Perhaps this is something to keep in mind when deciding on how large your collection should grow. How much time do you have, and will this time be enough to maintain your trees to a high level? Bearing in mind that as your trees improve and refine, in turn their maintenance times increase. I really enjoy growing pines but I am very aware of the time I have to spend on them each year. Needle plucking, pruning, wiring and candle work all add up. On a tree that is starting to get refined I am guessing I would be sending 6-10 hours on each of them over the year. When you add up all the pines you grow and then the time you spend on them, combined with the tasks you have for all other species you grow you begin to realise that there is a limit to how many trees you can look after to a high level. I lean towards keeping a smaller collection that is well maintained rather than a larger collection that doesn’t get the attention it deserves. That said it is hard to turn down a good tree.
Spring is certainly around the corner and all my trees seem to know about it. They are for the most part starting to swell their buds. As a result I have been re-potting. I re-potted one of my trident maples a couple of days ago to get it ready for the springs growth and thought I would share some pics of the process.

The bottom side of the rootball before and after the work.

Surface roots combed out.
Once the roots are all in order you can continue to pot up the tree. In this case it went back into the same pot.

Re-potted.
Another year and another re-potting…..
Winter is a hard time for me and my bonsai. For the most part, when I arrive home from work it is dark and cold. This makes working on my trees something I only tend to do on weekends. That being said I did get motivated one night after work to do some pruning on my Trident Maple (seen here and here).
Tridents grow quite quickly and within a year they can put on a lot of twiggy growth. A lot of this growth is not suitable to build future ramification on so it must be pruned off. Quite often it seems like you are taking two steps forward and one step back but the removal of twigs that are not formed correctly will ultimately make for a better bonsai in the long run.

Before and after pruning. The red lines show approximately where I made cuts.
At this point in this trees life I am looking to start to build fine twigs. Most of the vigorous growth over the last year has helped to form secondary branches but it has grown with internode gaps that are too long for the tips of a branch. As a result I have pruned to remove these long internodes, reduced all branch divisions to two and generally tried to form a better structure within the branch.
A lot of my trees were grown a little too quickly and as a result their branches do not have as good a structure as they might. I am now cutting a fair amount of those branches back and trying to correct the structural problems. One of the main problems I have in my trees is that the branches do not have a main branch line with sub branches but instead have several main lines. This makes the branches look full very quickly but in the long-term you do not get the taper and look you would if the branch was grown otherwise. It all comes back to pruning. Sometimes you have to set a tree back a little in order for it to progress.

The tree before and after. (poor lighting care of my kitchen.)
This tree will be re-potted in the coming months and may also have its branches fine tuned a little with some wire which should then make it ready for the start of spring.
I am still slowly working through my collection and preparing for winter. This weekend this Chinese elm was cleaned up along with a couple of other trees.

Before the work.
The tree I worked on had recently undergone a re-style. Upon re-potting last year I also decided to change front slightly. This required a bit of pruning. As I began to prune I realised that the initial branch structure had been grown too quickly and lazily on my part. Many branches were too thick, had little taper and had messy structure. I decided that the change in front would also be a good time to re-structure the ramification so I pruned hard.

The same tree a year or two ago prior to re-styling.
Re-styling an established tree can be a hard step to take but ultimately having this tree go backwards for a couple of years will mean that in the future it will be a much better tree. Luckily chinese elms are strong growers and rebuilding the ramification should be a fairly quick process.
The work I did this time around was mainly removing leaves that had not yet fallen off and cleaning the trunk of moss and also cleaning up the soil surface.

The soil and trunk need a clean up.
Keeping your bonsai clean of moss and fallen leaves and other debris achieves a few things. First, it makes the tree look better which I always find makes me take better care of it. I also find that doing work that makes you look closely at your trees you become more familiar with them and it often reveals what future work will need to be done in coming seasons. The last thing a good clean often does is it reduces the hiding places for pest insects and places for their eggs.

A large caterpillar that was living under the moss growing on the trunk.
After a general clean I pruned the long growth and then sprayed with lime sulphur.

After the work.
All the tree needs now is a wiring and a re-pot sometime prior to spring. I am toying with the idea of lengthening the canopy on the left side and possibly growing a low branch from the left side of the hollow. I guess I will grow one and see how it goes next season, i can always cut it off if it doesnt work out.
I am pretty happy with the pot it is in at the moment. I was never really 100% on the last oval pot and feel this one suits it a lot better.
The pot is a production Reiho. Reiho is one of my favorite production potters from Tokoname. Although the photos don’t really capture it, the pot really changes moods depending on the sun. Sometimes in low light it looks almost black, and then in full sun it turns to an almost ultra marine blue. you can kind of see it by comparing the colour in the first pic with that of the soil surface photos. Hopefully next season I will get some good colour on the tree so I can see the yellow leaves set off against the dark blue fo the pot.
This year has seen some dramatic changes to my bonsai. The most major of these was moving house and gaining some backyard space. My trees previously were kept in amongst a lush garden. On one hand this was good in that my bonsai were quite sheltered and there was a good micro climate in which to grow amongst. The down side was that I could never really rid my trees of pests as once the garden was infected everything was. As a result my trees ended up with a number of pest problems. Now I have moved I hope to rid them of these problems, which brings me to the subject of this post, my Trident Maple.
Earlier this spring I defoliated the maple and posted the results HERE. I repeated this defoliation process twice more during the season and was rewarded with much increased ramification.
As it began to change into its Autumn colours I set about doing the final defoliation. Usually I would leave the leaves on a little longer in order to see the full range of colours they would turn but I wanted to remove them before they dropped so I could dispose of them along with any insect eggs that may have been laid on them.

The trident at the beginning of autumn just beginning to show signs of it changing colour.

Starting to turn
I removed all the leaves which revealed the structure of the branches and all the new ramification. All the leaves that were removed were put into the household garbage to ensure that any eggs on them would not end up anywhere near my bonsai.

Defoliated.
Once the tree was naked I was able to carefully look over the tree to assess the amount of pruning that would be required. I wanted to spray the tree with lime sulphur to kill any remaining pests so I did not prune at this stage. I don’t like the idea of lime sulphur getting into fresh cuts. I am not sure if it is actually a problem or not but I choose to avoid it where I can.
What I did prune off was some insect eggs. I found what I first thought were fungal blooms on dead twigs.

If you look closely you can see the small white tufts of damage.

A close up of a damaged twig
Upon further investigation I realised that the tufts lead to a hollow channel within the twig which was filled with eggs around 0.5mm in size. I did a quick search on the net and realised they were the eggs of Passion Hoppers which lay their eggs in channels they make within small twigs. The twigs die soon after the eggs are laid so cutting the twig off and destroying it is a good way to tackle them.
I then went over the tree with a pair of scissors and removed every twig I could find that exhibited signs of damage.

A pile of some of the damaged twigs.
After removing what I can only guess was hundreds of insect eggs I sprayed the tree with a diluted solution of lime sulphur to prepare the bonsai for winter.
It was a satisfying days work. I hope that the work will pay off next season with a dramatic reduction of insects in my collection. Fingers crossed.
