
You are currently browsing the tag archive for the ‘wiring’ tag.
Life as always is busy but lately things have been flat-out. I have been juggling a two-year old, full-time work, managing our house’s extension, working customer trees, digging/collecting material and also travelling Australia (Perth, Sydney, Canberra, Bendigo, Geelong and Brisbane) as an AABC tutor giving lectures, demonstrations and workshops. As a result the blog has suffered.
Hopefully I can kick start the blog in the coming months. I have a number of posts lined up and I am sure there will be things of interest to share as the growing season heats up.
Today’s post is a small red pine that I worked for a good friend towards the start of winter.
It is rare to see red pines in Australia and particularly rare to see ones as good as this one. It underwent a fairly major transformation during the styling which in my opinion has set it up to be one of the best red pines of this size in the country (at least from those I have seen). It still needs a little filling out but it’s bones are set for it to grow into a really nice tree into the future.

The material prior to beginning. Nice colour and full growth which left a lot to work with.

The material prior to beginning. Nice colour and full growth which left a lot to work with.
Most of the work during the styling involved dividing the few branches up into multiple smaller pads that were in better scale and harmony to the size of the tree. Those were then used to accentuate the movement and direction of the trunk line.
There is still a number of areas that need to fill in with further ramification but I think it is certainly off to a great start.
After saying that red pines are rare in Australia my next post will be about another taller tree that is also of very high quality. Until then……..
As you may or may not be aware, I have recently undergone surgery on my right wrist. Being right-handed, this has put a fair dent in my bonsai plans of late.
A few nights ago after work I decided to do something about it and tried wiring up a small juniper.

Before the work
I have been working on this tree for a few years now, slowly chasing the foliage in closer to the trunk and replacing leggy growth with tighter growth. I decided that it was about due for its first styling so that I could create the bones to grow and fill in the foliage upon.
Considering that my right arm was in a cast I think the wiring went ok. It’s not show ready but it never was going to be. It has a few more years before it is going to be anywhere near presentable.
I really wanted to get some fine sand paper into the bark to reveal the orange / red texture below the outer layers but the cast proved too clumsy. Something to look forward to once the pins from the wrist are removed after the next operation.
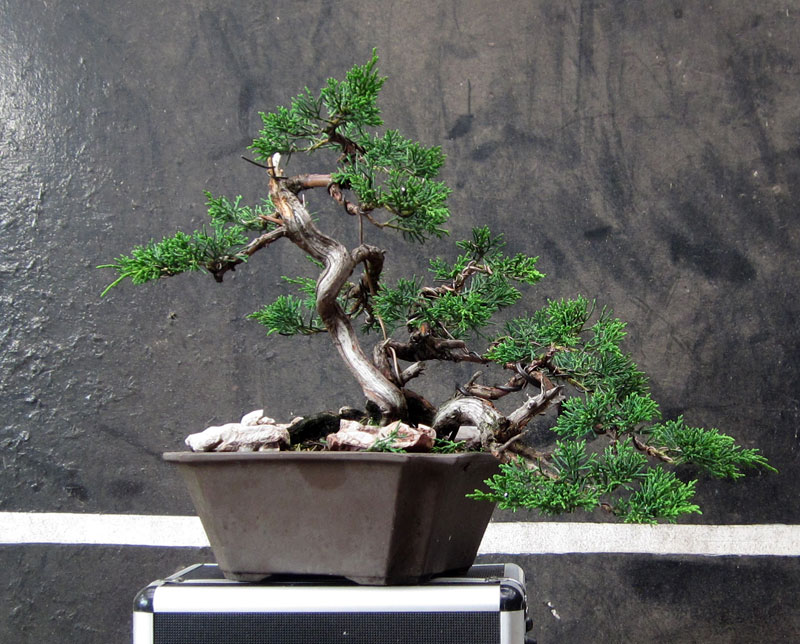
The little shimpaku from the front.
I find that when wiring junipers and particularly shimpaku, that preparation is key to a good result. Pruning unwanted growth and thinning what remains so that you end up with an evenly dense canopy not only makes the end result look better but it also makes for more balanced growth and an easier job while wiring.

As seen from the right

and from the back side
All in all I am pretty happy with the results considering that most of the wiring was done one-handed. I guess it just goes to show that interesting trunk movement is half the battle. That being said, the tree is only just beginning its journey as bonsai and should see many future wirings to come.
This post follows the progression of 6 months in the life of a Procumbens juniper. Last June i did a demonstration for a local club, Bonsai Northwest Inc. As most of my trees had been worked and I had very little left to do on them it was decided that we purchased some stock for the demo. While digging through all the stock at ‘Baloc Bonsai’ I came across this juniper.

The Juniper before the demonstration but after a bit of a cleanup.
Having looked over the tree for a day or so before hand while it was in my garden I came up with a plan for improvement. From the tree’s original front the foliage mass was not close to the trunk, I thought with a little work I could compact the foliage mass into a denser crown.

The foliage from the original front.
I also thought I could change the front and make use of a more interesting trunk and jin line. This plan created a few issues that I had to deal with in order to complete the re-styling. First was the trunk angle. From the original the trunk needed to be stood up around 30 degrees, which in turn placed most of the foliage pointing out towards the back of the tree.
Most of the bending of the larger branches was completed with the help of a bending jack as seen in the photo.

Jack in place prior to bending.
The other issue was that from the new front the jin did not compliment the movement of the tree so this was bent by means of what is essentially steam bending. I wrapped the jin in wet towels and plastic sandwich film over night to moisten the jin and then used a small gas torch to heat up and soften the wood fibres so that it could be bent into a new direction.

After the jin was repositioned and main branch bent into position.
The next step was compacting the foliage to form the crown and subsequaint branches. This was done with a combination of guy-wires and heavy wiring. The below picture shows the result. A small towel covered some branching that was to be removed once the tree had back budded in that area.

The result at the end of the demo.
If you look from the original front you can see how the foliage has been moved from its original positions to compliment the new front.

The re-styling from the original front.
Since the demo I re-potted the tree into a new container at the new planting angle. It grew out well in early spring with plenty of back-bedding and fresh growth. It was time to work on the foliage.

After some strong spring growth.
All this new growth provided me with the chance to cut out some of the leggy old growth and replace it with more compact fresh shoots.

A leggy branch with tired looking foliage.

The branch cut back so the fresh shoot at its base can replace it.
In this way I was able to improve and remove some of the poorer condition and leggy foliage. I cut more out of the strong areas and left a little more in the weaker areas to balance the growth of the tree.

After the cut back.
I was also able to remove one of the branches on the right side and hopefully in a few months I will be also able to cut back the other right hand branches.
There are a few other thing I want to do, such as lowering the planting position, define the live veins, and work on the shari texture, but for the time being those things can wait.
What the tree desperately needs now is a full wiring, I want to further compact the apex and better form up the crown and branches but unfortunately that will have to wait until my wrist heals. Hopefully I will be able to do it in a few more months. In the mean time I will keep feeding it heavily and keep replacing old growth with new healthy growth so when it does come time to wire, the tree is ready.
Prior to the recent AABC convention, I was asked to style an established Japanese white pine that had reached a stage where it needed some work to get it back on track.
It had been worked on a number of years ago during a workshop held by Hirotoshi Saito where the second trunk was bent upwards from what was a heavy first branch. Since then the tree has grown out with the occasional branch guyed down from time to time and with some trimming to keep the growth somewhat compact. What the tree was desperately needing was a full wiring and styling.

As the tree arrived in my garden.
I cut a good amount of branches off and had to do some heavy bending to move the apex from leaning towards the back to leaning forward. Most of the work was sorting out branch structure and setting basic branch positions to prevent thickening in areas that you might not want it in the future and providing structure for the tree to grow into.

Some of the removed branches.

After a couple of days wiring.
The tree will really benefit from a couple of years growth to fill out some areas such as the apex, but it now has a solid base structure to build upon further in the future.
The graft in this trees case is quite noticeable at the moment but I think that once the white pines park begins to crackle it should start to blend in much more. How long will that take? Who knows. I think 10 years would start to see the process beginning.
You don’t see many White pines in Australia and particularly of this size. It will be a good tree to keep an eye on as it progresses in the coming years.
I had some time this weekend to work on one of my pines. This time i chose to re-wire a small Japanese black pine (Pinus thunbergii).
The tree in question had belonged to a member of one of the clubs I belong to. When i received the tree it was estimated to be around 30 years old. It had been a nice little tree, but the last few years before I received the tree it had become leggy and some wire had also been left in the apex which had caused some large swelling and scarring. As a result, I had to prune most of the branches back quite hard and also remove the damaged section of the apex and upper trunk which essentially shortened the tree by a third.
The first wiring happened in March 2009.

One of the first wirings. Before and after, March 2009.
The little pine responded well to heavy feeding and was re-potted into a better mix. It budded back quite well and was ready for another light wiring by April of 2010.

After wiring the tips out. April, 2010.
As you can see the apex still needs a lot of developement. After cutting the damaged upper trunk off in 2009, I had then had to re-build the apex from a single branch. It is a slow process to rebuild a crown but this little pine responded well and produced a number of buds where i needed them.

The tree slowly coming to shape. Pre-wire, first branch and then secondary branches wired.
Every year the ramification increases and I am able to remove problem branches and replace them with better growth. The apex has now taken shape and now needs to increase its ramification to fill out its silhouette.

After the latest wiring.
Looking at the above picture the shape of the tree becomes clearer, but i think it still has a way to go. I like the long first branch, but am still toying up whether or not to break the foliage mass up into a couple of pads or keep it as a single mass. This years wiring was not the final wiring the tree will see and was done to achieve two things. The first was to start to set the form of the branches a little closer to how I imagine their final positions and also to let more light into the interiors of the structure. By letting more light into the interior I should be able to strengthen weak inner buds and also encourage further back budding.
I hope that in a couple more seasons I should be able to even out the foliage density and have the tree ready for show.
The tree below is one I worked on a couple of years ago. It is a large Shimpaku Juniper that had some great deadwood. When I was working on it, it was in the process of having some new roots grafted onto it. Because of this the styling was kept to just main branches, leaving the tips somewhat free so as not to stress the tree too much.

The tree before any work May 2009. There is a foam box that is holding soil for the grafts at the base. The layer was on the tree so that the deadwood would be brought closer to the soil surface and give the tree a more solid base.

After several hours wiring.
On my latest trip to Japan I re-visited Taisho-en and was reaquainted with this tree. The grafts had been a success and the tree had found a new home in a new bonsai pot.
It’s always nice to see trees you have worked on after some time apart. I get a similar feeling to that of seeing an old friend. When I saw this tree in the nursery I took my time looking over it and revisiting the familiar curves and lines of the trunk and branches.

The tree as of January 2011. The angle of the tree is a little more upright now and the base appears much more solid now it is lower in the pot. If you look closely you can see a tuft of foliage at the base that is still attached to the root graft.
I wonder if we will cross paths again.
I just thought I would add a quick before and after of a large white pine I styled while at Taisho-en.
It one of the largest trees i have worked on to date. It had quite a good canopy of foliage to work with and some nice features such as the shari on the lower trunk and the interesting kink in the first branch.
It was a big undertaking and took the best part of two days to fully wire. The planting angle was changed and the foliage was adjusted to suit. Some heavy bending was needed to compact the first branch as can be seen from the reenforcing bar next to the trunk.

Before
Working on large trees is a little bit strange. You have to work very closely to the tree in order to apply wire and position branches but due to their size you cannot get a true understanding of how it looks in connection with the rest of the tree. When working on smaller sized trees often all it takes to see the tree in the whole is just leaning back in your chair.
When working on larger material you end up regularly walking a few paces away to look at what you have done in conjunction with the rest of the tree’s form.

After the work
You can get an idea of the size of this tree by looking at my fingers at the top of the blue screen. I was holding the screen above my head with arms close to full stretch.
The below picture is of a branch I wired in Japan. It was actually the first piece of material i was allowed to place wire on.
When I first arrived at Taisho-en my duties were watering, sweeping/ cleaning and preparing hot water for the days tea. I did this for a few days as well as helping move the odd tree or other general task around the nursery. I also watched a lot. I watched people styling, pruning and working on a range of different tasks. I was actually enjoying the whole process even though i hadn’t really touched a bonsai yet.
One day Oyakata (Mr. Urushibata) brought me a branch that had just been cut off a white pine that was undergoing a re-styling and instructed me to ‘do wiring’. I was given a small space in the studio and was given some aluminium wire. I proceeded to wire that branch as well as i could. At the time it was the most advanced branch i had ever wired. Previously i had only seen pine ramification like that in books. Looking back at it now all i can see is errors in my wiring but at the time i was pretty happy with the result.
Oyakata was a little surprised. He seemed pleased with what I had achieved, although he said i had wired the branch too flatly. He then proceeded to adjust my work and explained how important volume within a branch was. I learnt a lot from that one cut off branch.

The first branch i was allowed to wire.
I passed my first test and that afternoon i was given my first tree to wire. A small Ezo spruce. It was a tree that was hidden up the back of the nursery. It didn’t look like much to start with but i was excited.

The Ezo Spruce before the work.
The apex was pruned out and a lower branch was wrapped in cloth (we couldn’t find rafia) with the intention of bringing it up to form a new crown.

The Ezo Spruce after the work
The tree was wired to the tips and I positioned all the branches and foliage. I then showed the results to Oyakata.
He again adjusted my work and explained why he was doing so. This was how my learning was to progress through out my stay. I would work on a tree without much help and then Oyakata would adjust my work and explain why. I learnt a lot over the course of my stay and every new tree I worked on had less and less adjustments made by Mr. Urushibata. Sometimes he would lower a branch a little or adjust some foliage, sometimes he would cut off some branches and sometimes he would make me cut off wire and re-apply it. Some trees had a lot of adjustments made others had none.
This process of working taught me a huge amount and I am very grateful that I was able to do it.
The Spruce and branch above were the beginnings of a very steep learning curve. I look back at them now and see a few things that I would do differently now as I am sure i will do when looking back at my current collecting sometime in the future. Although i may not be on as steep a learning curve as i was on my first visit, i am constantly learning from those around me and from my observations of my own bonsai. Hopefully i can spend some more time at taisho-en in the future and continue to improve.
