
You are currently browsing the tag archive for the ‘White Pine’ tag.
I lost a tree this year. It died in unusual circumstances and rather quickly, deteriorated after a single hot day.
People don’t tend to talk about the failures, the broken branches, the missed waterings or the mysterious die-back, it’s much easier to instead focus on the successes, the glossy pics, healthy foliage and triumphs. But we have all had failures, If you can find a bonsai grower that hasn’t killed a plant, you have probably found a liar. It happens. Some times it happens for very obvious reasons that you can solidly blame on yourself for but sometimes it seems a mystery.
Regardless of the reason, there is always a lesson to be learnt.
Which is where the below tree comes in.

The tree above was a white pine, that I had originally dug from a forestry plot and grafted white pine onto. I think from memory I dug the original stock in 2019 or 2020 with the graft being placed the season following digging it.
The graft grew out and i was able to remove the original foliage a season after the graft had been done.
The White pine foliage grew really strongly and well up until early this summer. It had flushed out strongly and seemed to be growing well until we got a single hot day and the tree’s fresh needles yellowed and browned and the tree then died.
The hot day in question wasn’t a record breaker but low 30’s(c). I wouldn’t have expected that sort of heat to have this effect on the tree in question, and it had survived well much hotter temps in previous years. The Chojubai cutting that was planted at it’s base also showed no sign of heat stress either. Strange.
I suspected a failed graft union.
So i decided to dig a little deeper into the graft. The below details my un-scientific autopsy of the graft union. I essentially cut a number of slices through the graft to see what was going on inside and below the bark as per the below images.

Above: you can see the swelling at the graft union site. The white pine above the graft grew very strongly and swelled each season while the trunk below the graft didn’t seem to swell at all, perhaps an early warning sign I didn’t click to.
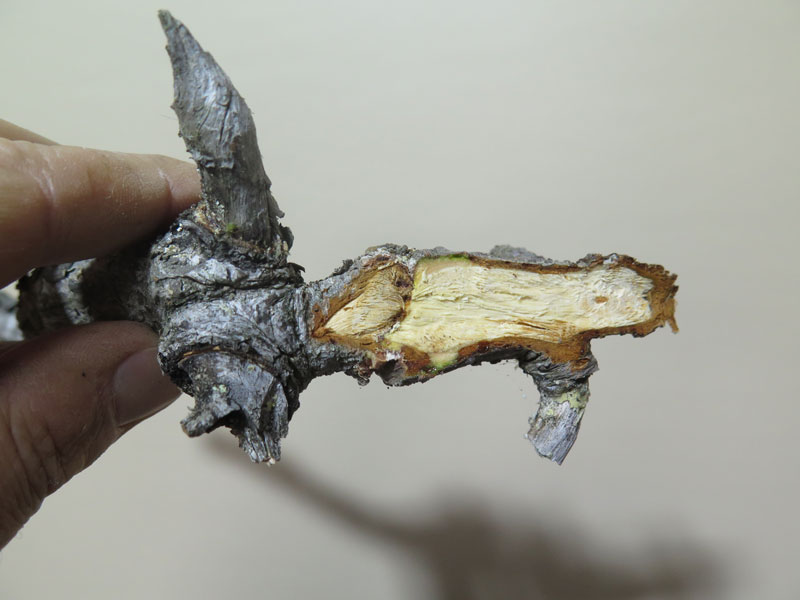


Above 3 Images: Various depth slices through the graft reveal some interesting things. There appears to be some bark inclusions within the graft and the cambium layers do not seem seamlessly knitted together. I wonder if the swelling was caused by a disruption in sap flow between the two sections of trunk?
My theory is that there was only a small section of connected and functioning cambium layer that as the trunk grew and swelled slowly got pulled apart. All it needed was the added stress of a hot day and the graft was not able to keep up with the sap supply…….. and hence a failure.
Googling ‘graft incompatibility’, brings up images that match mine above. The reasoning for the failures are varied and range from species or variety incompatibility through to poor craftsmanship of the graft itself.
As the stock tree was an unknown forestry hybrid, white pine may not be a good species match, but there is also every chance that my graft was not executed or aligned correctly to begin with also. Either way it failed and the graft itself showed some warning signs leading up to the failure.
For my future grafting projects i now have a better understanding of what signs to look out for (adverse swelling for starters) and can plan some contingency should these issues arise again.
If anyone has more knowledge or insight into the images above, i would really appreciate you adding a comment below so I can learn more.
This pine was one I dug (liberated) locally. Essentially a weed in our native forests i was happy to stumble across this one with it’s strange movement and old bark.
It has taken a number of years to get it out of the heavy old clay it grew in and into a better soil mix.
Last year i stripped off the site soil and put it into a shallow bonsai pot (all i had).


This year i put it into a much more suitable container (thanks again Ken). It should be able to stay in here for a few years as it establishes a dense root ball. Once it’s solidly rooted i will hopefully be able to remove the support sticks.
I may post an update once i see if the grafts live or die. The variety of pine is the same as THIS one, so i think i should have a decent chance of grafting success. Fingers crossed.
Just a quick post for today. I was going through some old holiday photos (mainly bonsai pics) and came across a small Japanese White Pine I had worked on in Japan.
I am really getting more and more into shohin sized trees. They are really challenging to grow well yet are easy to handle and take up much less bench space, which is a plus.
The challenge with this tree was to create enough detail in the foliage by means of multiple layers to give the illusion that it was in fact a much larger tree.

Before

After
Of course half the battle is starting with good stock which this little tree certainly falls into the category of.
Hopefully I can start producing some stock similar to this in the coming years.
While in Japan I worked on a number of trees which might make it to future posts.
One such tree was a bunjin style white pine that had been bought by the nursery as part of a larger collection. It had been styled by the previous owner but with far too thin wire so it was up to me to re-wire and find a new style for the tree. Oyakata gave me free rein on the tree and so I set about working.

As the tree began, styled by its previous owner.
So I stripped the old wire, pruned some branches and wired what was left. I then started to place branches and reached a stage where i wanted to cut off some branches that would take the tree past a point of no-return. So I called Oyakata from the garden to make sure he was going to be happy with my decisions.

My styling of the tree.
It turns out what I had done was not to his liking and he proceeded to remake the branches and form a more upright tree.

The tree after Oyakata re-re-styled it.
And so that is how the tree stayed. After all it was not my tree and I certainly did the right thing by asking when I did.
That being said, did I like the end product? No, not really but I wasnt really happy with my version either. I can see why Oyakata styled it the way he did.
It is a little more regular and perhaps in that form is more easily sold (which is the name of the nursery game) and being of fairly low quality comparatively with the rest of the nursery Oyakata was probably hoping to get it sold quickly to make room for something more interesting.
Having said all that what was interesting about the exercise was to see a piece of material transformed into three totally different stylings by three different pairs of hands over the course of the day. Each person who styled it, from the previous owner, to me, finally to Oyakata saw something different in the material and I think it is that difference in how each of us treats our trees that keeps this art interesting and keeps me turning up to demonstrations, shows and events.
Perhaps this material much like all others has no one perfect way to be styled but instead many different forms that play to different tastes.
I just thought I would add a quick before and after of a large white pine I styled while at Taisho-en.
It one of the largest trees i have worked on to date. It had quite a good canopy of foliage to work with and some nice features such as the shari on the lower trunk and the interesting kink in the first branch.
It was a big undertaking and took the best part of two days to fully wire. The planting angle was changed and the foliage was adjusted to suit. Some heavy bending was needed to compact the first branch as can be seen from the reenforcing bar next to the trunk.

Before
Working on large trees is a little bit strange. You have to work very closely to the tree in order to apply wire and position branches but due to their size you cannot get a true understanding of how it looks in connection with the rest of the tree. When working on smaller sized trees often all it takes to see the tree in the whole is just leaning back in your chair.
When working on larger material you end up regularly walking a few paces away to look at what you have done in conjunction with the rest of the tree’s form.

After the work
You can get an idea of the size of this tree by looking at my fingers at the top of the blue screen. I was holding the screen above my head with arms close to full stretch.
The below picture is of a branch I wired in Japan. It was actually the first piece of material i was allowed to place wire on.
When I first arrived at Taisho-en my duties were watering, sweeping/ cleaning and preparing hot water for the days tea. I did this for a few days as well as helping move the odd tree or other general task around the nursery. I also watched a lot. I watched people styling, pruning and working on a range of different tasks. I was actually enjoying the whole process even though i hadn’t really touched a bonsai yet.
One day Oyakata (Mr. Urushibata) brought me a branch that had just been cut off a white pine that was undergoing a re-styling and instructed me to ‘do wiring’. I was given a small space in the studio and was given some aluminium wire. I proceeded to wire that branch as well as i could. At the time it was the most advanced branch i had ever wired. Previously i had only seen pine ramification like that in books. Looking back at it now all i can see is errors in my wiring but at the time i was pretty happy with the result.
Oyakata was a little surprised. He seemed pleased with what I had achieved, although he said i had wired the branch too flatly. He then proceeded to adjust my work and explained how important volume within a branch was. I learnt a lot from that one cut off branch.

The first branch i was allowed to wire.
I passed my first test and that afternoon i was given my first tree to wire. A small Ezo spruce. It was a tree that was hidden up the back of the nursery. It didn’t look like much to start with but i was excited.

The Ezo Spruce before the work.
The apex was pruned out and a lower branch was wrapped in cloth (we couldn’t find rafia) with the intention of bringing it up to form a new crown.

The Ezo Spruce after the work
The tree was wired to the tips and I positioned all the branches and foliage. I then showed the results to Oyakata.
He again adjusted my work and explained why he was doing so. This was how my learning was to progress through out my stay. I would work on a tree without much help and then Oyakata would adjust my work and explain why. I learnt a lot over the course of my stay and every new tree I worked on had less and less adjustments made by Mr. Urushibata. Sometimes he would lower a branch a little or adjust some foliage, sometimes he would cut off some branches and sometimes he would make me cut off wire and re-apply it. Some trees had a lot of adjustments made others had none.
This process of working taught me a huge amount and I am very grateful that I was able to do it.
The Spruce and branch above were the beginnings of a very steep learning curve. I look back at them now and see a few things that I would do differently now as I am sure i will do when looking back at my current collecting sometime in the future. Although i may not be on as steep a learning curve as i was on my first visit, i am constantly learning from those around me and from my observations of my own bonsai. Hopefully i can spend some more time at taisho-en in the future and continue to improve.
