
You are currently browsing the category archive for the ‘General Bonsai’ category.
Another quick update to track this tree’s progress. Images below tracking its development since 2013.


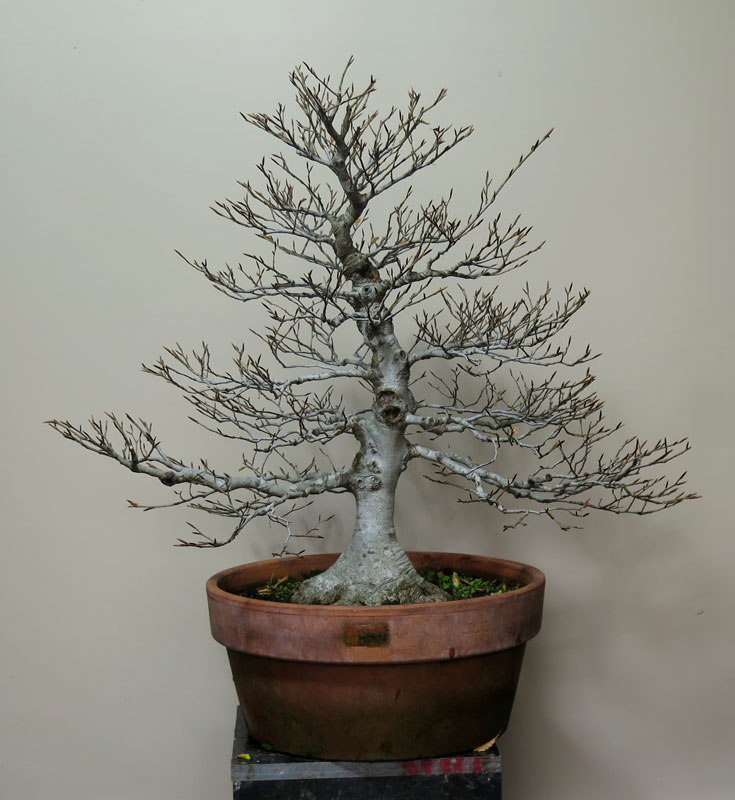
It’s finally been raining hence the dark trunk. This is another tree that is starting to fill in and get close to where i had imagined it many many years ago. Still deciding what to do with the scar on front of the root ball, I may ground layer it along the scar edge and grow new roots over the damaged area. A decision for next spring.
That time of year again, as I strip the autumn leaves off this trees (Beech tend to hold onto their leaves and don’t drop them), I finally get a chance to see how it’s development is going. Every year it gets closer to where i want it. Perhaps a few seasons off yet but getting there.
It needs some wiring this winter to adjust a number of branches but it finally feels like it is filling in with ramification. Looking forward to thinking about a new pot for this tree. I have a trip to Japan on the cards so may try to rustle one up there.
For interest, the trees journey over the years below.

Well, following on from the last interesting but somewhat downer of a post, I thought I’d do a bit of an update / introduction for a tree that hasn’t been on the blog before.
The tree in question is a bit of a rarity in Australia as you don’t see many (if any) Japanese white beech or Fagus crenata around, particularly any that are developed bonsai.
This example was imported from Japan when it was much easier to bring things into the country. There were still stringent processes to follow but it was somewhat less expensive or as regulated as it is today. This tree came in along with many others during this era, many of which are still out there if one looks hard enough.
Recently I was lucky to get some photos of the tree riding the subway back when it was first purchased in Feb 1999, some 25 years ago. Getting these images spurred me to look back over the few photos i had of the tree showing it’s history while under my care.

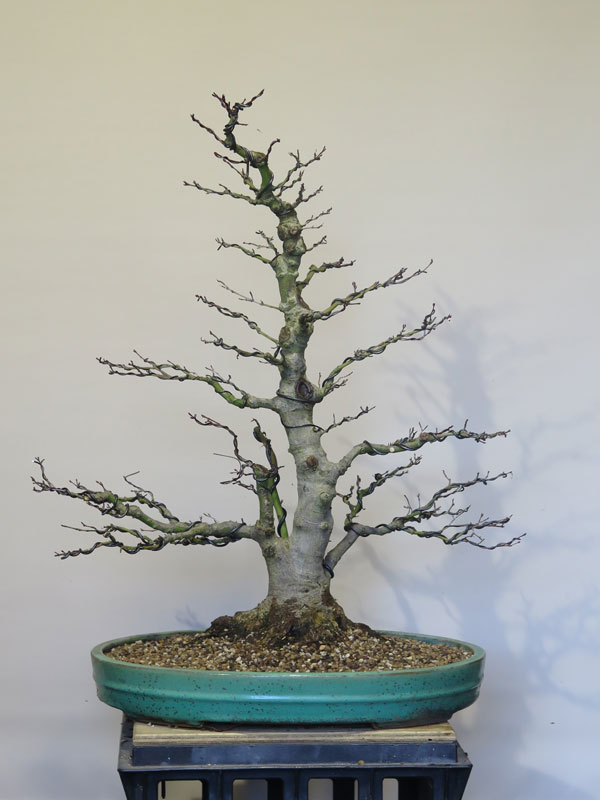
I was very lucky to get the opportunity to purchase the tree back in 2014 or 2015. Unfortunately the tree had weakened and lost its head along with quite a few branches. I must have been over excited at the time as i didn’t take any pictures on purchase but below is a picture from 2015 after I had removed much of the dead branches, twigs and apex.
Turns out i was in a bit of a hurry to get it into a nice pot. I also changed the original front as the die-back had effected both the major branching and top 1/3rd of the tree forcing a re-think. (if you look closely at the above image you can see the large scar from where the old continuation of the trunk line that died was.)
I hadn’t grown beech before and was shocked after my first season at just how slowly trees that only have a single flush of growth were to develop.
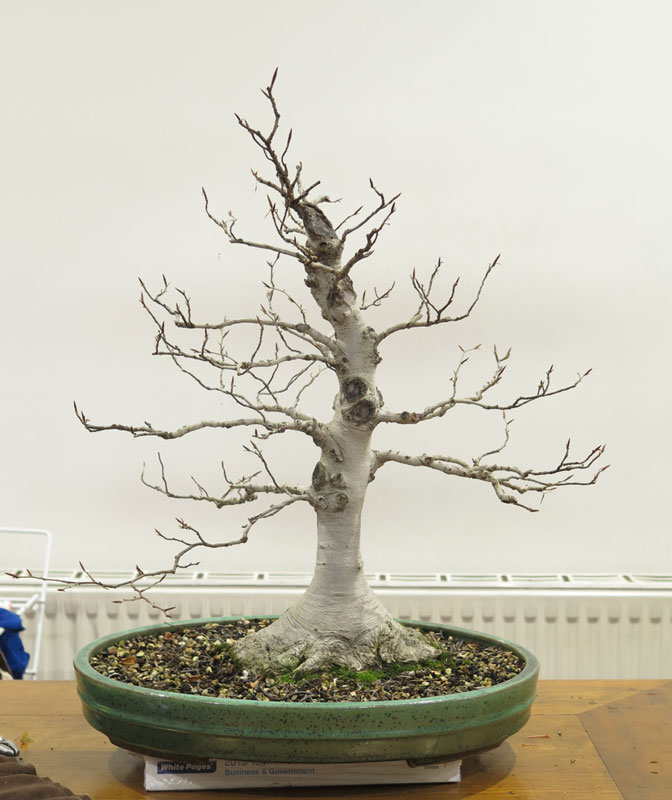
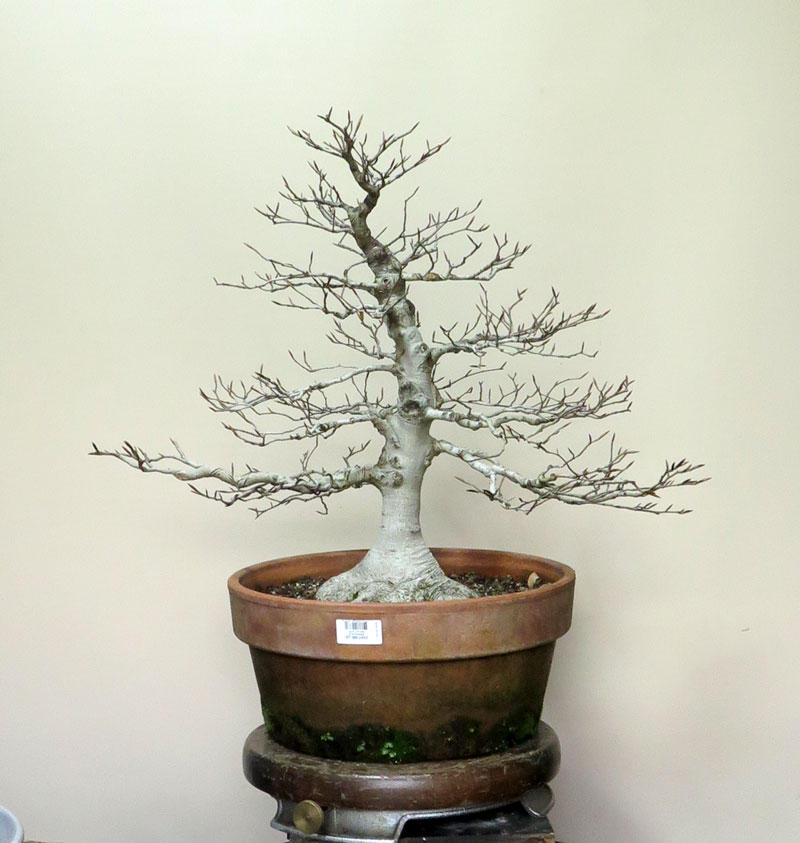
It’s first year it didn’t really gain much vigor so it got up-potted into a large terracotta pot so it had some more room for roots in the hope this would speed up the recovery.
From there it did slowly gain some strength but it always felt so painfully slow as i tried to rebuild a canopy and branch structure.
It did improve though, i wired it a few times and set about trying to get some thickness into the lower branches as i rebuilt the top of the tree. I think when i shifted from town supply to rainwater was when the tree really strengthened and built up some real momentum, although it was still slow compared to deciduous trees with multiple flushes of growth.
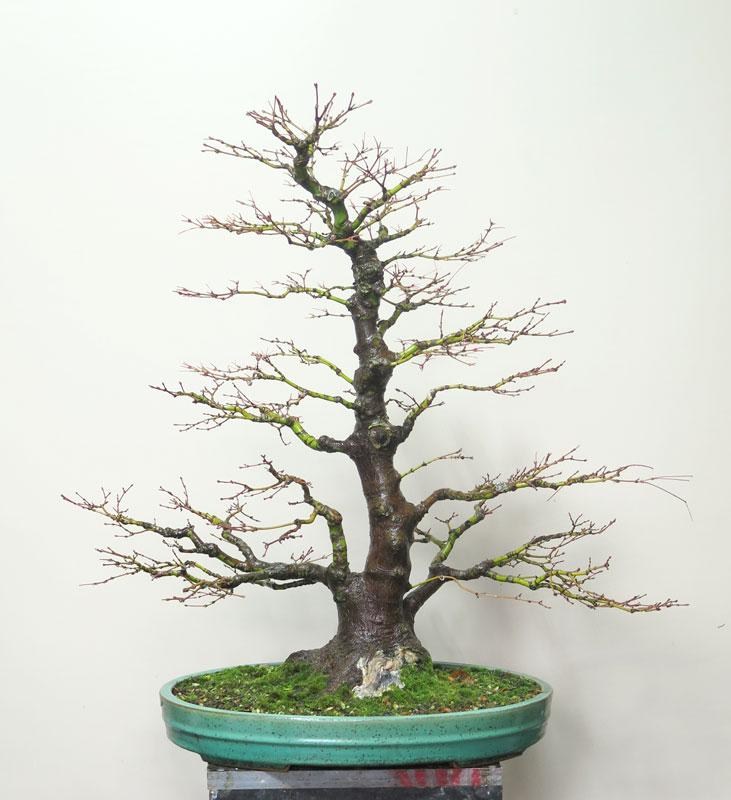
Which gets us to today. The tree is finally strong and even had a second flush of growth in some areas this year.
It has taken 10 years to this point just to get to the above image. Looking at it when it was purchased in 1999 i think it was more ramified than today so i am probably a few years off where it was on original purchase 25+ years ago.
It unfortunately does still carry a number of large pruning scars on the trunk. They are healing, but slowly. I think this spring i will re-cut the edges and encourage them to roll over more quickly. The scars will likely be a ‘fault’ on the otherwise smooth and silky white trunk line for years to come but i can live with them.
I am not entirely sure when it will get it back into a bonsai pot. Ideally i would like to triple the ramification before hand but we will see. It will likely still be several years away. People are always in a hurry to get things into bonsai pots but there is something cool about good trees in training pots. It’s quite a flex.
I think the below sketch is what i am shooting for prior to it going back into a bonsai pot. I think it’s achievable in 3 more years. I’ll try to check back in then and see if my theory proves correct. That should see the branch structure fully built out, then moving the tree into a shallow bonsai pot should then help to build a finer layer of ramification to really fill out the canopy.

While a long process thus far, it is now fairly satisfying looking back at the earlier images and seeing how much closer to being repaired the tree is. I am also pretty excited to move it towards the above sketch which i think would signify a completed rebuild. I could then try to take the tree beyond where it was 25 years ago back in Japan.
It’s been nice looking after a tree that has a long history like this. It’s been in Australia for at least 25 years and who knows how long it was developed in Japan prior to export (perhaps 30 or 40 years?). We as a country are only really recently starting to see second generation trees being passed from one caretaker to another. There was a time when this was regarded as cheating suggesting you needed to grow everything from a tree’s beginning as stock, seed or cutting. Thankfully this attitude seems to have fully disappeared which i think marks a real maturing of the bonsai community in this country.
A tree like the above really reinforces this as its has passed through several growers, each adding their mark and looking after it ensuring it moves forward through time.
Does anyone out in the internets know of any other Fagus crenata bonsai in Australia? I’d love to hear about them in the comments or via email. Does anyone have old exhibition images of this tree? I know it was shown in Melbourne from time to time. I would love to collect some more of it’s history if it’s out there.
I lost a tree this year. It died in unusual circumstances and rather quickly, deteriorated after a single hot day.
People don’t tend to talk about the failures, the broken branches, the missed waterings or the mysterious die-back, it’s much easier to instead focus on the successes, the glossy pics, healthy foliage and triumphs. But we have all had failures, If you can find a bonsai grower that hasn’t killed a plant, you have probably found a liar. It happens. Some times it happens for very obvious reasons that you can solidly blame on yourself for but sometimes it seems a mystery.
Regardless of the reason, there is always a lesson to be learnt.
Which is where the below tree comes in.

The tree above was a white pine, that I had originally dug from a forestry plot and grafted white pine onto. I think from memory I dug the original stock in 2019 or 2020 with the graft being placed the season following digging it.
The graft grew out and i was able to remove the original foliage a season after the graft had been done.
The White pine foliage grew really strongly and well up until early this summer. It had flushed out strongly and seemed to be growing well until we got a single hot day and the tree’s fresh needles yellowed and browned and the tree then died.
The hot day in question wasn’t a record breaker but low 30’s(c). I wouldn’t have expected that sort of heat to have this effect on the tree in question, and it had survived well much hotter temps in previous years. The Chojubai cutting that was planted at it’s base also showed no sign of heat stress either. Strange.
I suspected a failed graft union.
So i decided to dig a little deeper into the graft. The below details my un-scientific autopsy of the graft union. I essentially cut a number of slices through the graft to see what was going on inside and below the bark as per the below images.

Above: you can see the swelling at the graft union site. The white pine above the graft grew very strongly and swelled each season while the trunk below the graft didn’t seem to swell at all, perhaps an early warning sign I didn’t click to.
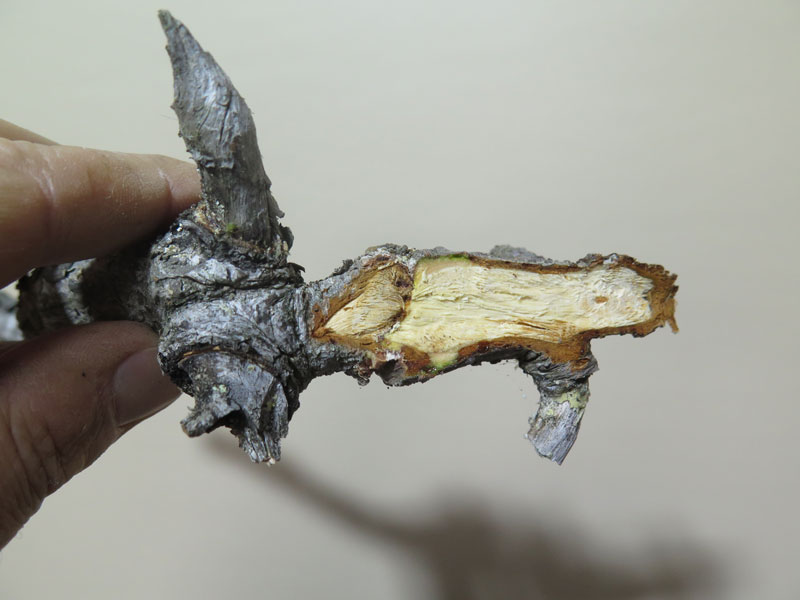


Above 3 Images: Various depth slices through the graft reveal some interesting things. There appears to be some bark inclusions within the graft and the cambium layers do not seem seamlessly knitted together. I wonder if the swelling was caused by a disruption in sap flow between the two sections of trunk?
My theory is that there was only a small section of connected and functioning cambium layer that as the trunk grew and swelled slowly got pulled apart. All it needed was the added stress of a hot day and the graft was not able to keep up with the sap supply…….. and hence a failure.
Googling ‘graft incompatibility’, brings up images that match mine above. The reasoning for the failures are varied and range from species or variety incompatibility through to poor craftsmanship of the graft itself.
As the stock tree was an unknown forestry hybrid, white pine may not be a good species match, but there is also every chance that my graft was not executed or aligned correctly to begin with also. Either way it failed and the graft itself showed some warning signs leading up to the failure.
For my future grafting projects i now have a better understanding of what signs to look out for (adverse swelling for starters) and can plan some contingency should these issues arise again.
If anyone has more knowledge or insight into the images above, i would really appreciate you adding a comment below so I can learn more.
For those of you familiar with Japanese bonsai nurseries and their workshops, you would likely have seen small pressure washing guns used to clean shari, particularly on small and shohin sized trees.
I had looked at buying and importing one from Japan a number of years ago but the 110v power that Japan uses was not compatible with Australia’s 240v system and by the time you added up the couple of hundred dollars for the gun, a power step down transformer, and shipping; a toothbrush / wire brush and glass of water started to look like very competitive options.
Cut to a little while ago, Evan Marsh, put me onto the below product. Its a textile stain removing pressure washer, easily available from ebay as a ‘textile spot cleaning gun’ for around $70 shipped (at time of posting). If you are looking for one, hunt down the 220v model for Australia’s power as it should come with the correct plug.

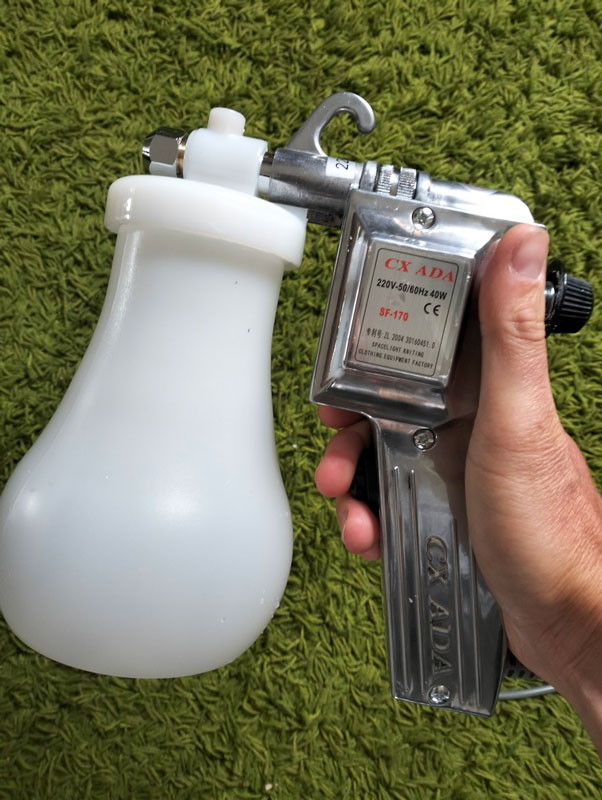
After receiving mine i was pleasantly surprised at how good it was. It is so powerful i would highlight the danger of it. DO NOT TEST ON YOUR FINGERS (like i did, and now have bruised my finger tips even though i was about 50cm from the nozzle.!!!) I think its stream has by far enough pressure to give pressure injection injuries. A quick search of that term will reveal horrific images that hopefully will cement in your brain not to point this thing at your self or anyone else.
The strong jet this gun produces however is great for cleaning and stripping moss, dirt and grime and other stuff from deadwood areas. Especially in hard to access places.
I would also think you could remove pulpy or rotted areas of deadwood easily in a way that leaves behind a natural texture when done also. It likely has enough power to damage bark and live areas so be careful.
All in all this tool appears really well made for the price and performs great. If you struggle to remove moss and algae from your deadwood it may be a cheap way to solve that issue.
The last few weeks have been pretty interesting. Our area has been under covid lock-down limiting movement and socialising and shortly after, a family member was exposed to a covid positive person at a local shopping location and we had to put the whole family into 14 day isolation where we couldn’t leave our property. Luckily we all tested negative but we still needed to complete the 14 day period of isolation…
Without being able to get out to exercise and walk off some of the kids energy we have been trying to come up with ways to occupy them (and ourselves).
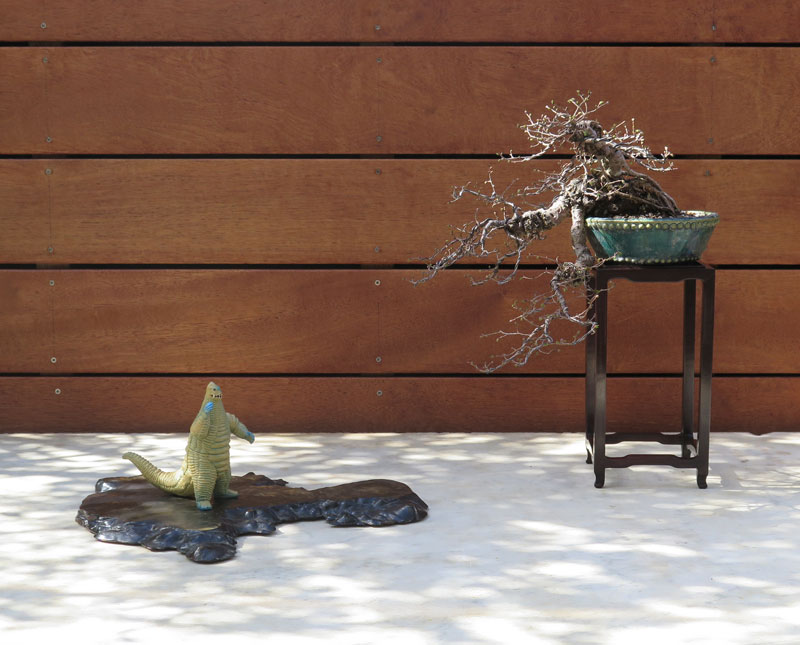
Bonsai has been a good distraction and my daughter wanted to help out so we grabbed some things lying around the house and messed around with a few versions of a bonsai display. Its a pretty modern interpretation with a couple of monsters from ‘Ultraman’ showing up but was a fun exercise to do together and really all the same considerations around placement, scale and colour / texture remain.
I was hoping to use some of the other coloured figures but my daughter is going through a dragon phase so switching them out was out of the question.
Any way, they were a bit of fun and killed some time, I hope you enjoy them. Let me know in the comments your favorite version.


I’ve gown Pinus Radiata (Monterey pines) on and off over the years and have somewhat of a love hate relationship with the species. They have several good points and are readily available as escapees from the several large plantations close to home. They have great characteristics such as good bark, fast growth and seemingly high survival rate when collecting but………. That said, their foliage can be ‘scrappy’ and there seems to be a big difference between older examples and more modern plantation escapees which I think is due to the genetic selection of the forestry stock and how it has changed over the years. These younger trees seem to have much more twisty and messy needle formations and growth patterns compared to older stock examples.
Near home is one of the first radiata stock trees that was selected for a parent or mother tree of much of the forestry stock at the time (planted in the 1880’s). From what I understand this tree was used early on but is no longer a parent, as better examples were grown, bred and fine tuned.
That said i have been digging various specimens again with the idea of grafting them over to white pine or perhaps red pine to make use of the great bark but also get good foliage characteristics. Well, at least that was the plan…..
While out exercising the family in one of the local forests, I came across this radiata witches broom located not too high up in the canopy. I found another of these a couple of years ago, but while waiting for the right season to graft, the plot of trees was logged, losing my opportunity.
This one I should have a lot more time up my sleeve to try to get some material off it to propagate as the trees it is growing in amongst are much younger and likely 10 years away from harvest.
What are witches brooms I hear you ask? Essentially they are a form of damage to a tree (virus, insect or otherwise) that change the genetics of a particular area of growth on a tree often resulting in a dense twiggy dwarf section of growth. Often these areas can be propagated (via layer, grafting or cutting etc.) to retain these characteristics and create new versions of the parent stock.

This broom was showing dense growth and shorter more compact and neat needles so I am hopeful it may be a good candidate to replace scrappy radiata foliage with and still keep it in the family so to speak. Time will tell I suppose.
Who knows it could turn out to be a good new bonsai stock option. Many famous dwarf cultivars started as witches brooms; for example, yatsubusa Japanese black pine came from a witch’s broom on a kotobuki black pine.
ON A SIDE NOTE: Has anyone had much success grafting radiata pines (Monterey pines)? What species did you try? I’d be really keen to here about your experiences in the comments!
During one of the now countless lockdowns our state has been through, I enrolled myself into a Tafe Engineering (Machining) class as a point of difference in what at the time was a fairly monotonous pattern of “covid normalcy”.
It’s been a great change of pace and learning to run Metal lathes, mills and other machines (that seem to always be plotting to kill you or remove you digits) has been very enjoyable.
As re-potting season is gearing up, it was about time to steal another of my wife’s chopsticks to aid with soil settling. This year however, I decided that with 100’s of thousands of dollars worth of machines at my disposal that I should make a tool to do the job rather than raiding the cutlery draw.
So I fired up the lathe and started turning down some steel and brass.

I turned a handle out of some brass stock and made the shank from some 6mm mild steel bar. The two pieces are fitted together in a low tolerance fit and are held together with thread lock. That way should I ever want to change the shank (or switch to a stainless one), I can heat it up, break the bond and swap it out relatively easily.
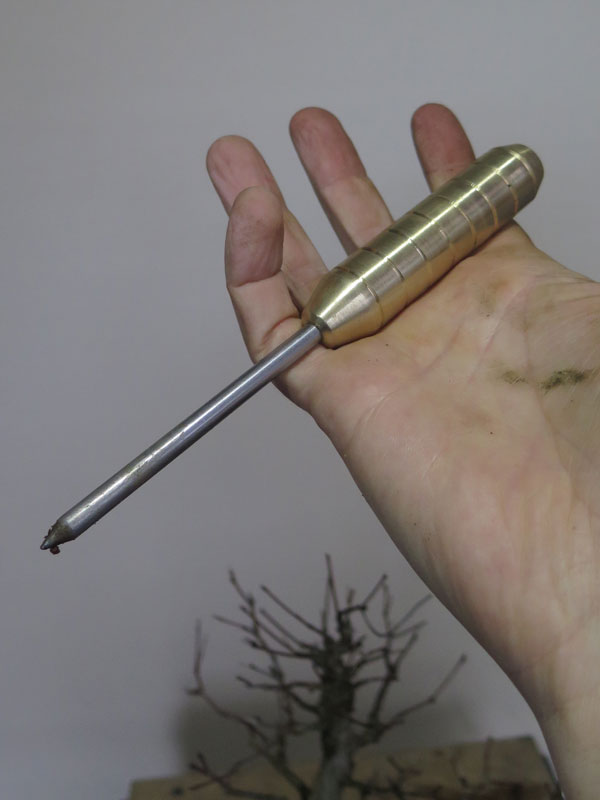
I’ve repotted a number of trees with it already and it seems to work well. It’s certainly heavy in the hand and feels solid.
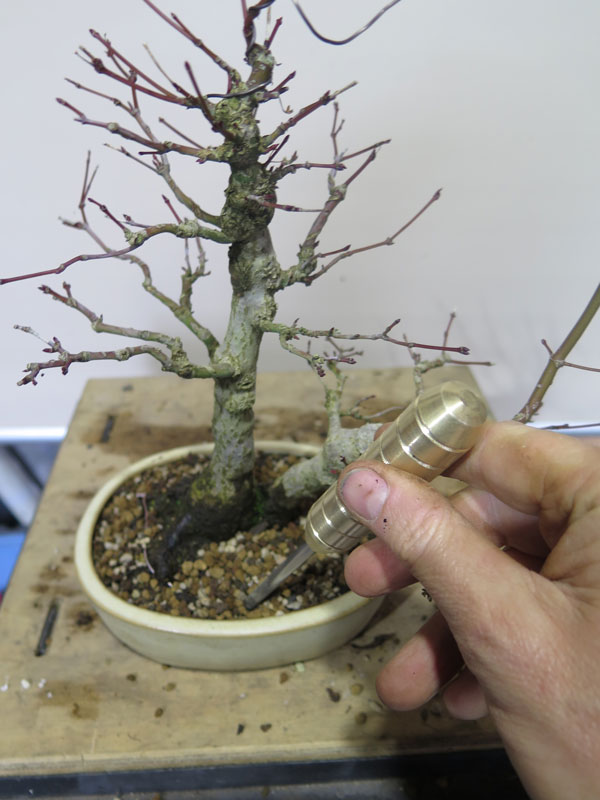
I enjoyed making it and there is something really nice about doing work with tools you have made yourself. Which brings me to a question back to who ever is reading this:
Does any one have any good idea for bonsai tools I could try to make in the future? If you have a good idea, please comment below. If it is something I could see myself using I will more than likely have a go at making it.
You may have read my previous post on my local water pH (HERE) where i discovered that the water I had been using on my trees was very alkaline. Well I developed a simple solution in that i installed a rain water tank and bought a pressure pump to deliver near pH perfect rain water to my trees. The results the change in water had on tree health was nothing short of amazing! Greener foliage, a reduction in other health issues etc. all were welcomed changes.
But then the tank ran dry…………………………
Luckily I had a plan B although i had been dreading implementing it. Turns out it was much simpler and easier than I had imagined.
I decided to refill the tank with tap water and then adjust the pH from there.
To adjust the water pH I decided to use household white vinegar to add more acid to the water in the form of Acetic Acid. I did some very basic tests to work out the dosing rate and came up with needing 12L of Vinegar to dose the 2000L tank.
It turns out my tests were not very accurate because I used half that rate and ended up with a pH close to what I wanted.

smart 
So from 3 bottles of vinegar (2L a bottle or 6L total) I was able to take the water’s pH from ‘8.something’ to around ‘6.0-6.something’. This should work well as it is on the acidic end of the range that is good for growing most plants.
Being only $1.20 a bottle it was a very cheap way to re-fill the tank with water of a suitable pH.
I think in the future I will try 2.5L of vinegar and see if I can get closer to 6.5-7.0pH but the levels I have now should be fine. As we are heading into Autumn and Winter, the coming rains will dilute the tank water further and bring me closer to these numbers anyway.
Also on the way is a digital pH meter so I can confirm exact pH of both my town water and that of the adjusted water in the tank. While the coloured chemical test kits are OK they are a ‘close enough’ type of accuracy only. I will update again with a post documenting the exact pH numbers when it arrives.
One of the reasons i have skipped de-candling this year was to regain some health to my trees pending a shift in water quality.
Since moving regionally i had seen some health issues creep into my trees with them slowly losing form over a 5 or 6 year period. Colour was on the yellow side and some leaves were showing fungal infection and nutrient deficiencies.
I had tried everything from fungicides to trace mineral / elements with nothing making a dramatic difference. As a last ditch effort i decided to check my water pH.
Where we had moved from in Melbourne had a pH of 6.5-7 which is near perfect for growing most things so i guess water as a cause hadn’t been high on the radar.
Turns out i had been treating the symptoms without finding the source.
smart
It turns out where i am living now has quite a high pH in the town water with it sitting somewhere around a pH of 8.0. Given that the uptake of nutrients can start to be inhibited above pH’s of 7.5 i figure that this explains my symptoms well. It also explains a slow decline in my trees health as nutrient deficiencies started to appear, health weakened and made my trees more susceptible to fungal infection and other issues.
Post pH check i looked up our local water provider and they say we have a Min /Max range of 7.5-8.5pH in the town water supply.
Alarming when you realise that nutrient uptake begins to be effected from 7.5pH and up.
To remidy the situation, last winter i installed a small water tank to catch roof run off. Luckily this year has been quite wet and the tank has just lasted through the’summer’. It is likely i will need to expand my storage again this winter.
Since switching to better water i have seen a big turn around in plant health. Pines are again lush dark green, fungal issues has mostly disappeared, trees on the brink have bounced back. I probably in hindsight should have checked the water pH the day i moved in.
So i suppose that the moral of the story is that when you encounter issues with tree health look to rule out some of the basic influences before going down a targeted treatment regime.
For the price of a pH test kit i would recommend everyone checking their water from time to time, you never know; it could lead to healthier, stronger bonsai!
