
You are currently browsing the category archive for the ‘Bonsai Techniques’ category.
This is a bit of a different post covering a tree that has found its way back into my collection lately.
I originally grew this as stock from a cutting and put some early bends into the trunk line. Soon after the wiring of the cutting i gave it to a friend who did the bulk of the work in forming it into a tree and growing it on.
As luck would have it, the tree recently found its way back into my collection.
Stupidly, i didn’t take any before pics, but when i received the tree i re-potted it, changing the angle a bit and fully wired the tree removing a branch or two in the process. All in all, building on my friends work, its forming into an interesting little tree!

Above: The tree post re-pot and styling.
But…….. it still has a while to go.
Normally a shimpaku of this thickness i would keep as stock and grow hard and fast to thicken the trunk and develop the shari’s and live veins. Luckily we cut shari’s into the trunk last year but i still need to focus on developing trunk thickness and continue to develop the sharis as things thicken.
This is somewhat difficult in a tree that i don’t really want to grow out of shape or get too much larger. What i want is to thicken the trunks and keep the tree’s foliage well managed.
The solution is………. Sacrifice branches.
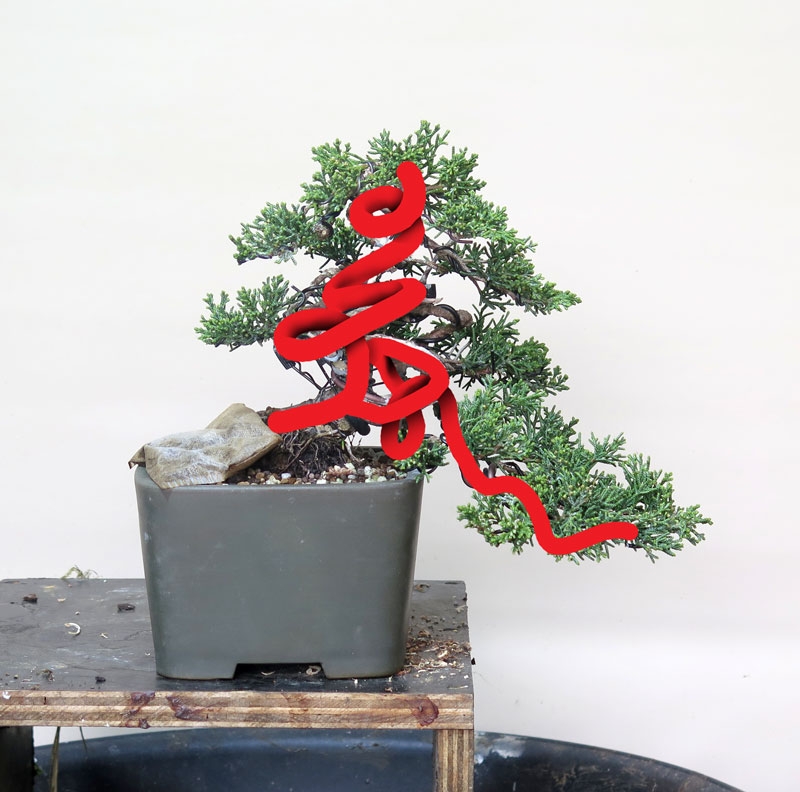
Above: The two main trunk/branch lines.
The tree is built off two main trunk lines as per the diagram above and ideally i would like to thicken both of these lines. To do this i will likely grow two sacrifice branches.

Above: likely locations of sacrifice branching (shown in pink).
I will locate two sacrifice branches (one per trunk line) but in slightly different locations. The sacrifice branch in the apex will be toward the top of the trunk line as i want the entire upright trunk to thicken.
The second sacrifice will be on the first branches trunk line, It will be located back from the first branch tip though, to avoid the branch holding the foliage from thickening too much, keeping it in scale with the other branches.

Above: the image in my head i am aiming for.
I will likely also wire the sacrifice branches into interesting shapes reinforcing the tree’s movement so i can use them as future jins.
To further facilitate this thickening i will be making a shari on the opposite side of the trunk to the shari’s we have already made. I’ve covered this a bit more in THIS post. I am hoping this speeds up the whole process quite a bit. Also keeping the majority of the foliage trimmed and compact should direct a lot of energy into the sacrifice branches which will be left un-pruned. Hopefully allowing them to grow quickly and do their work.
That said however, i do expect this process to take a number of years to get to the thickness level i am after.
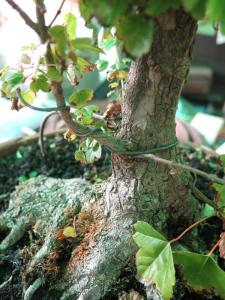
Just a quick post today tracking a task I do on the semi regular to develop the junipers that have deadwood and shari features.

Above is yet another of my trees in desperate need of a wire. While I didn’t wire it today, iI did do a little thinning of the foliage in preparation for summer growth and a future styling. The main task i completed however, was the widening of the shari’s on the tree.
If you’re interested in seeing the tree 10 years ago, HERE’S it’s first post.
I do this task every couple of years to slowly reduce the sizes of the live veins which speeds up trunk thickening (or more like widening) and develops the shari’s texture.
The technique it’s self is fairly straight forward and involves removing a couple of mm of bark along the edges of the shari. It is a fairly safe process as you have to be pretty unlucky for the branches above to be reliant on the narrow strip of bark but it does pay to make sure that you are not removing all of the bark from directly below branches.

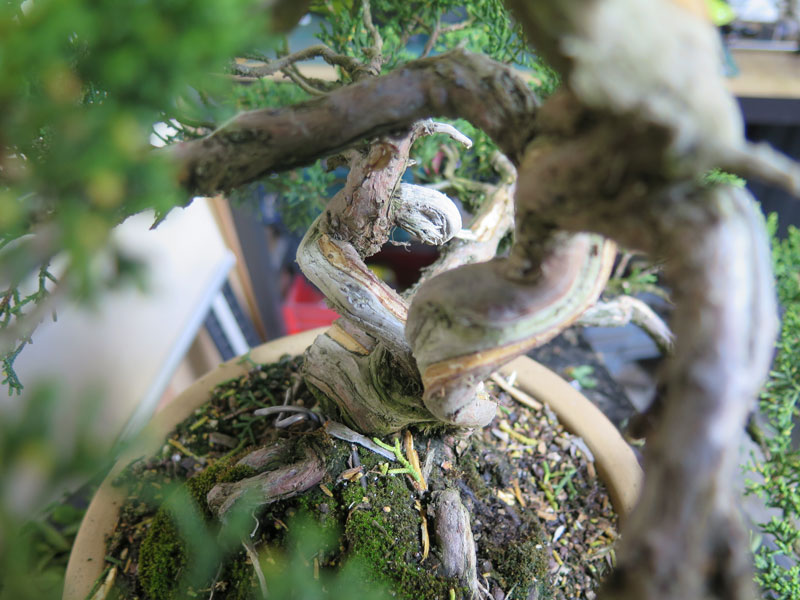

You can see the freshly exposed shari in the images above.
By reducing the size of the live vein you direct the same amount of sap (to supply the foliage above) through a thinner section of bark and as a result it tends to thicken in this area much more quickly compared to a larger area of bark supporting a similar amount of foliage. If you then have live veins on each side of the trunk they will grow outwards and appear to thicken the trunk much more quickly (if only in one side to side dimension.)
The other benefit of doing this technique over time is that you get a great texture on the shari areas. As you expose these new areas of shari, you are exposing younger heart wood and as a result you get lines appearing between the younger and older area of shari. You can see this quite clearly in the images above where there is a year or two age difference between each line. You can end up with an almost finger print like pattern on the shari with no need for carving and its a fairly effortless way to achieve a nice texture.
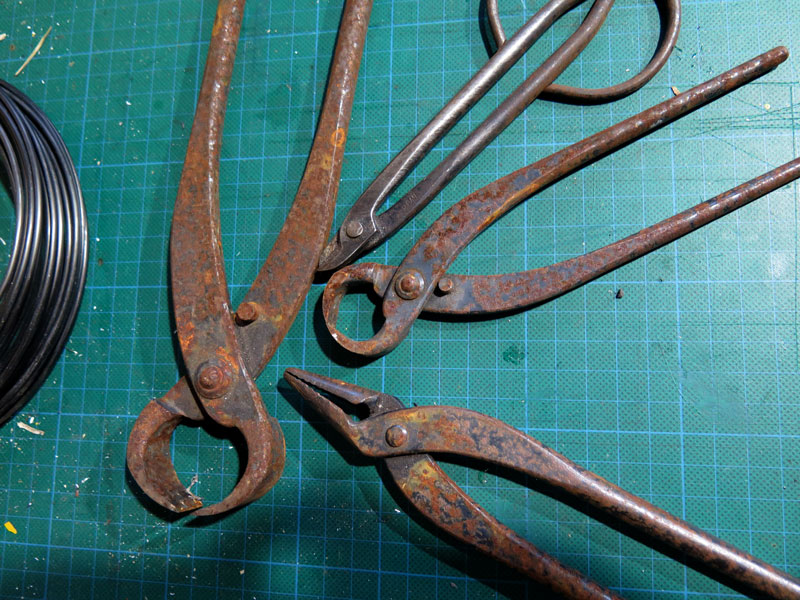
Every bonsai growers secret shame is often buried in the bottom of tool boxes or hidden away from prying eyes.
Once glossy black, smooth and sometimes hand crafted, forged tools forgotten on a bench for mere minutes (or so it seems) can soon turn into rusty messes.
But don’t fear, you don’t have to cast such shame upon yourself and your family, there is a solution……….. (that doesn’t involve buying stainless steel tools).
Lets talk about what the black coating of steel tools is. The process that the tools have been through is called ‘Bluing’.
Bluing is essentially an oxidised layer or more simply, a black/dark blue rust. It forms a layer of oxidisation similar to the oxidised surface of aluminium which prevents further oxidisation to the surfaces below. Essentially this black ‘rust’ or (black oxide) prevents the red rust or (red oxide).
Of course black oxide only prevents this so far, so if conditions are right or moisture levels are great enough the tools will eventually rust. Which is what happened to the tools above. (They may or may not have been left outside for a period of time.)
The first step in restoring the black oxide coating is to remove the rust. Unfortunately black oxide being chemically very similar to red oxide means that in most cases removing the red also removes the black.
Now there are heaps of different ways to remove rust from mechanical (wire brushes and sandpaper) to acids, electrolysis and other chemical solutions.
For the above tools I chose a product called ‘Evaporust’ which removes rust well but doesn’t damage the metal beneath like an acid might which is another good method (citric acid works really well and is cheap but you need to keep an eye on the removal).
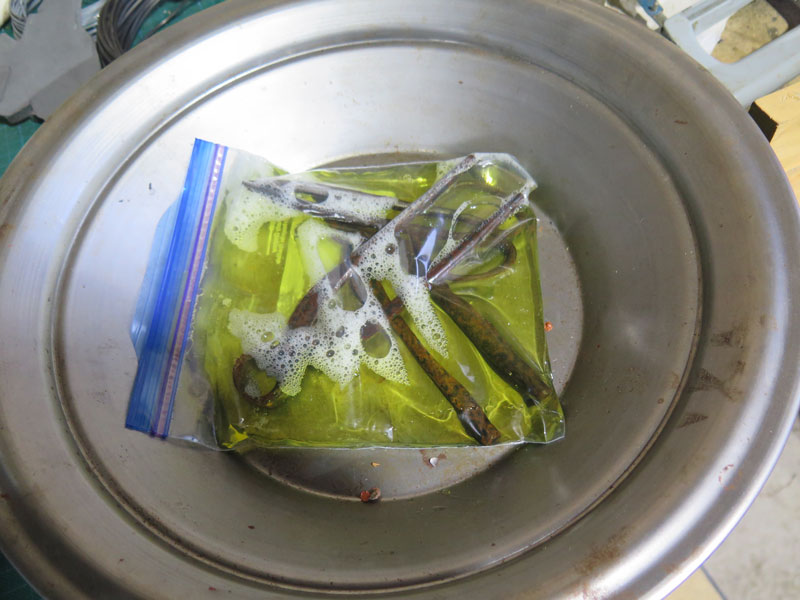
After a day or so of soaking the tools come out completely rustfree (of red and black rust).

Now there are two main ways to replace the Bluing; hot bluing and cold bluing.
For the home gamer, cold bluing is probably the most accessable and there are plenty of cold blue products that are mostly aimed as restoring firearm finishes. They usually have pretty clear instructions but for the most part it involves painting on the solution with a cotton swab. (heating the tools with a hair dryer prior to application can make for better results.)
Hot bluing is usually more of an industrial process as the chemical mix used is very toxic/caustic and usually done at high temps.
Hot bluing usually produces a better finish but for a couple of bonsai tools the cold bluing process is generally acceptable.
It can be hard to get a good finish in cold bluing as immaculate preparation and minimum contamination of the steel surface are big drivers of the end result. If you are not too fussy however, applying multiple passes/ coats usually ends in an acceptable end result.

My tools came out OK. Not perfect but certainly better than the rusty mess they began as. If i had perhaps acid etched them a little or done a better job of de-greasing between coats the result would have been less patchy. But for tools that are going to get knocked around and used, it’s good enough.
While this tree has had a couple of mishaps since I last posted about it, Project Trident 02 has been slowly progressing.
You can read about its beginning HERE.
Since that post, I removed the air layers and have been trying to get as much growth in the grafts I could to help them fuse with the parent trunk. I did have a small failure with the first branch’s graft as i knocked it when moving the tree and broke it.
I re-did that graft and it seems both grafts are growing well now. So well in fact I have decided to go into the next phase of this material’s development.
As I am looking to make a smaller tree I will at some stage have to make a fairly large cut to shorten the main trunk.
The newly taken graft on the left side of the trunk and the re-grafted branch lower on the right.
When making large cuts on bonsai, you should always have some sort of plan as to how you will heal/deal with the resulting wound. My plan with this tree is to heal the cut in phases.
What I plan to do with this tree is make half the cut now, use the growth on the main trunk above the cut to heal it and then sever the remaining half of the trunk. This should leave me with half the scar I would have otherwise .

The first cut.
So I cut through half the trunk with a small saw and then cleaned up this cut with a sharp knife and sealed it all with cut paste.

Cut paste applied.
The idea is that with the main trunk still attached, it will draw sap past the cut site and speed up the healing process. The more growth and sap that moves past a scar, the faster the scar rolls over the wound.
Once this is healed I will cut the other half and heal that side by growing out the branches and new apex of the remaining tree. For the rest of the season I will let the branches grow freely and feed the tree accordingly.

A new back branch.
While I had the tools out I also grafted on a new back branch. With this branch in place the tree will be well on its way towards having its foliage changed to that with much better internode/ leaf quality. I will probably look to graft on one more branch onto and or around the scar that is created when I remove the rest of the main trunk. This should speed up the healing of the final scar.
I will be sure to post some updates as the scar heals.
The blog has taken a bit of a back seat of late. I notice that my last post was from back in July last year! Things have been pretty busy since then with moving to a new city, starting a new job, renovating an old house and having a child all leaving me with very little time for bonsai related work.
That said I have been able to get the tools out from time to time and have been styling customers trees and working on my own trees as time has allowed.
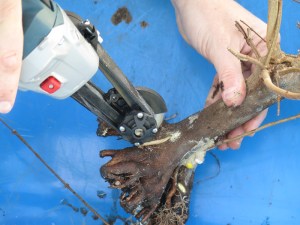
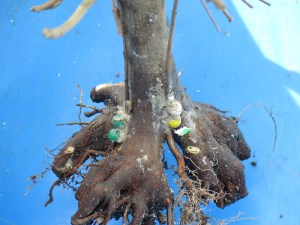
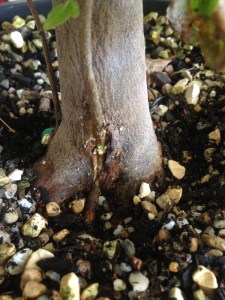
To kick off 2016 and start the blog off a fresh I thought a small photo essay of some grafting I did earlier this spring might be a good way to get things back into gear. The tree in question came from Shibui Bonsai and had just been lifted from the grow beds and showed the results of the early work Neil puts into these trees. It had a good start to build a really nice base upon so i decided to begin that process with some root grafting. Photos below:

A trident Maple that was field grown with pretty good roots. There were a couple of gaps which I decided could be filled in with some approach grafts. You can see the small trident whips that were selected to be used for the grafts in the background.
A trident Maple that was field grown with pretty good roots. There were a couple of gaps which I decided could be filled in with some approach grafts. You can see the small trident whips that were selected to be used for the grafts in the background.

A trident Maple that was field grown with pretty good roots. There were a couple of gaps which I decided could be filled in with some approach grafts. You can see the small trident whips that were selected to be used for the grafts in the background.
A trident Maple that was field grown with pretty good roots. There were a couple of gaps which I decided could be filled in with some approach grafts. You can see the small trident whips that were selected to be used for the grafts in the background.

A trident Maple that was field grown with pretty good roots. There were a couple of gaps which I decided could be filled in with some approach grafts. You can see the small trident whips that were selected to be used for the grafts in the background.
A trident Maple that was field grown with pretty good roots. There were a couple of gaps which I decided could be filled in with some approach grafts. You can see the small trident whips that were selected to be used for the grafts in the background.
Over the years while growing black pines I have always strived for more buds. Each year i tried to get back buds to form and most times I was successful although sometimes the tree I was working on would show signs of promise and then wave them in my face as it took them away again.
What am I talking about? I am sure you have all seen them; those small buds that form and give you hope, only to swell but never open, and then after a few seasons growth, wither and die.

A few of the buds in question.
As far as i can work out, these are needle buds and or weak adventitious buds that for what ever reason can never really get themselves into gear. Even after candle pruning the rest of the tree theses buds often still sit and do nothing. The most frustrating thing about these buds is they always seem to appear right where you want them which makes seeing them die all the more difficult.
I have tried a number of methods to awaken them but none have worked. I have had them in both shaded locations and spots where they get full sun, on bottom branches and in the apex, on strong growth and on weak. Nothing seemed to work no matter where they occurred or what I tried.
But there is still hope. At the convention a month ago Ryan Neil talked about these buds and passed on a technique I had not heard of before. He said these buds could be awakened by slightly damaging them with a scissor cut done at the same time you candle prune. That is to say that when you cut the candles, you also make a small incision into these sleeping buds. He said it was this damage that would trigger these buds to put out a flush of growth at the same time as the cut candles re-grow their second flush.
As we in winter at the moment I have not yet had the chance to try this method out, but I look forward to trying it this coming summer. Hopefully it is the answer to this annoying sleeping bud issue.
Sometimes things elsewhere look better than what you might have at your own disposal. This can do two things. One is you can become inspired and in turn try to improve your situation, or you can feel defeated and do nothing and long for what is over the proverbial fence.
In terms of Australian bonsai we sometimes look over our fence (or ocean) and long for the material of Japan or the yamadori of America or Europe. Sometimes this inspires but a lot of the time due to Australia’s strict quarantine laws (making importing near impossible) and the fact that most native collectible material is protected by law it instills a feeling of giving up or accepting second best. Myself, after returning from a trip from Japan, have looked over my collection and felt as if I was so far behind that I might as well sell up and take up stamp collecting when comparing my trees to Japan’s masterpieces and fantastic stock.
I have done my share of moaning and complaining about what is available (or perhaps more importantly not available) but complaining doesn’t solve the problem.
Australia doesn’t have juniper and pines as our native flora and those species we do have that do make good bonsai are often protected from collecting by law. This combined with an import ban on most bonsai species puts the us on the back foot when it comes to yamadori. The best chances we have at material even vaguely similar is digging from gardens.
So where does this leave us? We need to start growing more of our own. Taiwan produces ground grown or farmed junipers that for all intents and purposes look the same as their yamadori counterparts. Japan produces tons of quality raw material in a massive range of species that ensures that there is always a healthy base of material being produced for future excellent bonsai.
Growing material is not difficult, it just takes a little time. Most of this time is best invested early on in a plant’s life when it is young and flexible. 5 minutes to do some root pruning and another 5 minutes to wire the trunk for shape and you have the foundations for something interesting that has the potential to turn into an excellent bonsai.
A tiny shimpaku
The above Juniper came from a grower in Shizuoka. While I was studying at the nursery we went on many stock buying trips and this tree was from one such trip. The grower was not a professional nursery man but rather a home grower. The rooftop over his small garden shed had been turned into a small stock production area. He grew stock and traded it with the nursery for pots and other trees, supplies etc. What surprised me was that this was a guy living minutes away from a nursery that sold stock and trees I could only dream of here in Australia, yet with all this stock at his disposal he still was growing his own, excellent material.
If every grower in Australia, grew 5-10 good stock plants a year we would have so much good stock we wouldn’t know what to do with it all.
This year I have finally decided to stop complaining about the lack of stock and making excuses about my lack of space and have planted 60 Trident maples and 60 Japanese Black Pines as a test batch. For some reason I had been making excuses over the last few years as to why I couldn’t get this process started. My backyard was too small, I didn’t have the time and I wanted to keep my collection at a small size etc.
This year I decided that I could make room in my backyard, the time I needed was not all that much and that I could sell a good percentage of the stock once matured to keep the collections size down and to add some money to the bonsai bank.
I decided that because space in my garden was at a premium, I would grow small bonsai stock. I don’t have a ground growing area so I also had to be able to grow in pots. Growing small-sized bonsai made this an easy proposition.
What I was hoping to achieve was similar to stock i had seen produced in Japan.
A Pine wired into an interesting shape. I am pretty sure that I can produce stock similar to the above pine from seed in 2-4 years.
A juniper grown from cutting could save a year or two compared from starting from seed. Junipers might be a little slower than some species but they do make very impressive small bonsai and are worthwhile to grow.
A small kumquat. You don’t immediately think of deciduous or leaf species when you imagine twisted bonsai but they also make convincing and interesting choices for this type of bonsai.
Using the above trees as my base inspiration, I decided for my test batch I would grow a mix of half deciduous and half conifer so I had some variation in the final bonsai. As I didn’t have any juniper cuttings, I struck some Japanese Black pine and Trident maple seed and potted them up individually.
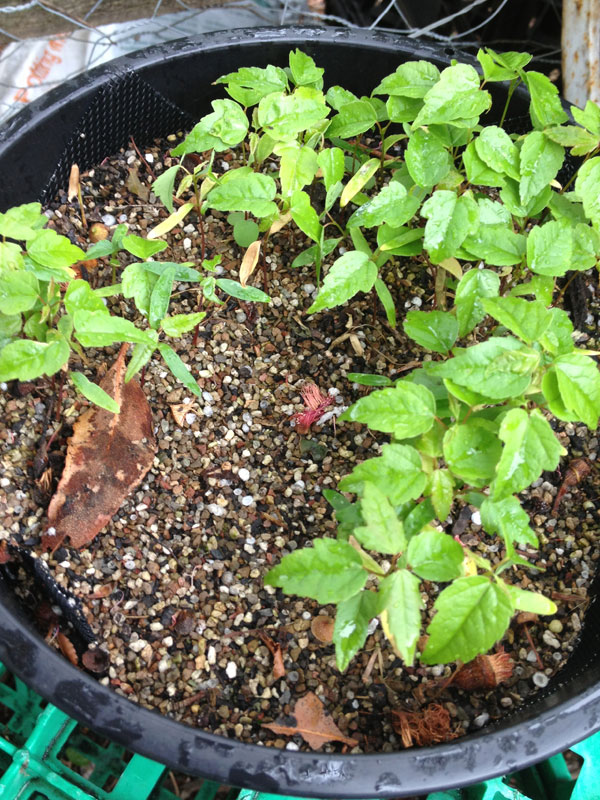
Trident Maple seedlings as germinated.

Japanese Black Pine seedlings as germinated.

The removal of tap roots (encouraging lateral roots).

Potted up seedling

A tray of 30 seedlings. These seedlings need to re-establish and put on some growth before wiring.
Pretty simple so far. The time spent on each plant to this point ran to the 5 minute mark (a generous estimation). Not a lot of time considering how much time will be invested in the future with watering, pruning and re-potting etc.
After the seedlings have established and put on some growth I got some movement into them.
This should take another couple of minutes per tree. The process is pretty standard really, insert the wire into the soil at about a 45 degree angle until it hits the side/ bottom of the pot. Then wire the trunk making sure that the wire is applied in even coils. Then you simply bend the trunk.

Wiring the seedlings.
The bends you put in the trunk should be tight and irregular. As the tree thickens the bends will soften in appearance so over exaggerate the bends at this stage. I try not to think about the final form of the tree at this stage rather I like to combine interesting kinks and twists and make each seedling different to the next. This means that come styling time I will have a range of shapes and styles to play with. I have also found that if you try to create styles at this stage you limit yourself somewhat. The more random you can make the trunks the more natural they seem. The times I have thought about their final form I ended up with many similar trees.
They should now be fed and left to thicken for a year or two. Once the wire cuts in I will un-wire and depending on how the bends have set, I may re-wire again.
Once i have them at pencil to finger thick I will start thinking about creating branching and small canopys. This should ensure that in a few years time I will have a lot of interesting stock to play with.
Hopefully this post inspires a few people to have a go themselves. You don’t need a lot of space, ground or time and the rewards in a few years from such a small investment should be well worth your efforts.
Most years i make fertiliser cakes from a range of ingredients (usually what is cheap or on special when it comes time to buy them) although the cakes that I have previously made have never really lived up to expectations.
For those that have used the fertiliser cakes in Japan I am sure you would have noticed an interesting thing. When the cakes have been on the soil surface for a few days they begin to get a white felt like mould on the underside and begin to omit a pleasant fermenting kind of smell. When I worked with Mario Komsta, he always got excited when he saw this mould as it was a sign the cake was breaking down and feeding the bonsai.
The cakes I have been using here in Australia have never got the mould that those in Japan got. I put this down to a couple of things. Firstly climate. Japan gets a whole lot of rain over their summer where as here in Australia we are usually hot and dry for most of the summer. The problem I was having with my cakes was that they were drying out and were then hard to re-wet and get them breaking down again. Japan was always so humid over summer that the cakes once wet stayed moist and were able to break down.
To try to combat that this year I am trying using my ingredients loose inside tea bags. The idea is that they will be much easier to re-wet each watering and hopefully break down much more quickly and hence feed my trees better.

Tea bags, for making your own tea blend bags and a pair of scissors I need to re-profile.
I found a cheap supplier of tea bags in the form of a Japanese 100yen shop called ‘Daiso’ which has just opened a couple of stores in Melbourne. $2.80 for 100 bags.
The mix I am using this year is fairly basic:
- Cottonseed meal – 5 part
- Blood and bone meal (including trace elements) – 5 part
- garden lime – 1 parts.

Filled bags.
The process of making the fertiliser bags is fairly easy and mess free. I fill the bags with a large spoon full of my mix and fold the bag shut. The cakes are now pretty much ready to go on the trees, but I do one more step prior to putting them on my bonsai.

Soaking in fish emulsion.
I soak the filled bags in a fish emulsion solution to fully wet the ingredients and add a bit of extra fish emulsion kick to them.

Bags on the bonsai.
Once on the soil I like to place a small dimple in the top of the bag/mix so that every time I water, a small amount of water pools on the surface of the fertiliser and helps to re-wet it.
Now it’s not the most attractive solution but it does have a few extra benefits out side of easy re-wetting. Firstly because all the ingredients are contained in the tea bag this stops a lot of the loose material clogging up the soil surface and hindering drainage. Then they are also very easy to remove and replace at de-candling time which is also a plus in my book. Possibly the biggest side benifit is there is no smell while making the cakes using this method, and no smell means no complaining neighbors and stinky backyard. Also not having to dry cakes means you can make them early in the season before the weather heats up to drying temps.
I look forward to seeing if i get the white mould and the working fertiliser smell……. fingers crossed!
As I managed to get some time to work on my trees this last weekend, I though it was a good opportunity to do some grafting before my black pines woke up too much. I like to do grafting on black pines just before they start moving in spring. For bud grafting this is important as once the sap starts to move in a big way any cuts made to hold grafts tend to flood with sap before placing the scion which makes them a little less successful. Approach grafts on the other hand are a little more forgiving but if I can I try to do them around the same time so that the burst of energy that comes with the first flush of candles extending goes into healing the graft site.

The graft site will be at the base of the thick bare section of trunk.
I have decided to graft this tree as it has a rather large bare section of trunk. If I can graft a new leader to the base of this I can build a much smaller and more compact tree with the new graft’s growth. Obviously this will be a longer term project but I figure why go down a long road just to end up at a mediocre tree. If this graft takes and the tree develops as I imagine it will be a far greater result in the future than had I just persevered with the existing structure.

The start of the process, a cut in the trunk.
The first step is to create a cut for the graft branch to sit inside. I like to make the cut about 1/4 smaller than the branch that is going to be inserted into it. I start by making the cut with a small saw. I try to make the cut so that it is wider at the rear of the cut than at the front edge. usually this takes two cuts, one slightly slanted upwards and a second slightly downwards. This flared cut will help the scion branch to lock into the cut.
Once I have made the first pass with the saw I clean up the cut with a knife so that I have clean and neat surfaces upon which the graft can be placed.

Some bark removed from the graft branch.
Next I remove a small slither of bark from either side of the scion branch. Make sure that you check where to make these cuts prior to getting the knife out as it is important that these cut surfaces line up with the cut surfaces you made with the saw. I usually find that the knife cute that clean up the saw cuts combined with the cuts on the scion branch tend to eliminate the 1/4 under size that was initially cut with the saw.

The graft made.
The Scion branch can now be inserted into the cut in the trunk. The fit should be snug and tight. Small adjustments might be needed to be made to the channel in the trunk to make sure things are all snug. If the channel is on the large side it is best to chock the scion branch so that it contacts firmly with the lower surface of the channel cut. (I use small twigs as chocks.) As sap runs from the roots up, contacting the lower surface will ensure that the graft has a better chance of taking than had it only contacted the upper surface. Either way, the scion should be firmly touching at least one cut surface on the channel in the trunk.

Sealed and held tightly in place.
Finally you simply seal the graft union and hold the scion firmly in place so that it cannot move and disturb the graft before it has had a chance to take.
The speed at which the graft takes will depend on the amount of growth you allow to occur on the scion branch and above the graft site. Obviously the more the trunk and scion branch grow and expand the more chance the graft has of taking. I would hazard a guess that this graft will be taken by the end of this coming seasons growth. Having said that I will probably cut off the growth above it in stages so it may be two seasons before I actually sever the scion branch from its original source.
I though it about time I updated how the grafts I did back in November were taking. If you look back at THIS post you can see the whole process of how I started this graft.

The graft is beginning to take.
A week or so ago I had to do a demonstration on approach grafting for a local club so I took this tree in as an example and also placed some new grafts onto other areas of its trunk. It was a strange night as we had an earthquake in the middle of my talk. It was a small quake in world standards (5.4 on the Richter scale) but it was the first I had felt. The building shook, doors rattled but it only lasted for about 30 seconds and the talk soon continued. It certainly added an interesting break in the night.
Now that the earth has stopped shaking and im not in front of a meeting group I am able to see how the graft is doing a bit more closely. The graft has begun to take but I think that I will leave it attached to the host branch for at least part of this growing season (ie. next spring). You can see in the above photo that the section after the graft is beginning to grow thicker than the host branch on the other side of the graft. This is a good sign that the grafted branch is beginning to take nutrients from the main trunk. Once it becomes a little thicker I think the union will be much more solid and I will be able to remove the host section of the branch.
I will be doing a whole lot more grafts on this trunk this coming spring so I can begin to build the framework of the branch structure. It really is an easy almost foolproof technique that allows you to get branches where you want quickly. If you have a tree that could benefit from a new branch, give it a go.
Just a small side note, I will be pretty busy for the next few weeks as Hirotoshi Saito is coming to Melbourne to run workshops with various clubs over the next week and a half. I hope to attend as many sessions as possible so will not have a lot of time to update the blog. Hopefully once the workshops are over i will have a bunch of photos from the events to share. For those interested in Hiro’s visit have a look HERE (information about the BSV workshops/ demo and the Ballarat sessions are available in the links section of that page.)
