
You are currently browsing the tag archive for the ‘Acer buergerianum’ tag.
With the first days of summer now under our belts and some solid early spring growth it was time to begin this seasons tasks around the garden. First cab off the rank was this trident which found its way onto my benches recently.
It had been fully wired in winter, most of which had begun to bite in with shoots extending aggressively with an early warmth to spring.
I defoliated the tree and removed the old wire setting it up for its next flush, some new buds and further ramification. Its a very nice tree and I think will develop into something that will always have a space on my benches.


While there is a long way to go with this tree, I think the bones are all in place and you can already get a sense of what the tree might look like in the next 5 years once it has a lot more ramification.
Now I have a sense of where it is heading, I will likely leave a few shoots to run on the lower branches to increase their size a little given how quickly the upper regions are thickening.
Onto the next one!
So it looks like spring is on it’s way early this year with Trident Maples and Chinese Elms in my garden already swelling their buds. This might not seem all that strange depending on when you are reading this post from but ‘down under’ we are still in July (at time of writing) and I don’t normally even consider repotting until mid to late August and often run into September and beyond.
NOTE: (for those in the northern hemisphere, the months of June, July and August are our winter. For the Americans who don’t have metric winters; a short summary of the above might be that we are 64 ⁄ 79 ths of the way through winter and trees are budding out.)
I was lucky this year that I had a YouTube celebrity come over and help me out.
For those interested, his YouTube channel “Jeff’s Bonsai” can be found HERE.

Jeff is a great guy and we had a great day together and it only cost me a bowl of reheated left overs for his lunch!
I had forgotten how nice it was to have company when doing bonsai. So much of my work is done on my own down the back of the garden in my little shed. I suppose that social isolation generally has only increased with Covid so it was a really nice change to have someone else around lending a hand.
I think together we repotted 12 or 13 trees in half a day or so. I don’t think I could have done half as many in that timeframe, so thankyou Jeff.
The other thing you might notice from the above image is the black mesh screen on top of my green waste bin. This was another idea I got from Jeff (noticed in one of his videos). The night before he arrived I welded up the screen to easily and cleanly get all the old soil into the compost bin without risking the tree or tools falling in. It worked a treat!
As for the trees we re-potted, eventually many of them may make it to the blog but in the mean time a couple you might recognise from older posts are below.


Thanks again to Jeff. With his help we have broken the back of what can often be an overwhelming and desperate race against swelling buds. Hopefully I can trick him into helping again!
The trident maple below is this years project. I spotted this tree in a friends garden and loved the big gnarly base. I like the base so much that I have just realised that I don’t have a picture of the whole tree, just photos of the base!

Lumpy flared base.
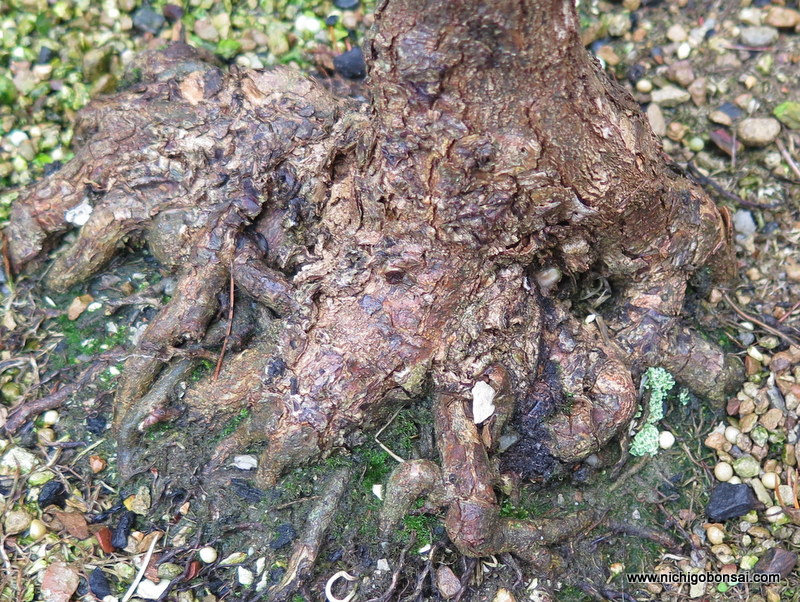
After removing one root, can you see where it came from?
The base has great character but the rest of the tree is tall and directs the eye away from the nebari so I felt I could work on that to improve the tree overall. The other challenge with this trident is that it is a variety with large leaves and long internodes which makes it difficult to make a good canopy, especially on small trees.
I have noticed that other tridents with this growth habit also develop nice bases easily. The down side is that their ramification is course and thick. How can you make use of the base and also have a good foliage canopy?

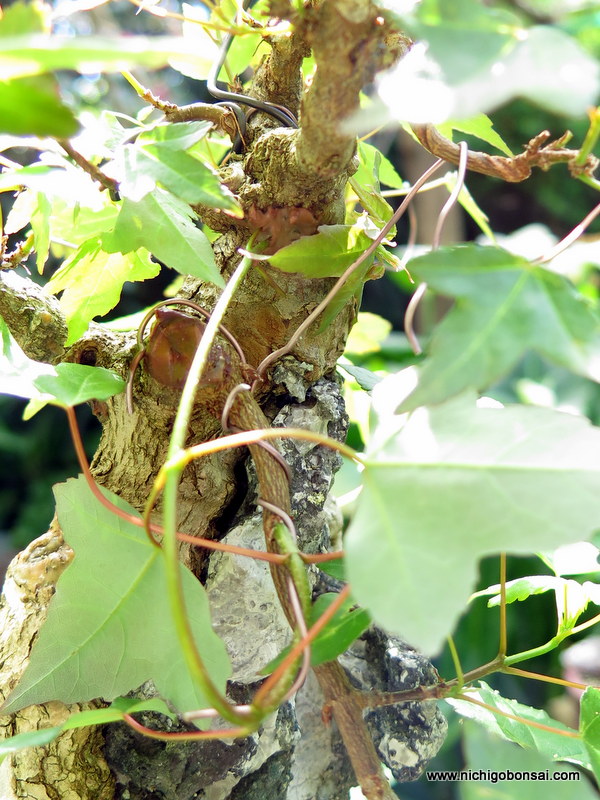
Approach grafting new foliage.
The answer is to change the foliage. I decided to graft a finer foliage onto the lower section of the trunk so that I can make a shohin sized small tree with a huge powerful base and fine delicate branching.

Seedling being planted in the same pot.
I chose a seedling from a batch that showed good foliage characteristics. That is smaller internodes and compact growth. I planted the seedling into the same pot as the main tree for ease of watering and then grafted the young whip into the main trunk.
I actually grafted it twice into the trunk, once on each side. I bent the seedling into a ‘u’ shape and simple cut a channel in either side of the trunk for the seedling to fit into. One side will become the apex, the other will become the first branch. This way I will have the same foliage on the whole tree once I cut off the main trunk in a year or two.
Even though i am changing the foliage I also wanted to keep the old foliage so i can experiment with it in regards to its base thickening properties. To save the foliage I decided to air layer off the top and the first branch.

The cut made and scraped clean. I actually used some branch cutters to cut a small amount of wood from around the layer site to ensure I got all of the cambian layer.

Sphagnum moss soaked in seaweed extract, all wrapped in strong plastic.
If these layers work, I will probably grow them in pots for a year or two before ground growing them to see if the base flaring/thickening is a genetic trait or just a result of how this tree was grown.
I have noticed that there are tridents that grow good bases and poor ramification and then tridents that do the opposite. Has anyone else noticed this?
I am hoping that I can use cuttings from this tree to grow great bases then graft a good foliage variety on top to finish up the process. Time will tell if this works out or not. If this doesn’t work out I have another seed grown trident that shows similar properties. Fingers crossed.
Every one needs a project or two in their collection. I really enjoy project trees, that is tree that are undergoing various processes to transform them into a new style, shape or form. The problem is that each year project trees undergo their transformation and then move into ramification/maintenance phases leaving me to find new projects.
Trident maples are one of my favorite species to work on and I really enjoy having one as a project. I always have my eye out for something that has plenty of room for improvement. The tree below is one such tree.

The tree as I received it
The tree was an imported trident maple. It had been brought into the country back in the 90’s when Australia’s border protection was much more flexible in regards to bringing bonsai in.
When I got the tree it had been left to grow out for the last 2 years and as a result there was a fair amount of work required to bring it back to its former glory.

After first cutback.
The first thing I did was cut it back hard to stimulate some back budding. It’s branches were quite old so it didn’t bud out how I had hoped. This lead me to go down the path of approach grafting rather than risk cutting off branches and not get any buds pop. I decided to graft on a new set of branches at the base of all the old branches. In total I grafted 5 branches and left the tree to grow.

The grafted branches have taken.
I also re-potted the tree and found a lump of old akadama in the center of the root ball. I bare rooted and picked all the old soil out of the root-ball. Almost immediately after the re-potting the vigour of the tree improved and I was rewarded with strong growth which helped the approach grafts to take. In the above image you can see the grafts emerging from the underside of each branch.

The large branches removed.
This spring I cut off all the large branches as the grafts were now strong enough to take over the sap flow. When I made the cuts I cleaned the wounds up with a knife and then applied cut paste which in my experience helps things heal.

A wound and a grafted branch.
I have left the grafted shoots long and I will let them grow until I am sure that they are strong and well connected to the host trunk. Once I am sure of that (probably in a month or so) I will cut them back to the first internode and then begin growing the branch structure.
Unfortunately the back branch’s graft didn’t take but as luck would have it this spring a bud has popped right at the base of the branch right where I wanted it. Sometime trees do what you want.

The two leaves are the new bud at the base of the back branch.
Once this shoot is strong enough I will also cut off the old thick back branch above.
This spring I also placed the last graft I need, just below the apex. This should allow me to cut off the last heavy branch on the tree without having to chance whether or not I get a bud where I want.
The shoot on the bottom left is bent up to under the apex where it has been approach grafted into the trunk.
Its been fun replacing the branches on this tree and i am looking forward to this season of growth where i can start to grow the branch structure and form the outline of the bonsai. Hopefully in 5 more years this will be a highly ramified and ready to show bonsai. Time will tell.
Well as is often the case, life has been busy and the blog has suffered. I have been able to find some time today to write a string of posts that should be published over the next few weeks.
To kick things off, while going through my photos i found some before and after images of a small tree I have been playing with. The images are just a summer’s growth apart and seeing pictures like this reminds me of how good it is to capture your trees in images to track their developement. This tree I thought hadn’t really changed all that much but looking at the images you can see it has changed a lot from the start of the season.
Picture one shows the tree as I received it. It was imported from japan some time in the 1990’s when regulations were a little less strict and I managed to be in the right place at the right time and picked it up.

This is how I received the tree (although I think for this photo I had just cut off a number of long sacrifice branches that had grown out)
Since it came into my collection I have potted it up and begun to build the branch structure. I had to graft on a branch (Third on the left) but now the basic structure is set and I am looking forward to ramifying it over the coming summer.
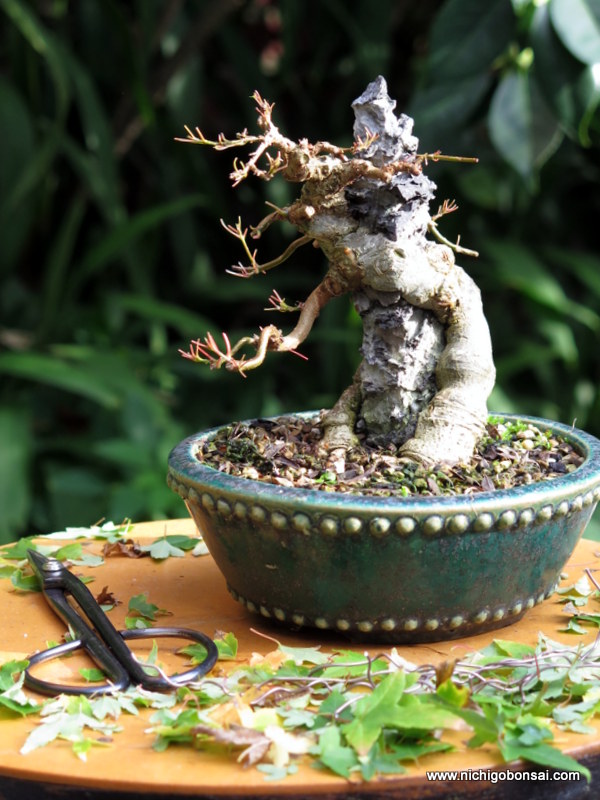
As the tree is now, ready for another years development.
Probably next year it could go into a more suitable pot but for now the Koyou pot it is residing in isn’t too bad.
Where to from now? well I want to grow the first branch out a little longer and generally ramify up the tree a whole lot more. Buds are just starting to open and I cant wait to get started.
I often hear people saying they wish they had access to good stock and or that they cant find any stock worth purchasing. Often the journey to find good stock can be difficult but there is definitely good stock available if you know where to look.
A couple of weekends ago I visited a friend on the outskirts of Melbourne to see how his ground grown stock had progressed this year.
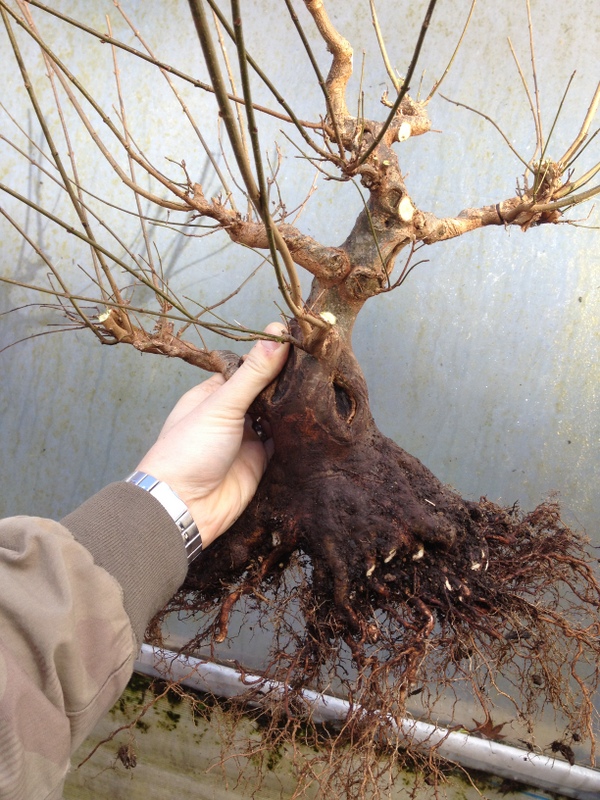
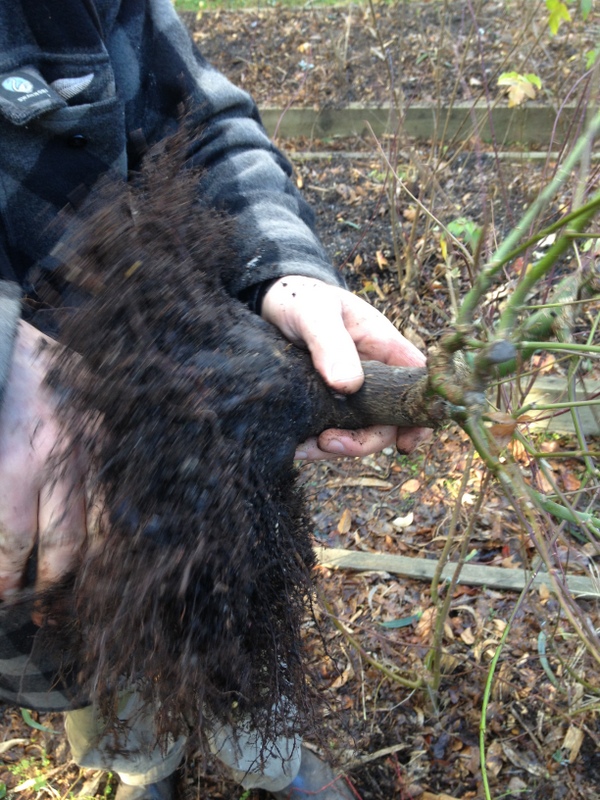
A trident slipped from the grow bed.
As you can see from the above picture, the stock was going very well indeed. There is no real secret about how to produce these results as they are a simple a matter of spending 10 years applying good technique and working the root bases each and every year.

Another great base.
Each year the trees have been dug up and cut back hard to encourage a fine, flat root system. Digging each year coupled with the excellent growing conditions in the grow beds results in good yearly top growth without roots getting too thick and creating faults. This makes for trunks with great base flare and very small scars which in many cases are healed in the ground.

A Japanese maple from the same beds.
When out of the ground, the most important cuts to the roots are in removing those that are downward growing and scarring the base of the trunk to further thicken the base; and with this stock, this has been done with great results. In fact, I was so impressed with the quality of the material I put my name on a couple that might come out of the ground in the next couple of years.
The roots on the underside of the trunk being removed.
For those not willing to spend 5 years working out the techniques and then a further 10 growing trunks luckily this grower also sells some of his stock.
His trident maples are available through Chojo Feature trees in Mount Evelyn. Jeff who runs the place is an extremely nice guy and I am sure could help out those interested in a trunk and or other bonsai related products.
Re-potting this year has been a rushed affair where I have been doing it when ever I have time. Mostly this seems to be under garden lights after work. Spring seems to be a little early this year which hasn’t helped as the schedule has had to be brought forward. Having said that, I have nearly got through all my trees. I have a handful left to do that I hope to get done this coming weekend.
As i have been in a rush there hasn’t been much time (or good light) to take many pics. Most of the re-potting I have been doing has been fairly un-interesting anyway and mainly just renewing of soil and replacing the trees into the pots that they came from.
One tree I did get to do during daylight hours was a trident maple. The pics i took were with my phone to see how that would work out and as you will see they are fine in good light (see the buds pic) and not so great when the light was getting low when i had finished re-potting the tree.

Buds starting to move
I talked about this tree with Boon while he was in Melbourne and also Hirotoshi saito. They both thought that the tree should be rotated slightly to the right. I had been tossing up whether or not to do this for some time before speaking to them but their advice made me decide to go ahead and try it. I am glad I did. A small tweak such as this 15 degree turn makes a lot of difference.

Left: the tree in August 2011. Right: the same tree, August 2012.
The reason I had been debating whether or not to make this change lay in the nebari. In the 2011 picture you can see that the nebari’s spread has a somewhat flat side to it which was facing the front. When it was rotated this formed an angle which is a little strange although there are a few good results of this change. First the slight thickening about 2/3rds of the way up disappears and there is more movement in the trunk. Also the branching is better from this new front.
I also tilted the tree forward a little. this moved the root ball a little and raised the soil in the rear of the pot a bit. I will correct this next re-potting once the roots re-establish themselves in the new position. I think i will also try to move the tree a little more to the right, i shifted it a bit this year but having seen the photos i think it could move over some more.
If you are interested in more of the re-potting process you can see the pics from last year HERE.
I though it about time I updated how the grafts I did back in November were taking. If you look back at THIS post you can see the whole process of how I started this graft.

The graft is beginning to take.
A week or so ago I had to do a demonstration on approach grafting for a local club so I took this tree in as an example and also placed some new grafts onto other areas of its trunk. It was a strange night as we had an earthquake in the middle of my talk. It was a small quake in world standards (5.4 on the Richter scale) but it was the first I had felt. The building shook, doors rattled but it only lasted for about 30 seconds and the talk soon continued. It certainly added an interesting break in the night.
Now that the earth has stopped shaking and im not in front of a meeting group I am able to see how the graft is doing a bit more closely. The graft has begun to take but I think that I will leave it attached to the host branch for at least part of this growing season (ie. next spring). You can see in the above photo that the section after the graft is beginning to grow thicker than the host branch on the other side of the graft. This is a good sign that the grafted branch is beginning to take nutrients from the main trunk. Once it becomes a little thicker I think the union will be much more solid and I will be able to remove the host section of the branch.
I will be doing a whole lot more grafts on this trunk this coming spring so I can begin to build the framework of the branch structure. It really is an easy almost foolproof technique that allows you to get branches where you want quickly. If you have a tree that could benefit from a new branch, give it a go.
Just a small side note, I will be pretty busy for the next few weeks as Hirotoshi Saito is coming to Melbourne to run workshops with various clubs over the next week and a half. I hope to attend as many sessions as possible so will not have a lot of time to update the blog. Hopefully once the workshops are over i will have a bunch of photos from the events to share. For those interested in Hiro’s visit have a look HERE (information about the BSV workshops/ demo and the Ballarat sessions are available in the links section of that page.)
Before I left for Japan a friend (who runs an interesting blog) asked me to take some pictures of bonsai from the side so he could get a good idea of how the trunk lines and apex were constructed.
He has begun growing some stock in the ground and was keen to see how the japanese constructed their trunks. So as I was snapping pics I sometimes remembered to take a few shots from different angles to show a more 3d view of the trunks.
He asked I photograph a wide range of trunks but I realised that the deciduous trees were the only ones that you could easily see the trunk movement and structure so those were what I focused on.
(Left image: front, Right image: Side view)

A medium-sized root over rock Trident maple.

Shohin Trident Maple

Another shohin Trident Maple

A shohin Japanese Maple
Looking back at the photos it is interesting to see just how far forward some of the apexes are. I guess this allows you to get a much more compact apex with many branches. If you imagine standing these apexes up you can picture that it would raise the height of the tree and also spread out the ramification in the top section creating a taller less dense image.
Looking over my own trees at home over the weekend I think that some of them could become more compact and dense from a simple tilting forward of their upper structure. It was a good exercise taking these pictures as I had seen hundreds if not thousands of trees over the years but have never really focused on this one detail. I think I will have to look over all my other photos and pick out individual styling details and see what they reveal.
The following trident maple was ground grown by a friend. Since digging it up I have slowly been preparing it for its future life as bonsai.
One of the things I wanted to do this year was to set a first branch in an area where there was no branching. I used a rough version of approach grafting which I hope to explain below.
Now the method I am using is not as exacting as it could be. The reason for this is the species I am using (Trident Maple). Tridents are very fast growing and forgiving. They also fuse very quickly which is the trait I am hoping to take advantage of in this instance.

Making the cut.
Approach grafting is a fairly straight forward technique. I wrote about it in regards to conifers in two parts HERE and HERE. To approach graft conifers you have to be fairly exact when lining up the cambium layers. Using the below variation you can be a bit less exact if using thin barked deciduous trees.

The finished cut.
Firstly you cut a channel roughly the width and depth of the whip you wish to graft.

The pinned whip.
You then insert the whip and secure it in place so that as it grows it is forced to grow into the cut channel, during which time it grows together with the trunk, fuses and makes the graft.

Hammer time.
In this example I used map pins to secure the graft. I find that the round surface of the pins heads does less damage to the growing and thickening whip than using square-headed pins or those with sharper edges.

The second pin secured.
In this case two pins were used to secure the whip. As Trident maples grow quickly and have relatively thin bark the whip and cut channel should graft together in a relatively short time as they heal and thicken. What is good about this technique is you can use very young whips as you do not need to expose the cambium layer. By not having to expose the cambium layer you avoid having to expose a large percentage of the cambium in the form of a wound and therefore increase the chance of the whip surviving and growing strongly.

Sealed, wired and ready to grow.
After setting the graft I like to lightly wire the whip and direct the tip upwards to ensure it will grow both strongly and leave the graft site at a desired angle.
This graft will be left to grow for the season so it can thicken, fuse and graft itself onto the trunk. I will cut it off the parent whip once I can see a difference in thickness between either side of the graft site. As the graft begins to take it should start to draw sap from the trunk and become noticeably thicker from the graft site onwards.
After I finished placing the graft on the trident maple I decided it was also a good time to clean up a graft on a Chinese Quince from last season. If you look closely you can see the difference in thickness between the grafted branch and the stub that use to be connected to the parent whip.

A successful graft
You can just see the stub below the branch junction where the whip was cut once it had taken.

Stub removed.
I like to leave the stub on for a while until I see the graft growing strongly. I think keeping wounds away from the graft site at least until you are sure the graft is successful is a good idea.

Sealed and finished.
To complete the process it is as simple as cleaning up the stub from where the whip was once attached and sealing the wound. Once the wounds heal and the graft grows for a season or two it will become increasingly difficult to tell that it was a grafted branch.
It is a very simple process all in all and one I use quite often. It can be used with a range of thin barked deciduous trees that show signs of fusing easily. It is an easy technique to do and most of the time returns great results. Some example species to try might be, Trident Maple, Japanese Maple, Chinese Quince, ficus species and other species with similar bark traits.
