
You are currently browsing the tag archive for the ‘Approach grafting’ tag.
While this tree has had a couple of mishaps since I last posted about it, Project Trident 02 has been slowly progressing.
You can read about its beginning HERE.
Since that post, I removed the air layers and have been trying to get as much growth in the grafts I could to help them fuse with the parent trunk. I did have a small failure with the first branch’s graft as i knocked it when moving the tree and broke it.
I re-did that graft and it seems both grafts are growing well now. So well in fact I have decided to go into the next phase of this material’s development.
As I am looking to make a smaller tree I will at some stage have to make a fairly large cut to shorten the main trunk.

The newly taken graft on the left side of the trunk and the re-grafted branch lower on the right.
When making large cuts on bonsai, you should always have some sort of plan as to how you will heal/deal with the resulting wound. My plan with this tree is to heal the cut in phases.
What I plan to do with this tree is make half the cut now, use the growth on the main trunk above the cut to heal it and then sever the remaining half of the trunk. This should leave me with half the scar I would have otherwise .

The first cut.
So I cut through half the trunk with a small saw and then cleaned up this cut with a sharp knife and sealed it all with cut paste.

Cut paste applied.
The idea is that with the main trunk still attached, it will draw sap past the cut site and speed up the healing process. The more growth and sap that moves past a scar, the faster the scar rolls over the wound.
Once this is healed I will cut the other half and heal that side by growing out the branches and new apex of the remaining tree. For the rest of the season I will let the branches grow freely and feed the tree accordingly.

A new back branch.
While I had the tools out I also grafted on a new back branch. With this branch in place the tree will be well on its way towards having its foliage changed to that with much better internode/ leaf quality. I will probably look to graft on one more branch onto and or around the scar that is created when I remove the rest of the main trunk. This should speed up the healing of the final scar.
I will be sure to post some updates as the scar heals.
The trident maple below is this years project. I spotted this tree in a friends garden and loved the big gnarly base. I like the base so much that I have just realised that I don’t have a picture of the whole tree, just photos of the base!

Lumpy flared base.
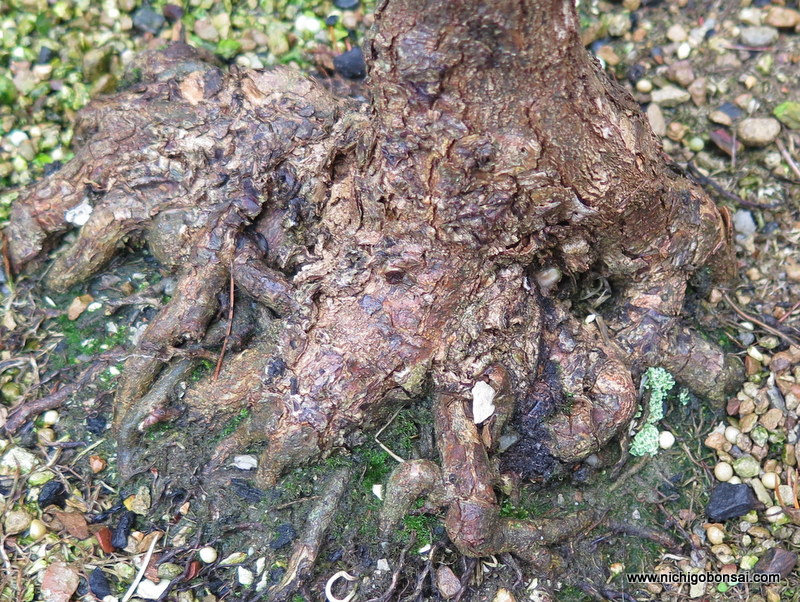
After removing one root, can you see where it came from?
The base has great character but the rest of the tree is tall and directs the eye away from the nebari so I felt I could work on that to improve the tree overall. The other challenge with this trident is that it is a variety with large leaves and long internodes which makes it difficult to make a good canopy, especially on small trees.
I have noticed that other tridents with this growth habit also develop nice bases easily. The down side is that their ramification is course and thick. How can you make use of the base and also have a good foliage canopy?

Approach grafting new foliage.
The answer is to change the foliage. I decided to graft a finer foliage onto the lower section of the trunk so that I can make a shohin sized small tree with a huge powerful base and fine delicate branching.

Seedling being planted in the same pot.
I chose a seedling from a batch that showed good foliage characteristics. That is smaller internodes and compact growth. I planted the seedling into the same pot as the main tree for ease of watering and then grafted the young whip into the main trunk.
I actually grafted it twice into the trunk, once on each side. I bent the seedling into a ‘u’ shape and simple cut a channel in either side of the trunk for the seedling to fit into. One side will become the apex, the other will become the first branch. This way I will have the same foliage on the whole tree once I cut off the main trunk in a year or two.
Even though i am changing the foliage I also wanted to keep the old foliage so i can experiment with it in regards to its base thickening properties. To save the foliage I decided to air layer off the top and the first branch.

The cut made and scraped clean. I actually used some branch cutters to cut a small amount of wood from around the layer site to ensure I got all of the cambian layer.

Sphagnum moss soaked in seaweed extract, all wrapped in strong plastic.
If these layers work, I will probably grow them in pots for a year or two before ground growing them to see if the base flaring/thickening is a genetic trait or just a result of how this tree was grown.
I have noticed that there are tridents that grow good bases and poor ramification and then tridents that do the opposite. Has anyone else noticed this?
I am hoping that I can use cuttings from this tree to grow great bases then graft a good foliage variety on top to finish up the process. Time will tell if this works out or not. If this doesn’t work out I have another seed grown trident that shows similar properties. Fingers crossed.
Every one needs a project or two in their collection. I really enjoy project trees, that is tree that are undergoing various processes to transform them into a new style, shape or form. The problem is that each year project trees undergo their transformation and then move into ramification/maintenance phases leaving me to find new projects.
Trident maples are one of my favorite species to work on and I really enjoy having one as a project. I always have my eye out for something that has plenty of room for improvement. The tree below is one such tree.

The tree as I received it
The tree was an imported trident maple. It had been brought into the country back in the 90’s when Australia’s border protection was much more flexible in regards to bringing bonsai in.
When I got the tree it had been left to grow out for the last 2 years and as a result there was a fair amount of work required to bring it back to its former glory.

After first cutback.
The first thing I did was cut it back hard to stimulate some back budding. It’s branches were quite old so it didn’t bud out how I had hoped. This lead me to go down the path of approach grafting rather than risk cutting off branches and not get any buds pop. I decided to graft on a new set of branches at the base of all the old branches. In total I grafted 5 branches and left the tree to grow.

The grafted branches have taken.
I also re-potted the tree and found a lump of old akadama in the center of the root ball. I bare rooted and picked all the old soil out of the root-ball. Almost immediately after the re-potting the vigour of the tree improved and I was rewarded with strong growth which helped the approach grafts to take. In the above image you can see the grafts emerging from the underside of each branch.

The large branches removed.
This spring I cut off all the large branches as the grafts were now strong enough to take over the sap flow. When I made the cuts I cleaned the wounds up with a knife and then applied cut paste which in my experience helps things heal.

A wound and a grafted branch.
I have left the grafted shoots long and I will let them grow until I am sure that they are strong and well connected to the host trunk. Once I am sure of that (probably in a month or so) I will cut them back to the first internode and then begin growing the branch structure.
Unfortunately the back branch’s graft didn’t take but as luck would have it this spring a bud has popped right at the base of the branch right where I wanted it. Sometime trees do what you want.

The two leaves are the new bud at the base of the back branch.
Once this shoot is strong enough I will also cut off the old thick back branch above.
This spring I also placed the last graft I need, just below the apex. This should allow me to cut off the last heavy branch on the tree without having to chance whether or not I get a bud where I want.
The shoot on the bottom left is bent up to under the apex where it has been approach grafted into the trunk.
Its been fun replacing the branches on this tree and i am looking forward to this season of growth where i can start to grow the branch structure and form the outline of the bonsai. Hopefully in 5 more years this will be a highly ramified and ready to show bonsai. Time will tell.
I have been busy re-potting in the last few weeks and finally managed to get around to doing a project tree that I have been growing for a couple of years. When I first acquired the tree I placed 6 or so root grafts onto the trunk. 3 took and 3 failed. Since then I have been meaning to replace the failed grafts but for what ever reason, every time I have had this tree out of its pot I havent been able to do the grafts.

The Arbortech and the faulty nebari in the back ground. You can see the two vertical scars from last attempt.
The first failures were all down to the fact that the channels that accepted the new shoots were too shallow. As the approach grafted seedlings thickened, they simple pushed away from the trunk instead of fusing. I originally cut the channels with a knife and was only able to cut so deep.
This years remedy was the Arbortech! I do very little machine carving but this tool does get a bit of work this time of year as it is excellent for cutting graft channels.
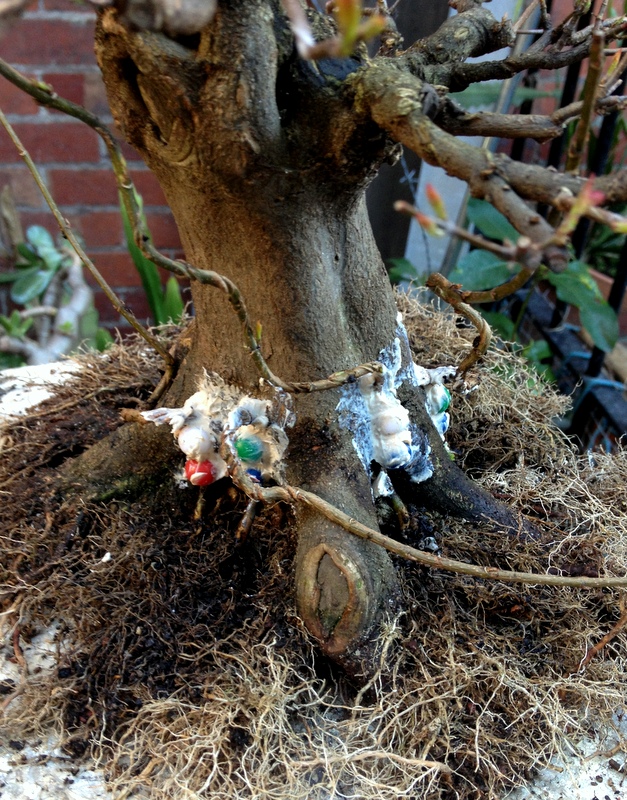
The four new grafts.
The process is dead simple. It is much the same as any other approach graft except instead of using a branch from the same tree you use seedlings as your grafting material.
The basic idea is that you cut a vertical channel in the trunk where you would like some new roots. You then insert a seedling into the channel and adjust it until the seedling’s roots are at the same level as the existing nebari. Then you fix the seedling into the channel (I used big map pins), seal it all up with cut paste and let it grow. Soon enough the seedling will thicken and fuse with the trunk. Cut off the top of the newly grafted seedling and you have new roots where there were previously none. For a better breakdown of the general theory see these two posts. Post 1, Post 2.
This year, the seedlings look a little strange as they are all from the batch of seedlings I bent the year before. Having said that, the bendy little trunks were very useful as I was able to use the first bend to create a good angle for the new roots to leave the trunk from.
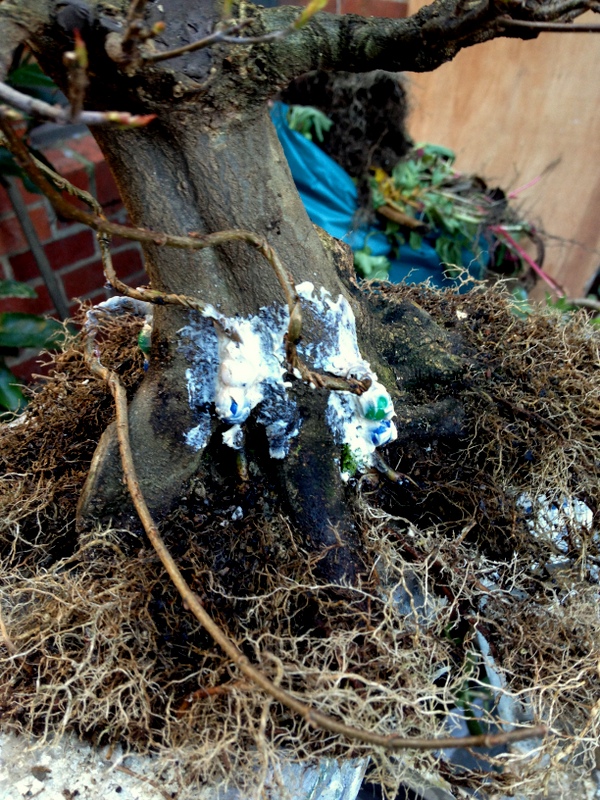
The bendy seedlings are care of a project I started last year.
The new grafts were generously coated in cut paste and then the whole lot was potted back into its training pot.
I imagine that by the end of this rapidly approaching summer the grafts should have taken and I will be able to shorten them back before then some time the following year cutting them flush with the trunk.
Hopefully I remember to take a few pictures along the way.
As I managed to get some time to work on my trees this last weekend, I though it was a good opportunity to do some grafting before my black pines woke up too much. I like to do grafting on black pines just before they start moving in spring. For bud grafting this is important as once the sap starts to move in a big way any cuts made to hold grafts tend to flood with sap before placing the scion which makes them a little less successful. Approach grafts on the other hand are a little more forgiving but if I can I try to do them around the same time so that the burst of energy that comes with the first flush of candles extending goes into healing the graft site.

The graft site will be at the base of the thick bare section of trunk.
I have decided to graft this tree as it has a rather large bare section of trunk. If I can graft a new leader to the base of this I can build a much smaller and more compact tree with the new graft’s growth. Obviously this will be a longer term project but I figure why go down a long road just to end up at a mediocre tree. If this graft takes and the tree develops as I imagine it will be a far greater result in the future than had I just persevered with the existing structure.

The start of the process, a cut in the trunk.
The first step is to create a cut for the graft branch to sit inside. I like to make the cut about 1/4 smaller than the branch that is going to be inserted into it. I start by making the cut with a small saw. I try to make the cut so that it is wider at the rear of the cut than at the front edge. usually this takes two cuts, one slightly slanted upwards and a second slightly downwards. This flared cut will help the scion branch to lock into the cut.
Once I have made the first pass with the saw I clean up the cut with a knife so that I have clean and neat surfaces upon which the graft can be placed.

Some bark removed from the graft branch.
Next I remove a small slither of bark from either side of the scion branch. Make sure that you check where to make these cuts prior to getting the knife out as it is important that these cut surfaces line up with the cut surfaces you made with the saw. I usually find that the knife cute that clean up the saw cuts combined with the cuts on the scion branch tend to eliminate the 1/4 under size that was initially cut with the saw.

The graft made.
The Scion branch can now be inserted into the cut in the trunk. The fit should be snug and tight. Small adjustments might be needed to be made to the channel in the trunk to make sure things are all snug. If the channel is on the large side it is best to chock the scion branch so that it contacts firmly with the lower surface of the channel cut. (I use small twigs as chocks.) As sap runs from the roots up, contacting the lower surface will ensure that the graft has a better chance of taking than had it only contacted the upper surface. Either way, the scion should be firmly touching at least one cut surface on the channel in the trunk.

Sealed and held tightly in place.
Finally you simply seal the graft union and hold the scion firmly in place so that it cannot move and disturb the graft before it has had a chance to take.
The speed at which the graft takes will depend on the amount of growth you allow to occur on the scion branch and above the graft site. Obviously the more the trunk and scion branch grow and expand the more chance the graft has of taking. I would hazard a guess that this graft will be taken by the end of this coming seasons growth. Having said that I will probably cut off the growth above it in stages so it may be two seasons before I actually sever the scion branch from its original source.
I though it about time I updated how the grafts I did back in November were taking. If you look back at THIS post you can see the whole process of how I started this graft.

The graft is beginning to take.
A week or so ago I had to do a demonstration on approach grafting for a local club so I took this tree in as an example and also placed some new grafts onto other areas of its trunk. It was a strange night as we had an earthquake in the middle of my talk. It was a small quake in world standards (5.4 on the Richter scale) but it was the first I had felt. The building shook, doors rattled but it only lasted for about 30 seconds and the talk soon continued. It certainly added an interesting break in the night.
Now that the earth has stopped shaking and im not in front of a meeting group I am able to see how the graft is doing a bit more closely. The graft has begun to take but I think that I will leave it attached to the host branch for at least part of this growing season (ie. next spring). You can see in the above photo that the section after the graft is beginning to grow thicker than the host branch on the other side of the graft. This is a good sign that the grafted branch is beginning to take nutrients from the main trunk. Once it becomes a little thicker I think the union will be much more solid and I will be able to remove the host section of the branch.
I will be doing a whole lot more grafts on this trunk this coming spring so I can begin to build the framework of the branch structure. It really is an easy almost foolproof technique that allows you to get branches where you want quickly. If you have a tree that could benefit from a new branch, give it a go.
Just a small side note, I will be pretty busy for the next few weeks as Hirotoshi Saito is coming to Melbourne to run workshops with various clubs over the next week and a half. I hope to attend as many sessions as possible so will not have a lot of time to update the blog. Hopefully once the workshops are over i will have a bunch of photos from the events to share. For those interested in Hiro’s visit have a look HERE (information about the BSV workshops/ demo and the Ballarat sessions are available in the links section of that page.)
The following trident maple was ground grown by a friend. Since digging it up I have slowly been preparing it for its future life as bonsai.
One of the things I wanted to do this year was to set a first branch in an area where there was no branching. I used a rough version of approach grafting which I hope to explain below.
Now the method I am using is not as exacting as it could be. The reason for this is the species I am using (Trident Maple). Tridents are very fast growing and forgiving. They also fuse very quickly which is the trait I am hoping to take advantage of in this instance.

Making the cut.
Approach grafting is a fairly straight forward technique. I wrote about it in regards to conifers in two parts HERE and HERE. To approach graft conifers you have to be fairly exact when lining up the cambium layers. Using the below variation you can be a bit less exact if using thin barked deciduous trees.

The finished cut.
Firstly you cut a channel roughly the width and depth of the whip you wish to graft.

The pinned whip.
You then insert the whip and secure it in place so that as it grows it is forced to grow into the cut channel, during which time it grows together with the trunk, fuses and makes the graft.

Hammer time.
In this example I used map pins to secure the graft. I find that the round surface of the pins heads does less damage to the growing and thickening whip than using square-headed pins or those with sharper edges.

The second pin secured.
In this case two pins were used to secure the whip. As Trident maples grow quickly and have relatively thin bark the whip and cut channel should graft together in a relatively short time as they heal and thicken. What is good about this technique is you can use very young whips as you do not need to expose the cambium layer. By not having to expose the cambium layer you avoid having to expose a large percentage of the cambium in the form of a wound and therefore increase the chance of the whip surviving and growing strongly.

Sealed, wired and ready to grow.
After setting the graft I like to lightly wire the whip and direct the tip upwards to ensure it will grow both strongly and leave the graft site at a desired angle.
This graft will be left to grow for the season so it can thicken, fuse and graft itself onto the trunk. I will cut it off the parent whip once I can see a difference in thickness between either side of the graft site. As the graft begins to take it should start to draw sap from the trunk and become noticeably thicker from the graft site onwards.
After I finished placing the graft on the trident maple I decided it was also a good time to clean up a graft on a Chinese Quince from last season. If you look closely you can see the difference in thickness between the grafted branch and the stub that use to be connected to the parent whip.

A successful graft
You can just see the stub below the branch junction where the whip was cut once it had taken.

Stub removed.
I like to leave the stub on for a while until I see the graft growing strongly. I think keeping wounds away from the graft site at least until you are sure the graft is successful is a good idea.

Sealed and finished.
To complete the process it is as simple as cleaning up the stub from where the whip was once attached and sealing the wound. Once the wounds heal and the graft grows for a season or two it will become increasingly difficult to tell that it was a grafted branch.
It is a very simple process all in all and one I use quite often. It can be used with a range of thin barked deciduous trees that show signs of fusing easily. It is an easy technique to do and most of the time returns great results. Some example species to try might be, Trident Maple, Japanese Maple, Chinese Quince, ficus species and other species with similar bark traits.
Following on from yesterdays post I thought it would be good to include some examples of approach grafts that were at Taisho en while I was studying. The two examples below are using approach grafting for two different reasons. The first is grafting roots onto an upper section of a trunk to shorten a bonsai. The other is using the technique to both replace foliage and graft on new roots.

What do you do when you want to shorten the trunk of a species such as Tsuga that doesn't aerial layer well? Approach graft!

Here you can see some new roots being grafted to a Tsuga trunk. The roots have been wrapped in cloth and are both watered and fed as if in a standard pot.
The taxus tsuga above was an interesting bonsai with an un-interesting lower trunk. The image of the bonsai could be greatly improved by shortening the trunk and hence roots were approach grafted onto the trunk.
The below juniper was undergoing a major change too. It was a tosho or japanese needle juniper (Juniperus rigida). It was very large stock extending about 2-2.5 meters in length. It had some great movement and excellent jin/shari. The future for this tree was to break it up into sections. By grafting new roots and new foliage along the live vein at key points the large piece of stock would be able to be broken down into 3 or 4 bonsai, all with nice movement and good foliage. Shimpaku juniper was grafted onto the tree instead of more tosho as it is a more popular species and therefore easier to sell once the separation is complete.

As you can see this is a large piece of stock that is both too big to become an exhibitable bonsai (by Japanese standards) and the foliage is that of needle juniper which is not popular in Japan at the moment. How would you improve this material? Approach grafting.

In this case roots are being grafted onto a section of live vein in order to allow the entire trunk to be split up into smaller individual bonsai.
Hopefully from these two posts you can see the possibilities that this technique can provide. The ability to manipulate your stock and bonsai is a powerful tool in the bonsai artists arsenal. Shortening trunks, adding branches and changing foliage types can be controversial in some bonsai circles but I think that when push comes to shove the results speak for themselves.
I have been quite lucky that I have been able to visit a number of Japanese nurseries (SEE HERE). I love seeing the high quality trees and amazing level of finish and polish that these trees posses, but what I have also found very interesting during these visits is looking into the back of house areas where bonsai are in various stages of transformation.
Air layers, grafts and other techniques are all on display out the back of most nurseries. It not only gives you a look into these techniques but also gives you some ideas on what sort of material to apply these techniques to.
One such technique is approach grafting.

A needle juniper is slowly changing its clothes. Soon it will be a much more valuable shimpaku. The white lump is the rootball of the scion which is wrapped in towel to protect its roots.
While I was studying at Taisho-en I was able to see this technique used to improve a range of stock. Shimpaku were given smaller foliage. Needle junipers were given shimpauk foliage. Roots were moved closer to the foliage to shorten trunks. It was obvious that after only a short stroll through their back of house that this was a valuable technique.
The technique itself, whether you are grafting on new roots or new foliage, is rather simple.
- Find a scion whip of the same species around 1-2 pencils thick and slice a sliver of bark off opposite sides at the point you want the whip to be grafted.
- Cut a channel in the trunk the same depth as the whip is thick.
- Widen this channel with a sharp knife to ensure clean cuts. The width of the channel should make a snug fit for the cut down section of scion.
- insert the scion into the stock trunks channel. Ensure that the cambium layers meet up accurately along the top edge of the channel cut.
- Fix the scion into the channel so it will not move or become miss-aligned. You can tie it with grafting tape or use a nail or two, screw etc.
- Cover it all in some type of sealant and wait for it to take.

I drew up a quick diagram to help explain the technique a little.
The scion whip can be from several sources. It could be a long branch doubled back on itself and grafted into the trunk, or could be a small whip that is growing in its own pot. If your scion is of the second type you may need to wrap the root ball in hessian or towel if the root ball ends up in a strange position after being grafted.
How long does the graft take to be successful? That is a difficult question. It is species dependent, growth dependent and also depends on how well you aligned the cambium layers in the first place. Although you can have success with poorly aligned cambium layers in this technique due to the face that both scion and stock support themselves before the graft takes, it is much faster to align the cambium correctly from the get go. I would say that most approach grafts would need one to two years to take. After that you could begin to reduce the original foliage over time and slowly let the new grafted foliage take over.
All in all it is a very useful technique that can be use to get you new roots, new foliage and generally improve difficult stock.
In the next day or so I will be posting a few examples to further illustrate the technique.
To see some real life examples have a look at “Approach grafting 2”.
