
You are currently browsing the tag archive for the ‘Grafting’ tag.
This pine was one I dug (liberated) locally. Essentially a weed in our native forests i was happy to stumble across this one with it’s strange movement and old bark.
It has taken a number of years to get it out of the heavy old clay it grew in and into a better soil mix.
Last year i stripped off the site soil and put it into a shallow bonsai pot (all i had).


This year i put it into a much more suitable container (thanks again Ken). It should be able to stay in here for a few years as it establishes a dense root ball. Once it’s solidly rooted i will hopefully be able to remove the support sticks.
I may post an update once i see if the grafts live or die. The variety of pine is the same as THIS one, so i think i should have a decent chance of grafting success. Fingers crossed.
It seems a consistent theme is me not updating my blog. Well, it’s been a long time between posts again so figured I should make an update…..
I’ve been fairly active doing various things within the garden and have recently been involved in a local bonsai gathering with some bonsai mates which has spurred my passion for bonsai along again.
During one of these catch up’s I brought along and worked on the tree features in this post. It has featured on the blog before (2012) as per the post below. That said, it has changed quite dramatically since then.
I was never entirely happy with the procumbens foliage on this tree. It could be made to look good but it grew quickly and needed a lot of up-keep to maintain at its best. So I decided to graft it with Itoigawa.
It turns out that this was a long process from which I’ve learnt a few things.
Probably the biggest take away was the size of the scions to use. I had originally used small pieces of scion foliage on the belief they would perspire less and therefore have a higher chance of success. This was the case and they were successful, but they took forever to build up enough strength to grow into something I could think about styling and or cutting the original foliage back to (think several years post graft success).
The next round of grafting I used much larger whips as scions. (probably in the 150-200mm long range.) I found that the extra foliage, almost immediately, built up strength and vigor and as a result could be utilised in much shorter time frames post grafting.
It took me a few years to learn these lessons so the ‘changing of clothes’ process took a lot longer than it might have otherwise. That said, I am now using these learnings on other trees and benefiting from the previous errors. You will see from the image below, I am growing out some whips on this tree to be used as grafts on other stock.
To cut a long story short, I finally got around to doing a structural styling on the new foliage on this tree and I am pretty happy with where it stands. It has a lot of growing to do to fill out and develop secondary and tertiary structure but its now on a good path.

The questions remains though, is this a procumbens juniper (sonare) or an itoigawa?
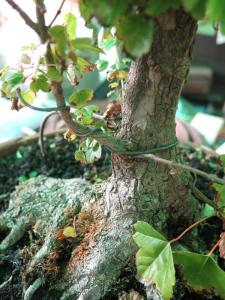
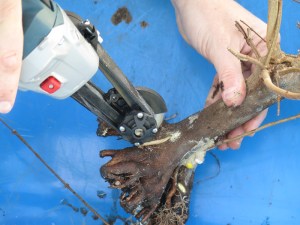
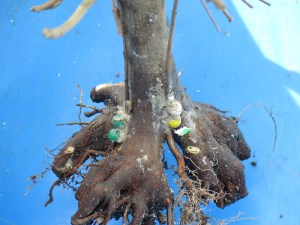
I am trying to repot a handful of trees each weekend in the lead up to spring to get ahead of the growth that seems to be quickly approaching. One of the trees I potted last weekend was the below, tall Japanese white pine.
The little pine didn’t start it’s life as a white pine and in fact was collected (liberated) from a local pine plantation’s roadside where it had self sown. I collected it really only to test as grafting stock.
It had some nice bark and a strange curve atop an otherwise straight trunk. It was also very thin which meant it had a small root ball and was easy to collect.
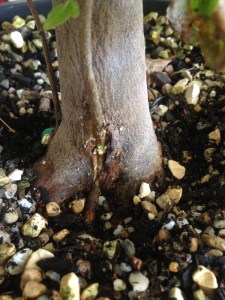
Turns out that it took the graft really well and the white pine foliage I grafted on has thrived.

After the graft being successful I think I let it grow out for a couple of years before I cut all the original foliage off. Essentially I was able to replace the long (20cm-ish) and shaggy original pine foliage with neat and compact white pine.
After the experiment was confirmed a success, I decided I should probably do something with it so I styled the tree and finally got it into a pot.

I really like how this one has turned out for what was just an experiment. It has a lot of development and growing to do before it is any more than styled stock but I think its off to an interesting start. I am really liking the tall-ness of this tree and it has made me want to go and dig a handful more so I could graft them and assemble a group. I did have to remove the tap root this re-potting but it had few feeder roots growing from it so fingers crossed it is a quick recovery.
While this tree has had a couple of mishaps since I last posted about it, Project Trident 02 has been slowly progressing.
You can read about its beginning HERE.
Since that post, I removed the air layers and have been trying to get as much growth in the grafts I could to help them fuse with the parent trunk. I did have a small failure with the first branch’s graft as i knocked it when moving the tree and broke it.
I re-did that graft and it seems both grafts are growing well now. So well in fact I have decided to go into the next phase of this material’s development.
As I am looking to make a smaller tree I will at some stage have to make a fairly large cut to shorten the main trunk.
The newly taken graft on the left side of the trunk and the re-grafted branch lower on the right.
When making large cuts on bonsai, you should always have some sort of plan as to how you will heal/deal with the resulting wound. My plan with this tree is to heal the cut in phases.
What I plan to do with this tree is make half the cut now, use the growth on the main trunk above the cut to heal it and then sever the remaining half of the trunk. This should leave me with half the scar I would have otherwise .

The first cut.
So I cut through half the trunk with a small saw and then cleaned up this cut with a sharp knife and sealed it all with cut paste.

Cut paste applied.
The idea is that with the main trunk still attached, it will draw sap past the cut site and speed up the healing process. The more growth and sap that moves past a scar, the faster the scar rolls over the wound.
Once this is healed I will cut the other half and heal that side by growing out the branches and new apex of the remaining tree. For the rest of the season I will let the branches grow freely and feed the tree accordingly.

A new back branch.
While I had the tools out I also grafted on a new back branch. With this branch in place the tree will be well on its way towards having its foliage changed to that with much better internode/ leaf quality. I will probably look to graft on one more branch onto and or around the scar that is created when I remove the rest of the main trunk. This should speed up the healing of the final scar.
I will be sure to post some updates as the scar heals.
The blog has taken a bit of a back seat of late. I notice that my last post was from back in July last year! Things have been pretty busy since then with moving to a new city, starting a new job, renovating an old house and having a child all leaving me with very little time for bonsai related work.
That said I have been able to get the tools out from time to time and have been styling customers trees and working on my own trees as time has allowed.
To kick off 2016 and start the blog off a fresh I thought a small photo essay of some grafting I did earlier this spring might be a good way to get things back into gear. The tree in question came from Shibui Bonsai and had just been lifted from the grow beds and showed the results of the early work Neil puts into these trees. It had a good start to build a really nice base upon so i decided to begin that process with some root grafting. Photos below:

A trident Maple that was field grown with pretty good roots. There were a couple of gaps which I decided could be filled in with some approach grafts. You can see the small trident whips that were selected to be used for the grafts in the background.
A trident Maple that was field grown with pretty good roots. There were a couple of gaps which I decided could be filled in with some approach grafts. You can see the small trident whips that were selected to be used for the grafts in the background.

A trident Maple that was field grown with pretty good roots. There were a couple of gaps which I decided could be filled in with some approach grafts. You can see the small trident whips that were selected to be used for the grafts in the background.
A trident Maple that was field grown with pretty good roots. There were a couple of gaps which I decided could be filled in with some approach grafts. You can see the small trident whips that were selected to be used for the grafts in the background.

A trident Maple that was field grown with pretty good roots. There were a couple of gaps which I decided could be filled in with some approach grafts. You can see the small trident whips that were selected to be used for the grafts in the background.
A trident Maple that was field grown with pretty good roots. There were a couple of gaps which I decided could be filled in with some approach grafts. You can see the small trident whips that were selected to be used for the grafts in the background.
As I managed to get some time to work on my trees this last weekend, I though it was a good opportunity to do some grafting before my black pines woke up too much. I like to do grafting on black pines just before they start moving in spring. For bud grafting this is important as once the sap starts to move in a big way any cuts made to hold grafts tend to flood with sap before placing the scion which makes them a little less successful. Approach grafts on the other hand are a little more forgiving but if I can I try to do them around the same time so that the burst of energy that comes with the first flush of candles extending goes into healing the graft site.

The graft site will be at the base of the thick bare section of trunk.
I have decided to graft this tree as it has a rather large bare section of trunk. If I can graft a new leader to the base of this I can build a much smaller and more compact tree with the new graft’s growth. Obviously this will be a longer term project but I figure why go down a long road just to end up at a mediocre tree. If this graft takes and the tree develops as I imagine it will be a far greater result in the future than had I just persevered with the existing structure.

The start of the process, a cut in the trunk.
The first step is to create a cut for the graft branch to sit inside. I like to make the cut about 1/4 smaller than the branch that is going to be inserted into it. I start by making the cut with a small saw. I try to make the cut so that it is wider at the rear of the cut than at the front edge. usually this takes two cuts, one slightly slanted upwards and a second slightly downwards. This flared cut will help the scion branch to lock into the cut.
Once I have made the first pass with the saw I clean up the cut with a knife so that I have clean and neat surfaces upon which the graft can be placed.

Some bark removed from the graft branch.
Next I remove a small slither of bark from either side of the scion branch. Make sure that you check where to make these cuts prior to getting the knife out as it is important that these cut surfaces line up with the cut surfaces you made with the saw. I usually find that the knife cute that clean up the saw cuts combined with the cuts on the scion branch tend to eliminate the 1/4 under size that was initially cut with the saw.

The graft made.
The Scion branch can now be inserted into the cut in the trunk. The fit should be snug and tight. Small adjustments might be needed to be made to the channel in the trunk to make sure things are all snug. If the channel is on the large side it is best to chock the scion branch so that it contacts firmly with the lower surface of the channel cut. (I use small twigs as chocks.) As sap runs from the roots up, contacting the lower surface will ensure that the graft has a better chance of taking than had it only contacted the upper surface. Either way, the scion should be firmly touching at least one cut surface on the channel in the trunk.

Sealed and held tightly in place.
Finally you simply seal the graft union and hold the scion firmly in place so that it cannot move and disturb the graft before it has had a chance to take.
The speed at which the graft takes will depend on the amount of growth you allow to occur on the scion branch and above the graft site. Obviously the more the trunk and scion branch grow and expand the more chance the graft has of taking. I would hazard a guess that this graft will be taken by the end of this coming seasons growth. Having said that I will probably cut off the growth above it in stages so it may be two seasons before I actually sever the scion branch from its original source.
I have been quite lucky that I have been able to visit a number of Japanese nurseries (SEE HERE). I love seeing the high quality trees and amazing level of finish and polish that these trees posses, but what I have also found very interesting during these visits is looking into the back of house areas where bonsai are in various stages of transformation.
Air layers, grafts and other techniques are all on display out the back of most nurseries. It not only gives you a look into these techniques but also gives you some ideas on what sort of material to apply these techniques to.
One such technique is approach grafting.

A needle juniper is slowly changing its clothes. Soon it will be a much more valuable shimpaku. The white lump is the rootball of the scion which is wrapped in towel to protect its roots.
While I was studying at Taisho-en I was able to see this technique used to improve a range of stock. Shimpaku were given smaller foliage. Needle junipers were given shimpauk foliage. Roots were moved closer to the foliage to shorten trunks. It was obvious that after only a short stroll through their back of house that this was a valuable technique.
The technique itself, whether you are grafting on new roots or new foliage, is rather simple.
- Find a scion whip of the same species around 1-2 pencils thick and slice a sliver of bark off opposite sides at the point you want the whip to be grafted.
- Cut a channel in the trunk the same depth as the whip is thick.
- Widen this channel with a sharp knife to ensure clean cuts. The width of the channel should make a snug fit for the cut down section of scion.
- insert the scion into the stock trunks channel. Ensure that the cambium layers meet up accurately along the top edge of the channel cut.
- Fix the scion into the channel so it will not move or become miss-aligned. You can tie it with grafting tape or use a nail or two, screw etc.
- Cover it all in some type of sealant and wait for it to take.

I drew up a quick diagram to help explain the technique a little.
The scion whip can be from several sources. It could be a long branch doubled back on itself and grafted into the trunk, or could be a small whip that is growing in its own pot. If your scion is of the second type you may need to wrap the root ball in hessian or towel if the root ball ends up in a strange position after being grafted.
How long does the graft take to be successful? That is a difficult question. It is species dependent, growth dependent and also depends on how well you aligned the cambium layers in the first place. Although you can have success with poorly aligned cambium layers in this technique due to the face that both scion and stock support themselves before the graft takes, it is much faster to align the cambium correctly from the get go. I would say that most approach grafts would need one to two years to take. After that you could begin to reduce the original foliage over time and slowly let the new grafted foliage take over.
All in all it is a very useful technique that can be use to get you new roots, new foliage and generally improve difficult stock.
In the next day or so I will be posting a few examples to further illustrate the technique.
To see some real life examples have a look at “Approach grafting 2”.
