
You are currently browsing the tag archive for the ‘itoigawa’ tag.
I finally got around to finishing the last round of work on the this tree.
Since i wrote the last update on this tree i have been slowly adjusting some of the deadwood and mulling over various adjustments and future plans.
It really needed an angle change and a better pot. As luck would have it I have just got back from a trip to Japan where I found a pot I thought might work well with this tree.
Upon arriving home, being at the beginning of re-potting season I got straight into getting this tree into its new container. I think it is a good fit. I like the colour, shape and size and it should leave a decent amount of soil available for the tree to grow strongly and fill in over the next season.
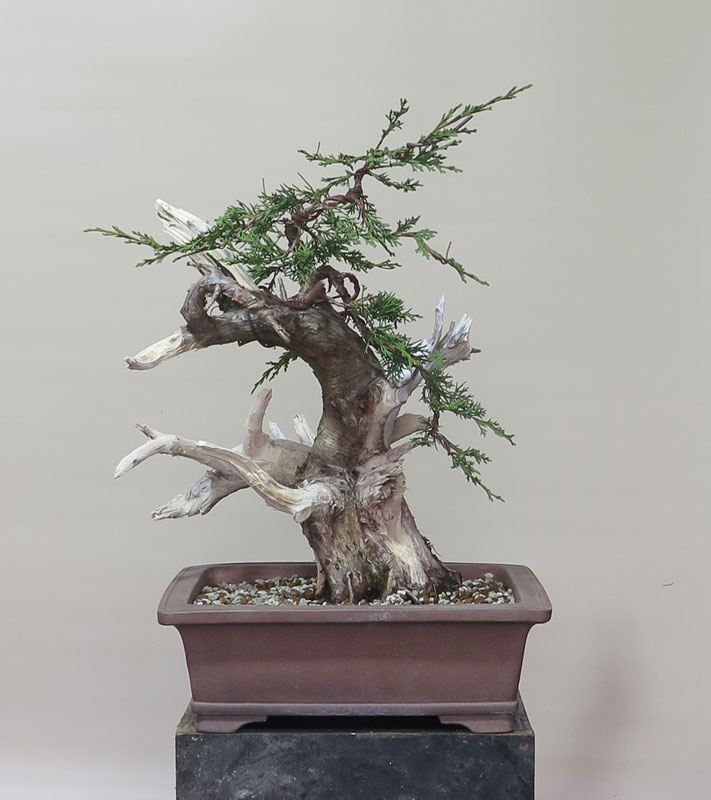
I messed around with fronts and planting angles a fair bit and landed on the above.
It’s so good to have the tree now potted at what is at least very close to the final angle and into a pot that is much nicer proportioned than it’s previous home.
I am glad i re-potted this tree this season as i found a lot of old garden soil in close to the trunk that i was able to remove and replace with bonsai mix. It should set things up for a bright future.
I have a number of other junipers i will be grafting in the next couple of months and will try to get pics as i do. It is a great way to produce bonsai material as you can see from the above tree.
Today’s post is a quick update on a tree that has been in the works for a number of years. I am not sure when I dug this originally but it was certainly a while ago, five years ago perhaps?
The juniper was originally a Sabina Juniper that came from a local school that was removing the garden bed in which it was planted. A good friend put me onto it and we both dug this and a couple of other similar trunks.

Once I had brought it back to some health from the original dig I set about grafting the foliage over to Itoigawa. While Sabina foliage is fine, after many years persevering and working on trees with sub par foliage i now look to grown trees with the best characteristics. With the amount of time you put into your bonsai i don’t want to be investing that time into a foliage characteristic that will always have down sides. Hence the grafting.
I ended up with two grafts that took and have been growing them out and strengthening them over the last couple of seasons prior to thinking about styling.
I finally got around to doing a rough first styling last night.

Obviously the tree has a long way to go, judging by the timelines with THIS tree, it will be another 2-3 years before this bonsai starts to properly take shape.
That said, it was good to get into this styling and set some structure that the future of the tree will grow upon.
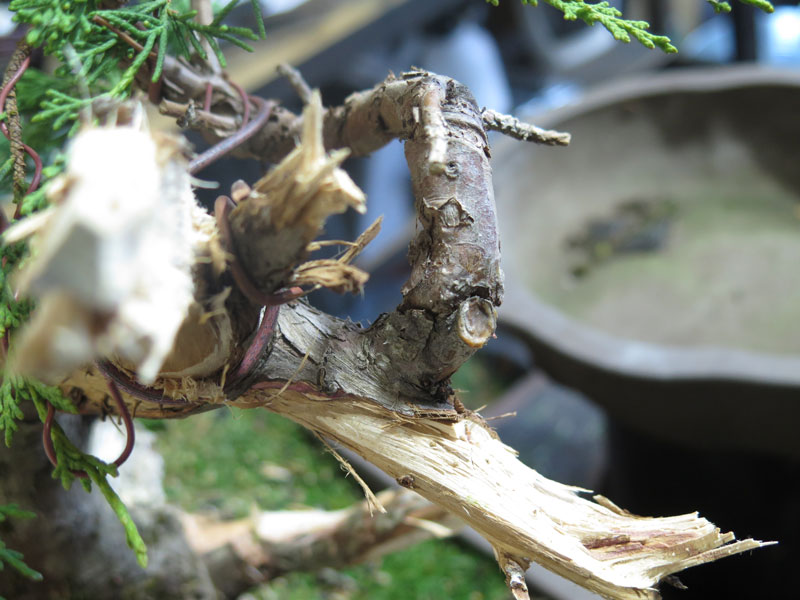
As I worked my way through the basic pruning of the tree i decided to move the direction of the tree back towards the right hand side. As part of this re-directing of the movement of the trunk over to the right, i also began modifying the deadwood to reinforce this movement. I will also need to grow the top of the tree further over toward the right as the tree progresses.
The dead wood still needs a lot of work, i need to spend a bit more time going over the bark and finding the live veins and cleaning dead bark from the deadwood sections as well as continuing to carve the shari and jins.
For carving I very much prefer hand tools for this carving. Chisels, large slip-joint pliers, branch splitters and various other tools all get a good work out. It’s a much slower way of carving but I think it creates a much more natural end result.
The one electric tool I do use is a wire brush on either an angle grinder or drill to strip hard to remove bark and smooth out the fibers from the hand carving………. But carving techniques are probably a topic for another post.
I am looking forward to finishing stripping the old bark so I can get some lime sulphur onto the wood and begin to get the contrast between all the colours to develop. This winter i plan on spending some more time on the dead wood so will post an update when it is further refined.
I also need to start thinking about what pot to put it in. I have a trip to Japan later this year to visit family and will keep an eye out while I am there but I’m still not entirely sure what style to use. If you have any ideas or good examples I’d love to hear about it in the comments below.
Just a quick update on how this tree is developing. It was in the workshop recently for a cleanup (mainly as an excuse to play with THIS).
It is proving to be both a really useful and fun tool to use around the collection. It’s an amazingly quick way to clean up deadwood, remove built up muck, staining and compact dirt from trunks and roots and even stones. Ive had trident maples with dark staining on their lower trunks for years, this is the first season they are clean!! Its a tool that is well worth the investment if you have similar tasks in your own trees.

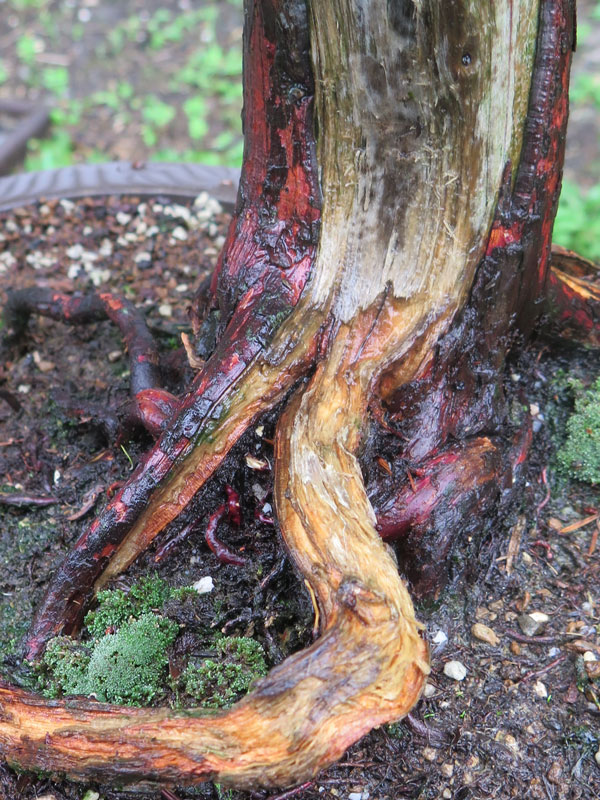
The above comparison shows what 2 minutes can do with one of these tools. You can probably also see that it has removed a lot of the rotten, punky deadwood in the process leaving behind the harder heartwood which has saved another task. All i will need to do is a final hand clean and we are ready for a new coat of lime sulphur.
I am going to also give this ‘Alchohol & Resin’ wood hardener a go this year and see how that works in some of the more prone to rot areas.
As for the tree itself, it is building momentum and developing quickly now and i am contemplating on displaying it at a local show mid next year if it continues to go from strength to strength and i can get all the foliage as developed as the lower first branches pads are.
Its an interesting tree to look at over time as per the images below:


So back to the work, after a good cleaning the shari and deadwood was re-limesulphured and the bark somewhat cleaned up. Its growing into a nice tree.

While I had the tree on the bench i also thinned and shaped the live veins a little on the rear of the tree to further define them and ideally encourage them to ‘plump up’. Afterwards I gave the shari areas and jins a good fresh coat of lime sulphur and added some moss while I waited for things to dry. As I was applying the moss i also pulled and tied down the root on the left side that was hovering above the soil surface which I think was an easy improvement to make.

Next time this tree is on the bench I need to remove and likely re-wire the foliage and branching, but I am going to wait for things to fill in a little more before I do that, maybe next month’s task.
Wow, it’s been a while since last posted. Life has been busy but bonsai has been still been ticking away in the background (mostly after dark / kids bed time). At the moment, re-potting is in full swing with the first warm days hinting at springs approach.
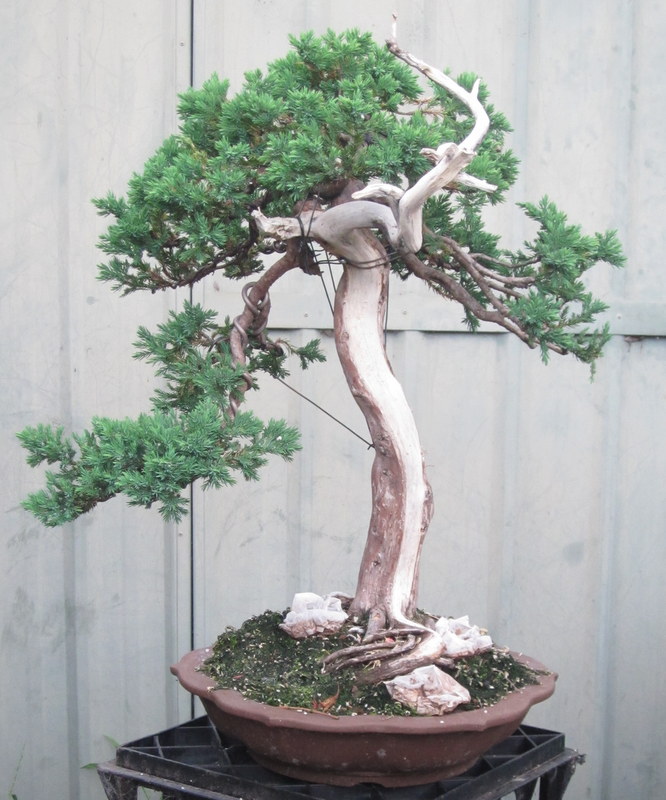
Looking at the last post I made, (https://nichigobonsai.com/2022/09/05/the-tree-previously-know-as-sonare/) I thought it only fitting to re-visit this tree as it was interesting to see how much this tree has developed in 12 months.
I re-potted it into a new shaped container which i think suits it more and gives it a little more root room, which in turn i hope converts to a season of healthy foliage growth to further fill out the silhouette.
2022 on the left and 2023 of the right. The grafts certainly seem to have taken well and are now thriving! I think i can comfortably say this is a (grafted) Itoigawa juniper now.
I have a bunch more re-potting posts to come which should give updates to some previously featured as well as some new to the blog trees. Until then……
It seems a consistent theme is me not updating my blog. Well, it’s been a long time between posts again so figured I should make an update…..
I’ve been fairly active doing various things within the garden and have recently been involved in a local bonsai gathering with some bonsai mates which has spurred my passion for bonsai along again.
During one of these catch up’s I brought along and worked on the tree features in this post. It has featured on the blog before (2012) as per the post below. That said, it has changed quite dramatically since then.
I was never entirely happy with the procumbens foliage on this tree. It could be made to look good but it grew quickly and needed a lot of up-keep to maintain at its best. So I decided to graft it with Itoigawa.
It turns out that this was a long process from which I’ve learnt a few things.
Probably the biggest take away was the size of the scions to use. I had originally used small pieces of scion foliage on the belief they would perspire less and therefore have a higher chance of success. This was the case and they were successful, but they took forever to build up enough strength to grow into something I could think about styling and or cutting the original foliage back to (think several years post graft success).
The next round of grafting I used much larger whips as scions. (probably in the 150-200mm long range.) I found that the extra foliage, almost immediately, built up strength and vigor and as a result could be utilised in much shorter time frames post grafting.
It took me a few years to learn these lessons so the ‘changing of clothes’ process took a lot longer than it might have otherwise. That said, I am now using these learnings on other trees and benefiting from the previous errors. You will see from the image below, I am growing out some whips on this tree to be used as grafts on other stock.
To cut a long story short, I finally got around to doing a structural styling on the new foliage on this tree and I am pretty happy with where it stands. It has a lot of growing to do to fill out and develop secondary and tertiary structure but its now on a good path.
The questions remains though, is this a procumbens juniper (sonare) or an itoigawa?
