
You are currently browsing the tag archive for the ‘Australia Bonsai’ tag.
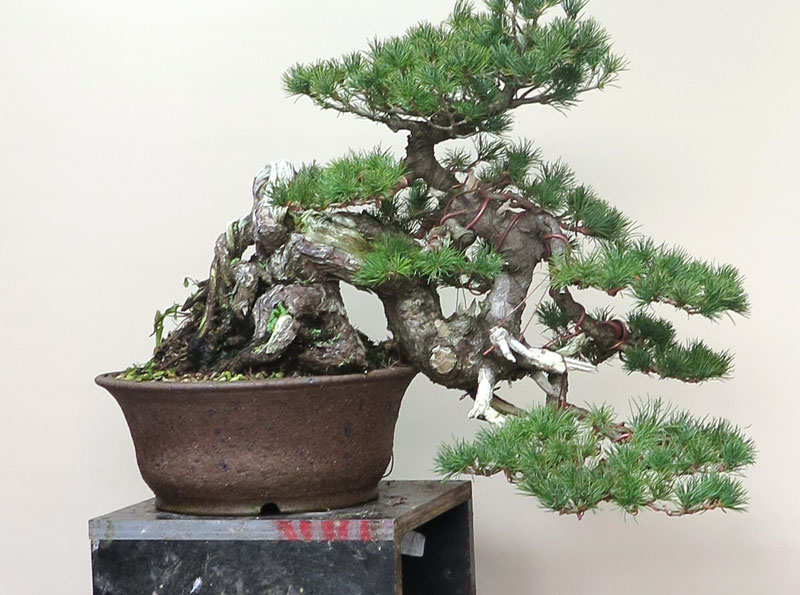
I’ve been wanting to work on this little black pine for a while. I had an idea while watering last summer and have since been waiting for the seasons to change and temps to come down, sap to slow and the tree to be in a place where a heavy bend was as low risk as it was ever going to be.
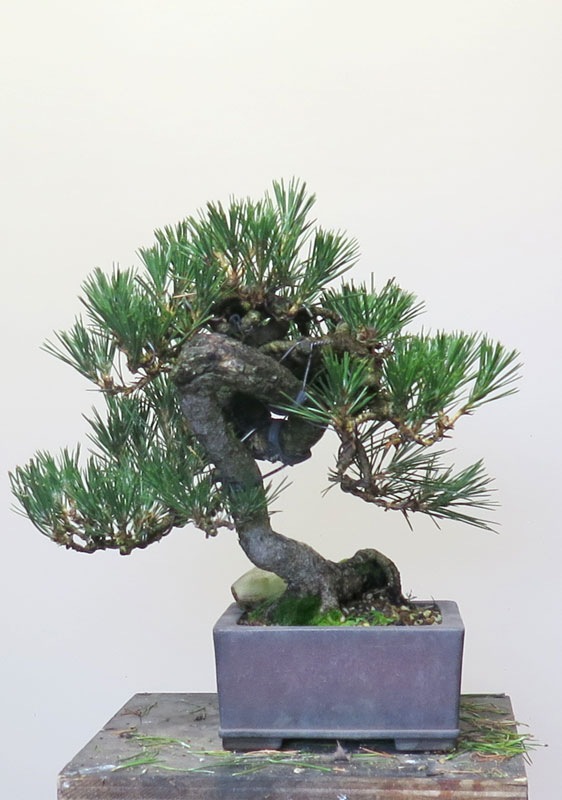
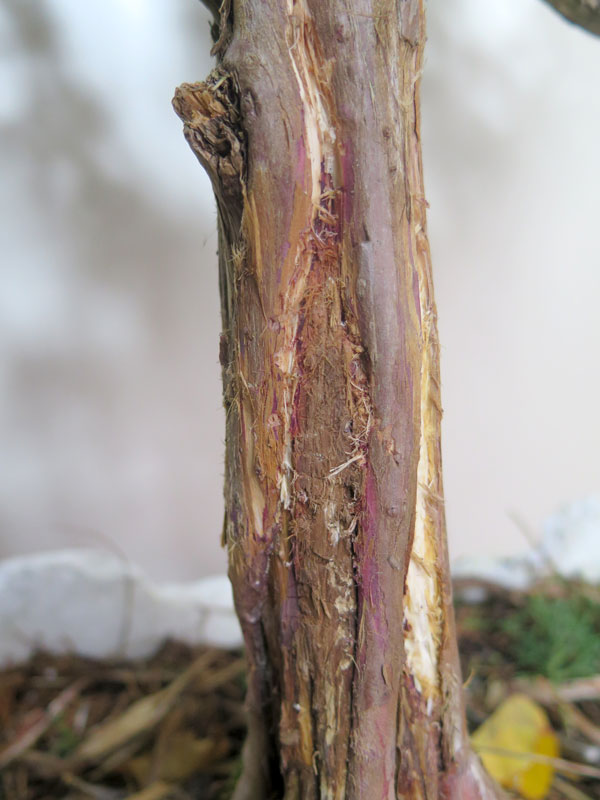
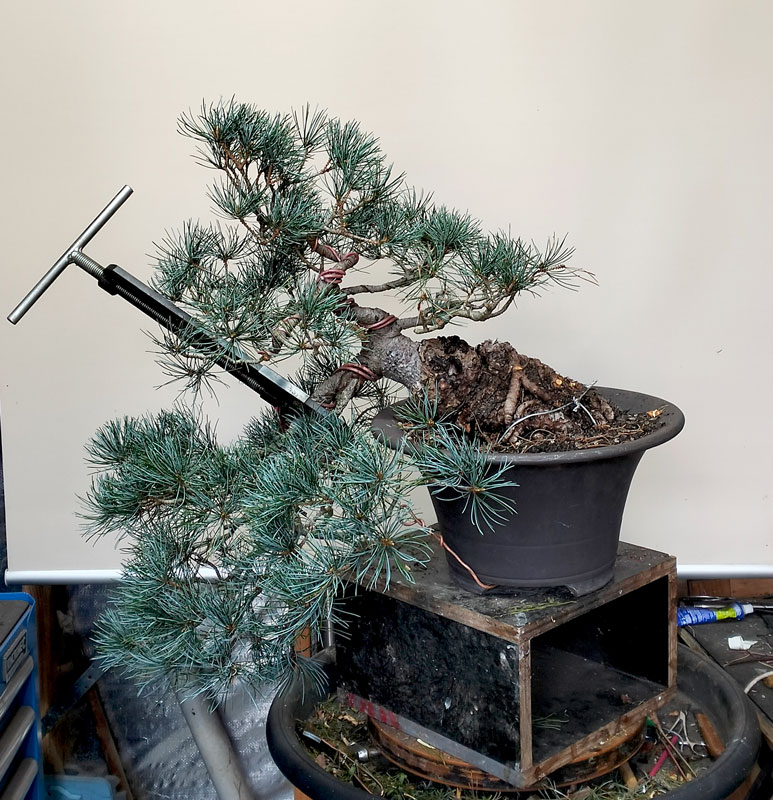
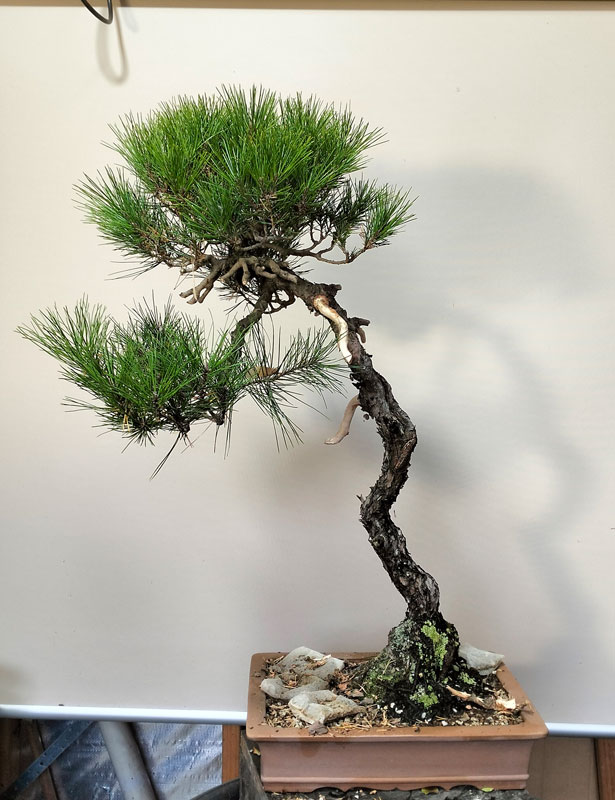
Prior to the works. Its a strange tree with a compact twisted upper section which is somewhat disconnected to the lower portions that seem stretched out and straight in comparison.
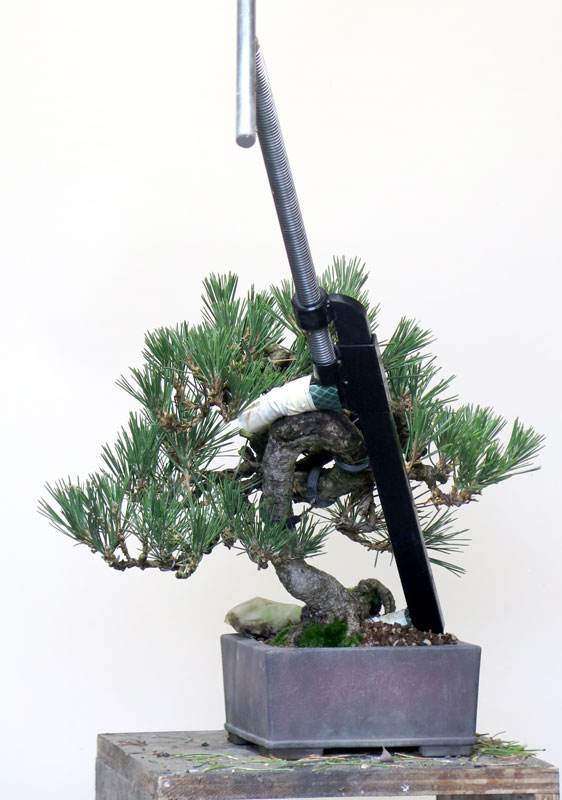
and…. the solution. I put a bending jack on the trunk and brought the top of the straight section down to meet the root base.
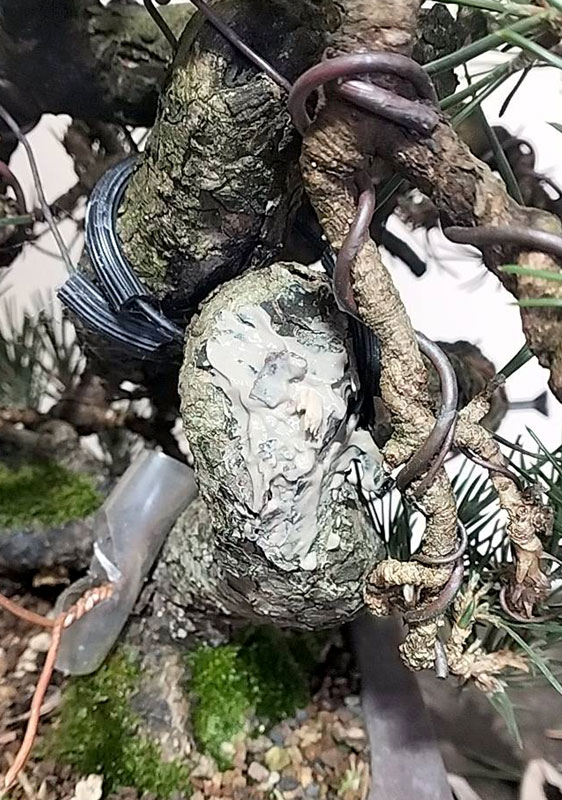
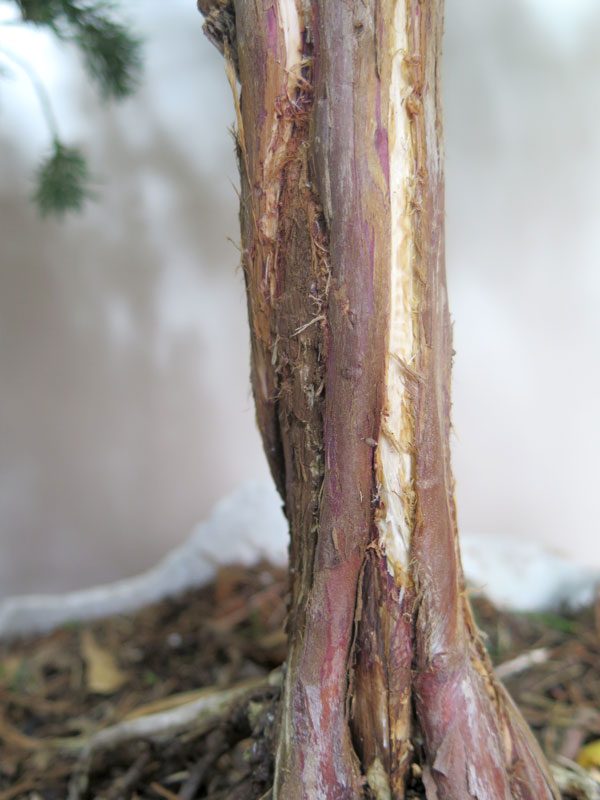
The trunk underwent a 90 degree bend and did so mostly with only minor complaints. A small split did open up but it wasn’t of a size that was really of too much concern. I don’t tend to raffia bends like this as I can much more easily see what is happening at the bend location without a covering. I only really use raffia on brittle trunks and branches of older trees or more ‘snappy’ species.
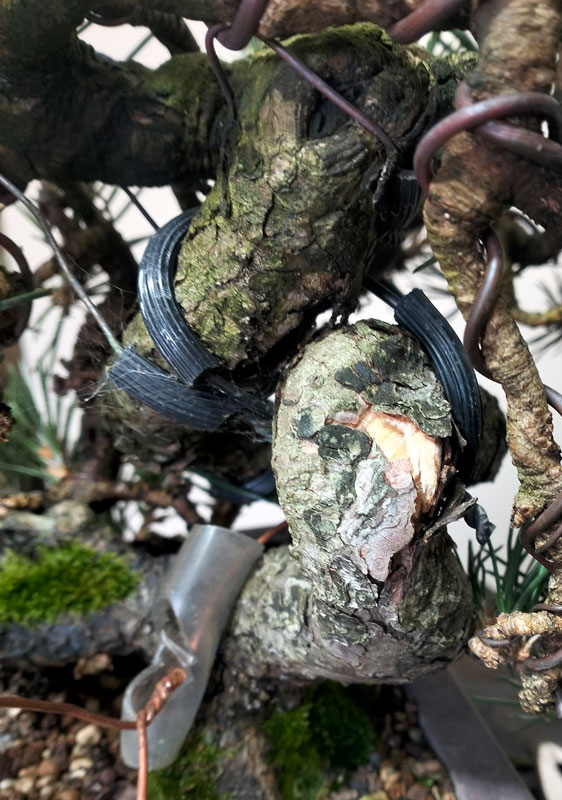
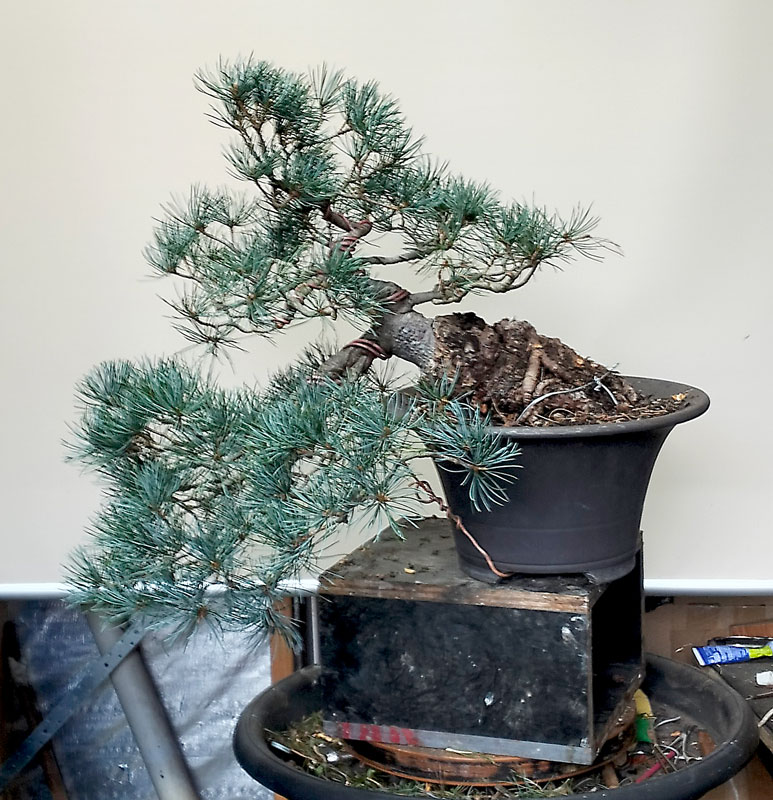
I did however use some cut paste which Evan Marsh has dubbed the ‘Magic eraser of the bonsai world’ which i think is very fitting in this case.
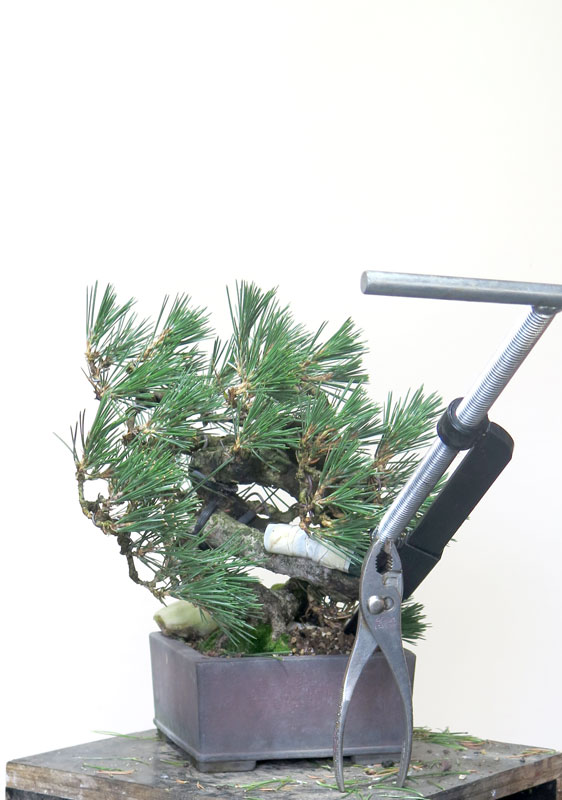
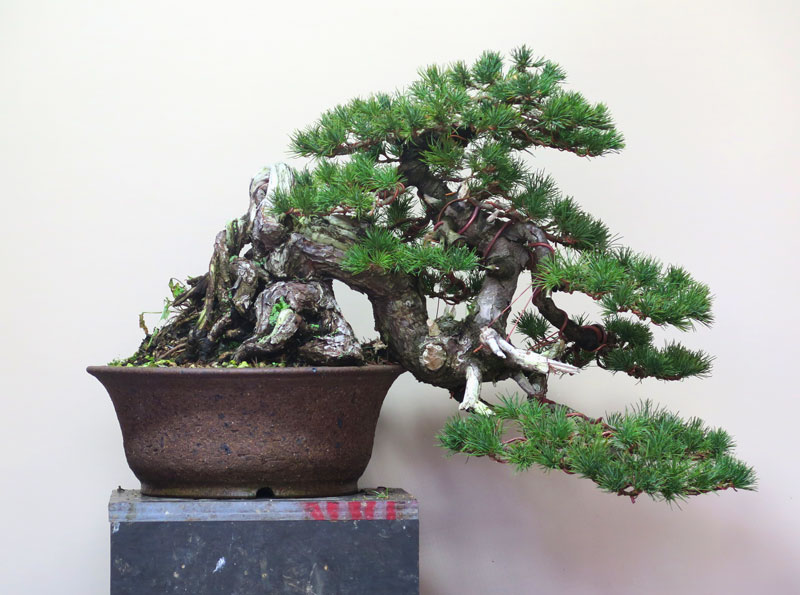
From here the tree will need a full re-wire once fully recovered but i did adjust the foliage using the old wiring and also pruned some branches.
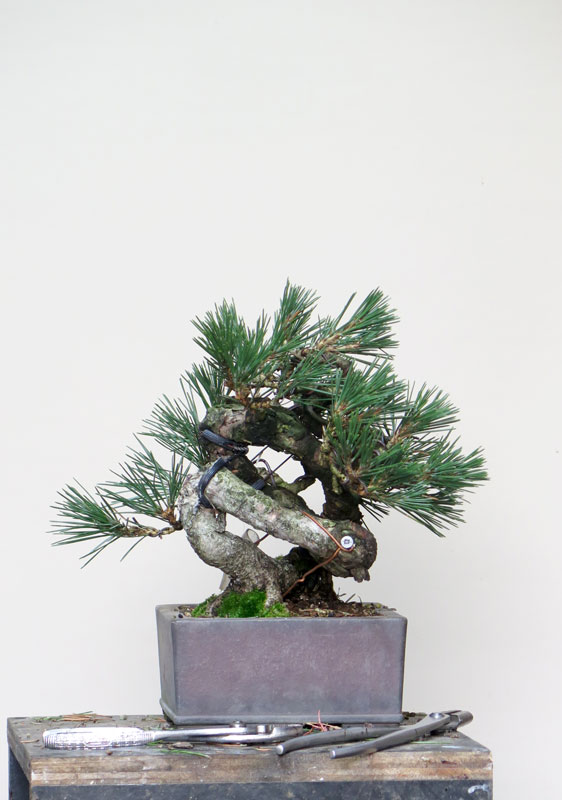
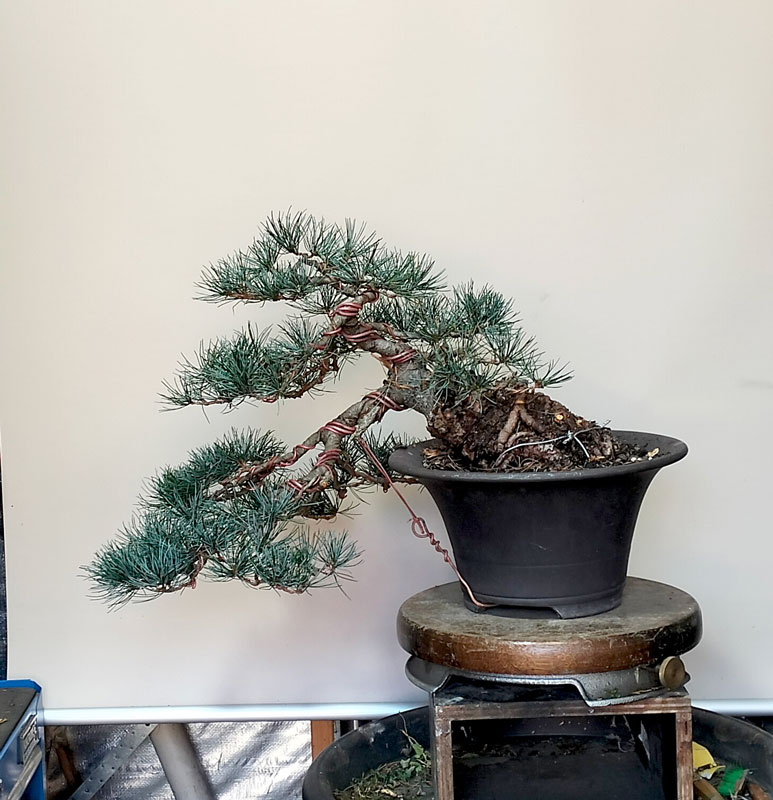
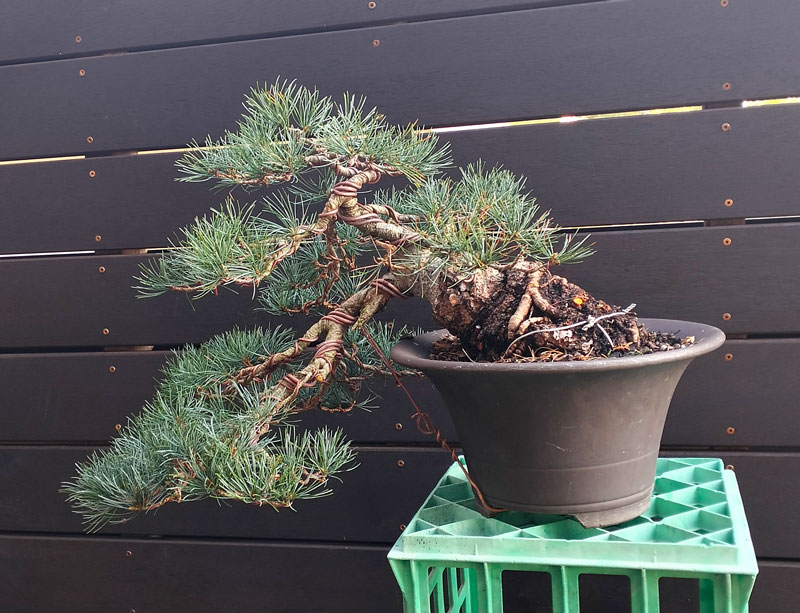
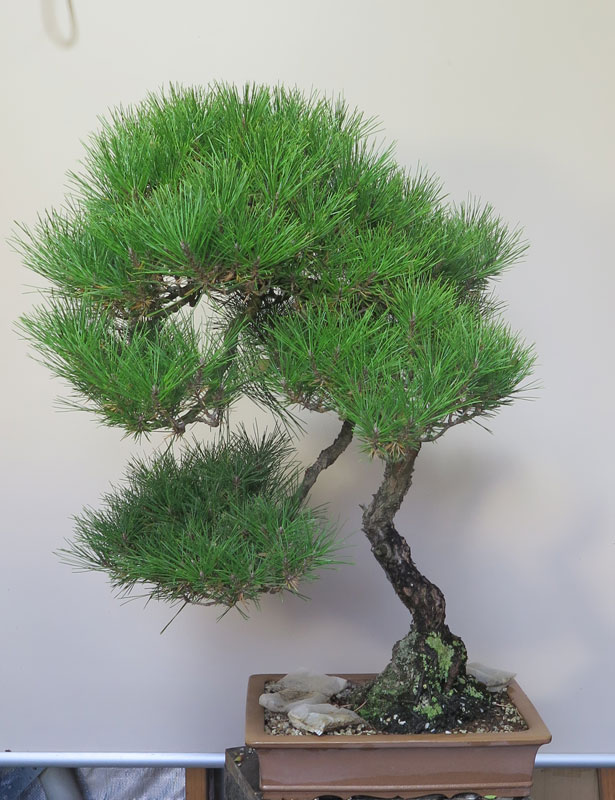
The finished image for now. I am pretty happy with how this twisted little nugget has turned out. It has a decent amount of recovery to do and could do with further wiring and pruning but for now i am very happy with where it is at.
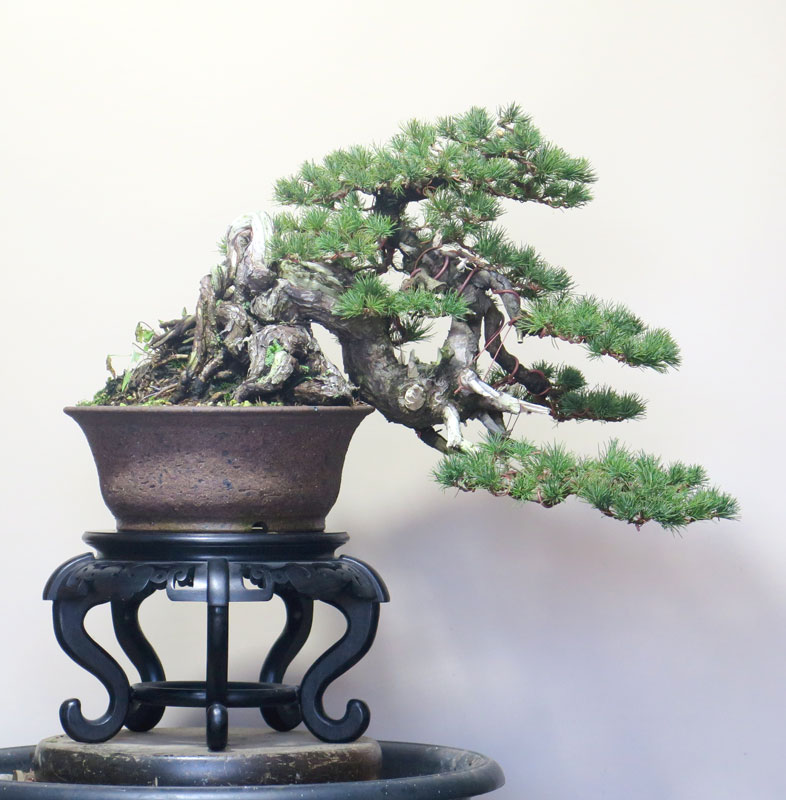
As is often the way i have already been thinking about it’s next re-pot and have a pretty special pot in mind that it may end up in, but that will likely form part of a future post. It has to recover first and will likely be re-potted in a years time depending on how it grows this season.
Overall I think its a big improvement, but id be keen to hear your thoughts in the comments……


Having long been a fan of zombie movies, particularly those of George A Romero, the idea of things coming back from the dead is quite appealing.
This post tracks a tree, that similarly to the un-dead hordes, came back from beyond the grave.

Sometimes you do things that go against your best judgement.
This tree is a good example of that in my case. A white Pine on its own roots, great movement, interesting exposed roots, age and also ramification on the branches that could be shaped into something. Very rarely do all these features align, let alone be available to me……… the only down side was that it was dead, or so it seemed.
I think I was likely only offered the tree because of it’s poor condition. I also likely was only able to afford it because of this. If it was healthy, it would have been well outside of my price range. All that said, against my better judgement, when this tree came up and I was offered it, I agreed on a price and and bought the tree.
When I traveled to pick it up, it was worse than the pics I had received and the guy delivering it (who was not the owner) said they felt bad to be delivering a dead tree………. All the same, I loaded the tree into my car and began the trip back interstate.
At the time I bought it, it was the most I had ever paid for a bonsai and once it got onto my benches back at home the doubt and regret crept in. What was i doing? ……………Buying expensive, dead bonsai!
The only hope left (and why i went through with the sale) was that while most of the needles were burnt, dead and brown, the buds seemed to still have some life left in them.
I set about re-potting the tree to inspect the roots, removing old soil along the way and getting it into a mix i knew and trusted. The roots seemed surprisingly healthy and a picture of potential causes emerged. Perhaps the tree was just terribly sunburnt? If the roots were strong and the buds looked not quite dead, maybe there was a chance…… From there i crossed my fingers, was careful on the watering and began to look for signs of recovery.
Some time past and the buds seemed to be swelling, so i slowly introduced fertiliser which i ramped up over the course of a growing season and slowly saw the buds turn into shoots, and then shoots turn into needles. All the brown needles the tree had when it arrived it dropped, leaving the tree sparse but with stunted yet green new growth.
White pines usually are fed only sparingly and often only in Autumn but I fed the whole time slowly building strength and soon the autumn buds that began to set looked healthy, plump and closer to what i would expect on a healthy tree.
After another season of feeding and healthy growth I was convinced that the tree was over the hump and back from the dead.
Which jumps the time line to now, where I could finally think about styling the tree and starting it on a path back toward refined bonsai.


Essentially the work formed a first styling. Given the original damaged needles, the canopy was still somewhat thin but there was enough there to shape and form what will likely be the structure of the tree into the coming years.
The process of reshaping the tree I tried to capture above. In the shadow of the trees recovery the styling seems minor but it still involved a number of heavy bends to bring branches and foliage into their respective positions that on a normal styling would constitute major work. I was surprised at just how nice the available foliage was and for the most part created a fairly complete canopy.
I am looking forward to this coming seasons’ growth to further fill in the tree and refine both the silhouette and fill in some small gaps here and there.
All in all the risk paid off, the tree rose from the dead and now, should grow into an impressive tree with time. It’s rare to find white pine on it’s own roots and this one, being styled as it is also scratches my semi cascade itch. I am pretty happy that the risk paid off this time and who knows, in a year or two it might be in a state that is ready to be shown if i play my cards right….. time will tell.
Moral of the story, dunno…… perhaps sometimes you need to put your better judgement aside and take a risk if the reward seems worth it. That said and while I would like to think some skill was involved in the tree’s recovery, there was also definitely a solid dose of luck that played on my side. The above post could have very easily gone the other way and at the time, many of my friends questioned the purchase……. and rightly so. So buyer beware……..but don’t write every sick tree off……. it may rise from dead.
Another quick update to track this tree’s progress. Images below tracking its development since 2013.


It’s finally been raining hence the dark trunk. This is another tree that is starting to fill in and get close to where i had imagined it many many years ago. Still deciding what to do with the scar on front of the root ball, I may ground layer it along the scar edge and grow new roots over the damaged area. A decision for next spring.
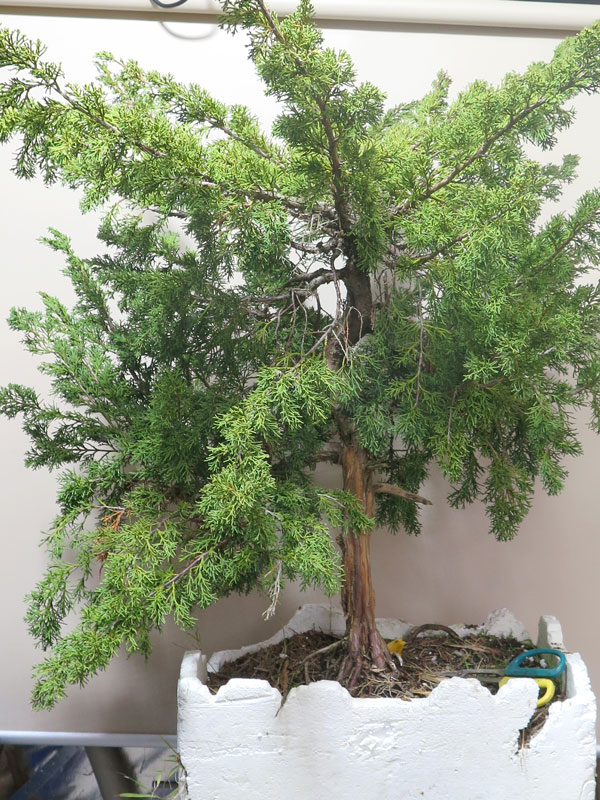
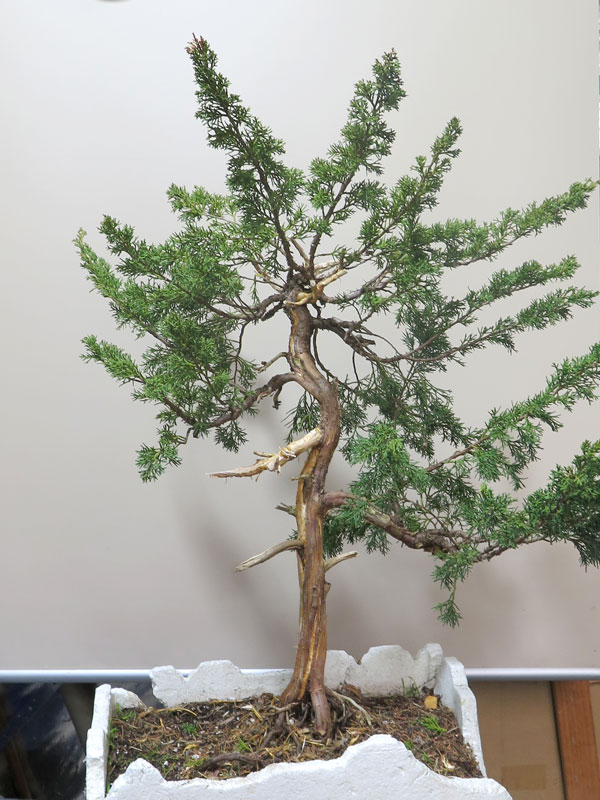
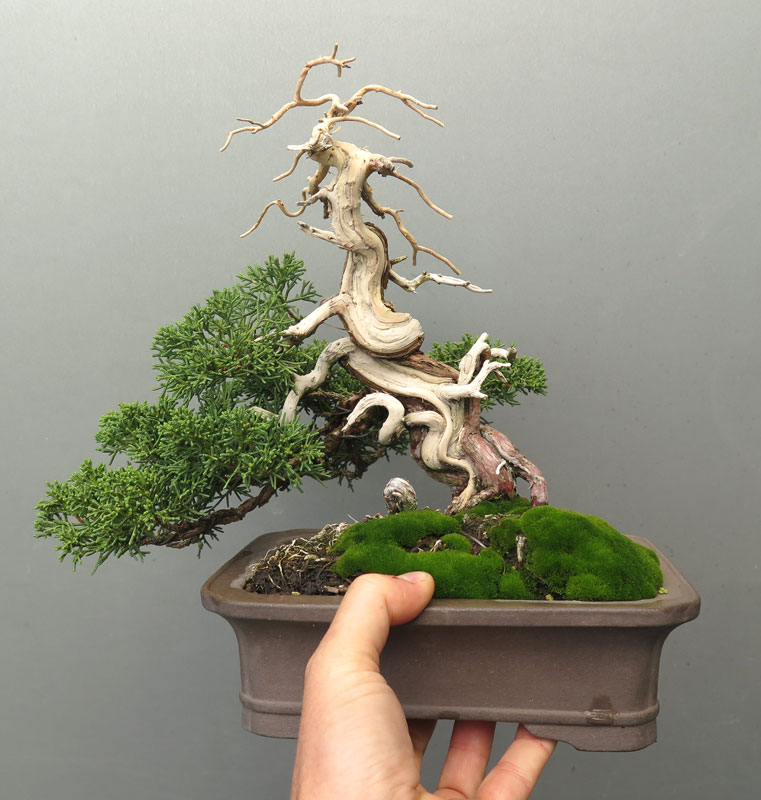
This post is a bit of a pictorial progression of a Shimpaku Juniper that i have been playing around with for a few years.
The tree came from a friend and ended up in my garden in 2024. It has spend the last couple of years re-growing more dense foliage and being slowly compacted and grown into a new shape. The process is somewhat outlined below.
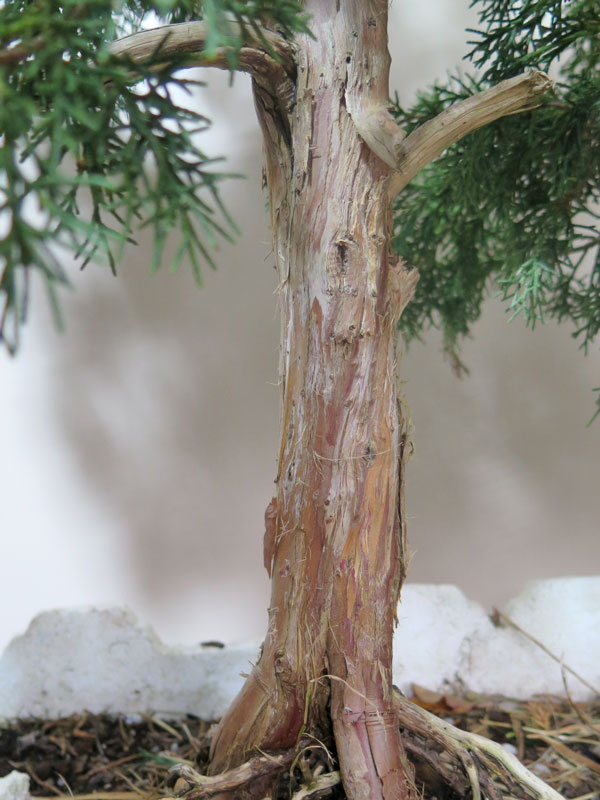
As I began to clean up the trunk and foliage, some interesting features began to expose themselves. The beginnings of veins and shari started showing themselves which you can begin to see in the images above.
Some areas already had died back and created shari naturally and other areas i created it. This began to identify thinner live veins along the trunk. you can see the difference between the exposed wood, with the already dead areas being a dull brown and the freshly created areas of shari being white.

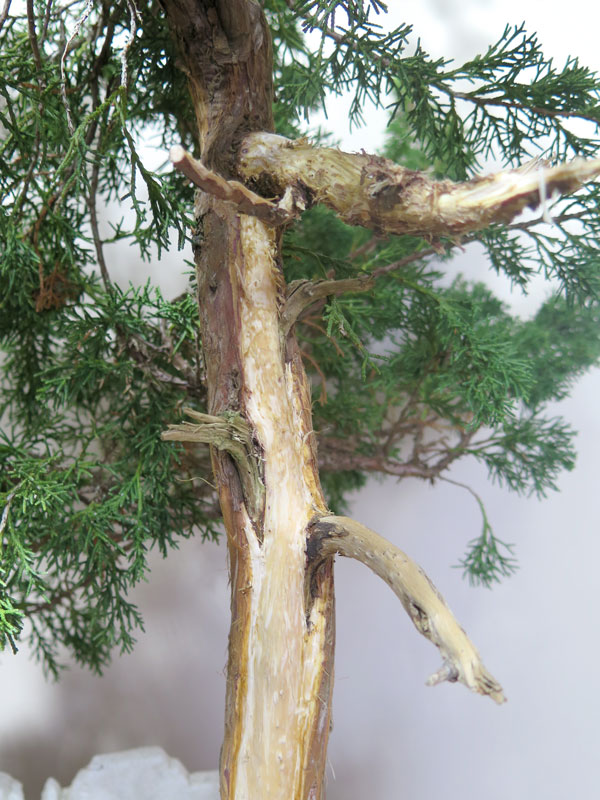

Once I had identified which veins were supplying certain branches and areas of the foliage i could begin to remove some if I pruned their corresponding branches off.
From here i thinned the foliage with the aim that this would create back budding and allow much more light into the inner areas, strengthening inner growth for use in future stylings.
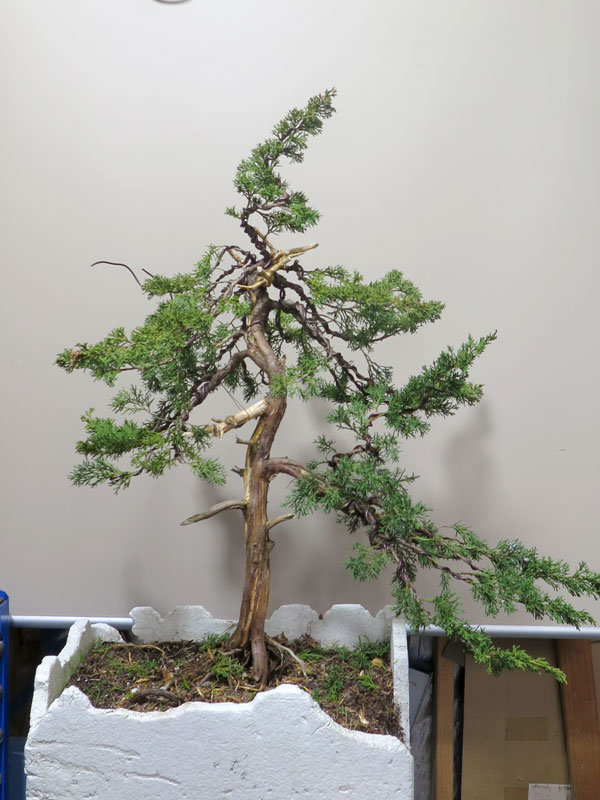
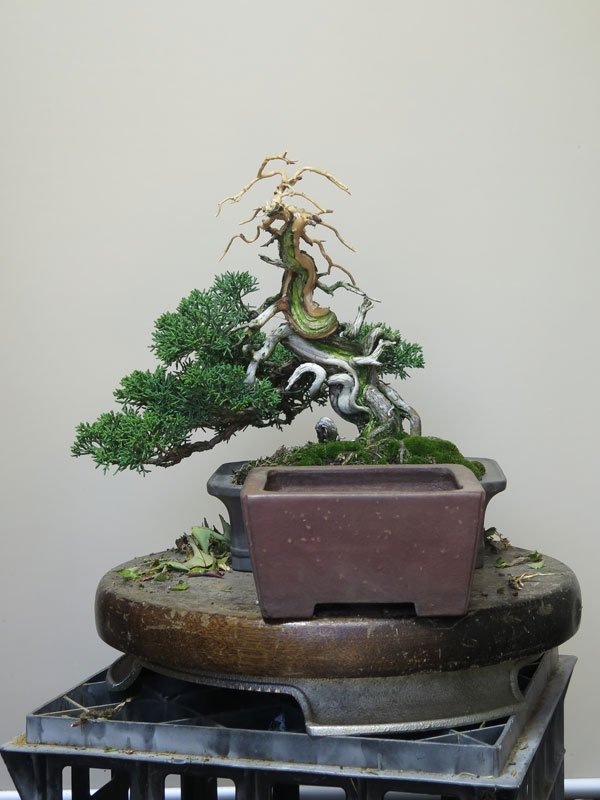
The end of the first session involved roughly wiring the main branches, bringing them down toward where i saw their future. This also has the side benefit of lowering the tips which in turn helps buds on the inner upper sections of the branch gain access to light and strengthen. The foliage was still very much too long and leggy so these inner buds and potential back budding was very important.
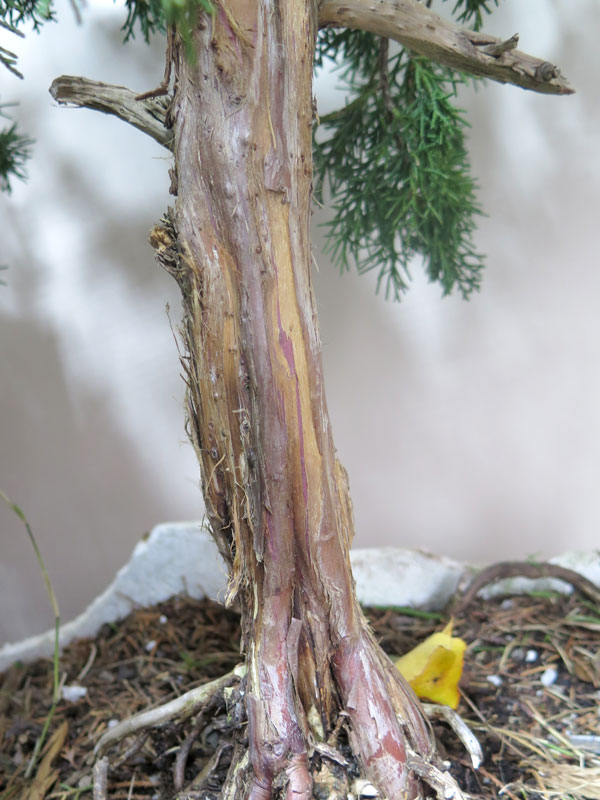
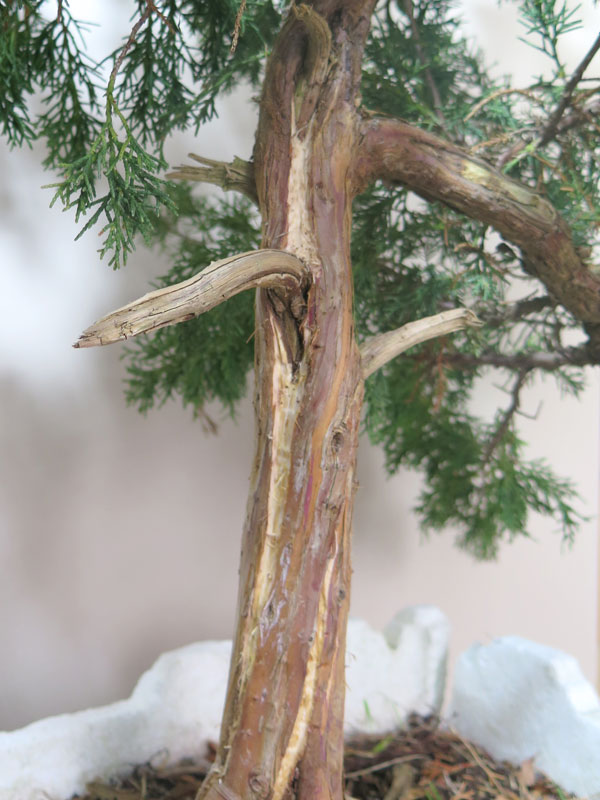
After a season’s growth, now in 2025, the tree was re-potted and further pruned and roughly styled. Back budding had started and inner growth had strengthened enough to allow me to cut back to it. This drastically improved the trunk to foliage balance but left a way to go. Further shari work was done, thinning veins and defining sap paths.
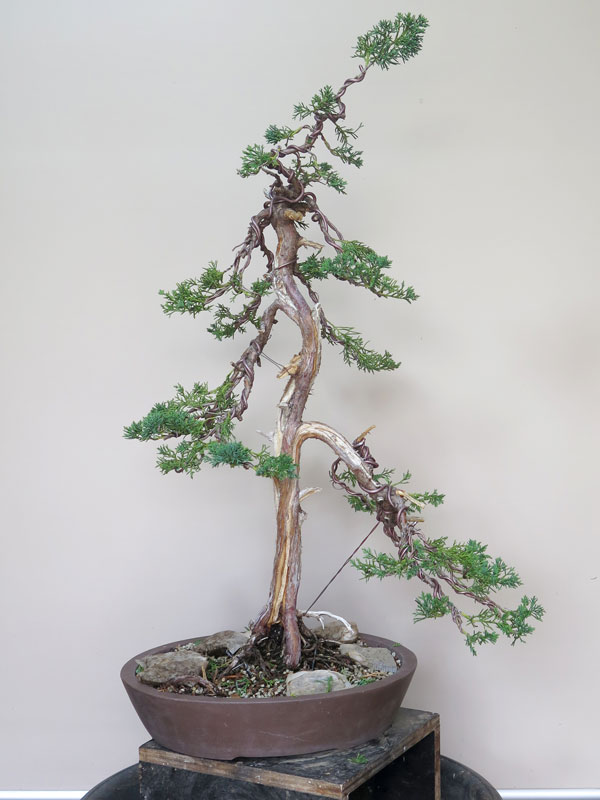
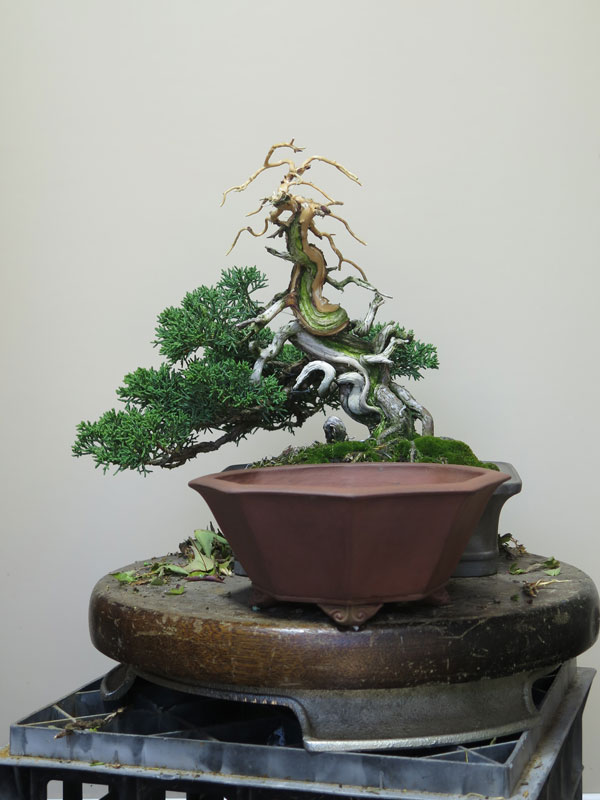
Another year on in 2026. Foliage is improving and most of the original wispy leggy growth has been removed and replaced with much healthier, compact shoots. Shari’s have been extended and some carving has been undertaken. There is a lot more carving to do to really make the shari interesting but it is something that takes time and i find i quite like to do it over many sessions rather than all in one go. There are many areas that need filling in with more growth but i think the bones of the tree are in place. This winter i aim to re-pot the tree into a much smaller drum pot that i had lying around and i think will suit it quite well. The trunk, while not full of movement is beginning to become interesting and i think some further live vein thinning and shari carving will really add to the interest in this tree.
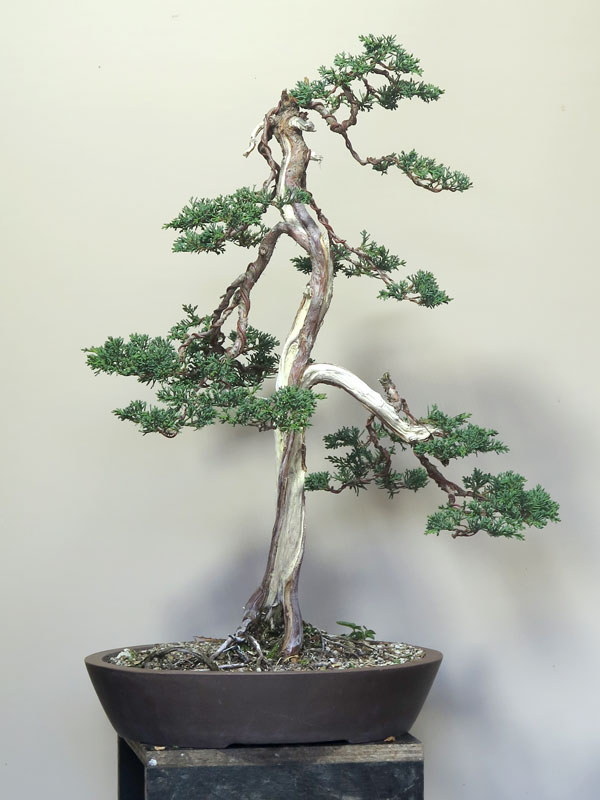
I really consider this the trees ‘first styling’ a process that has taken 2 years from rough stock and still has a long way to go. I hope it provides some insight in the time component that it can sometimes take to get a tree into shape. This is particularly the case with junipers that have been growing uncontrolled and need a new flush of foliage to provide the material you need to style a tree. If you have a juniper at home that is a bit leggy, i would recommend thinning it and beginning to chase the foliage back, it will speed up the development once you get around to the first styling.
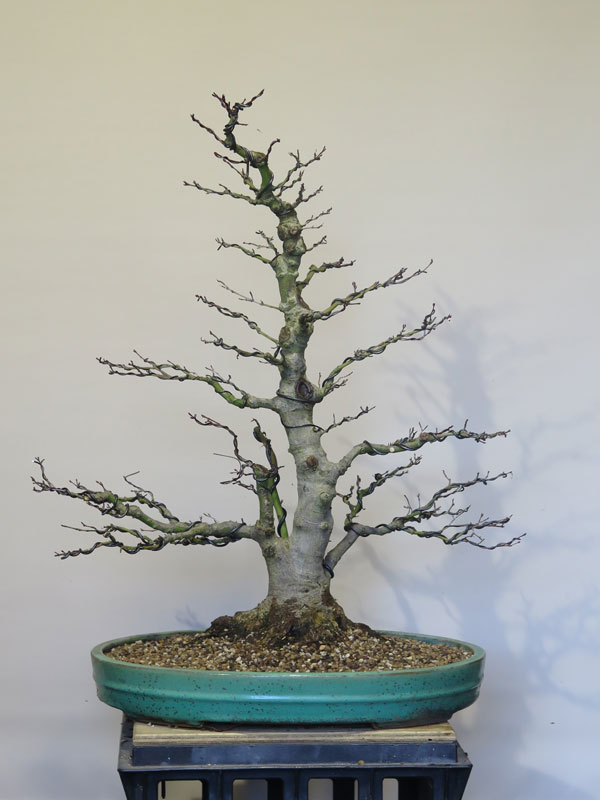
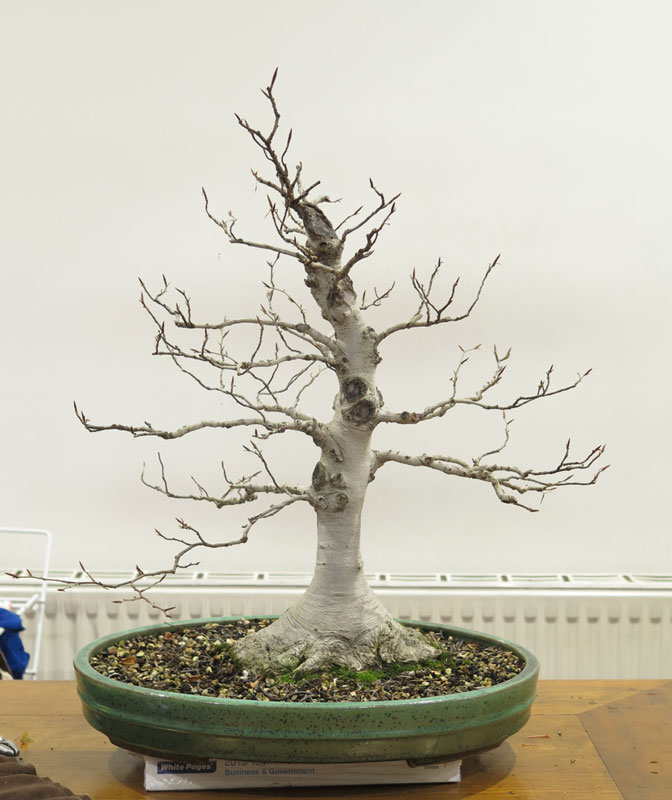
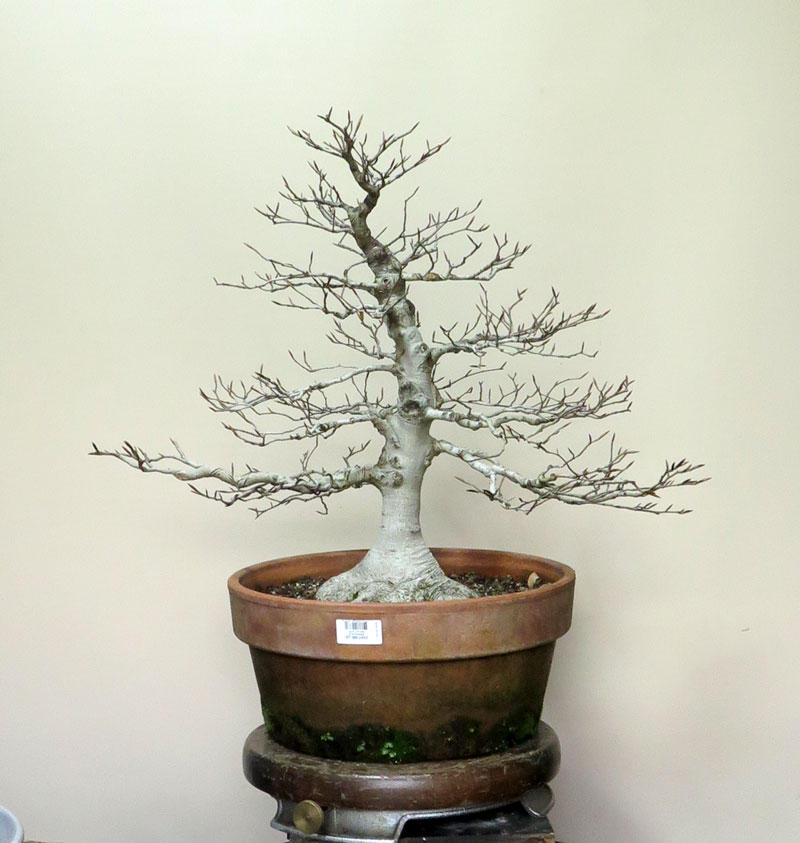
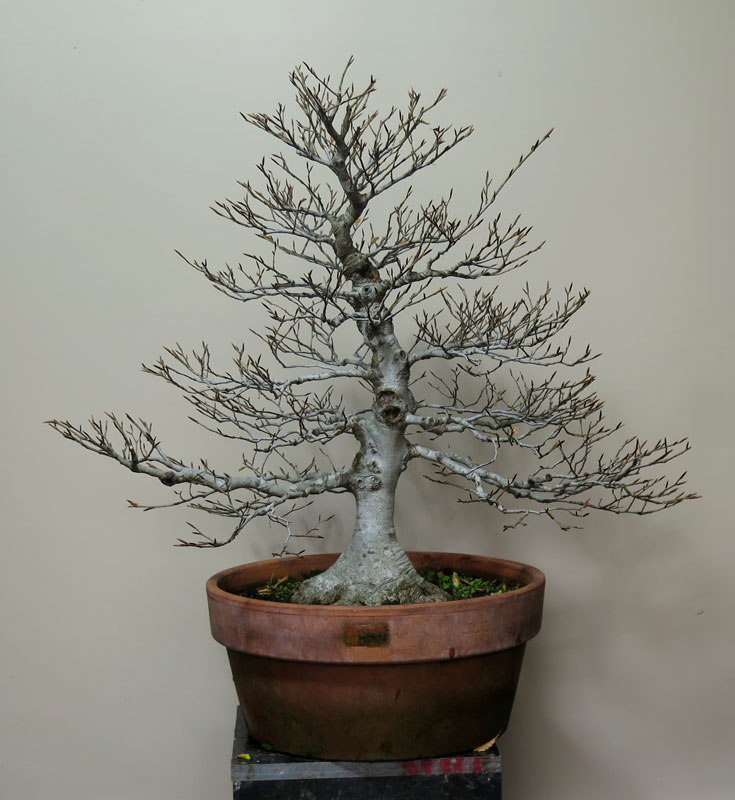
That time of year again, as I strip the autumn leaves off this trees (Beech tend to hold onto their leaves and don’t drop them), I finally get a chance to see how it’s development is going. Every year it gets closer to where i want it. Perhaps a few seasons off yet but getting there.
It needs some wiring this winter to adjust a number of branches but it finally feels like it is filling in with ramification. Looking forward to thinking about a new pot for this tree. I have a trip to Japan on the cards so may try to rustle one up there.
For interest, the trees journey over the years below.

THIS shimpaku is one I have had kicking around the benches for years. It’s been through numerous styling’s but has never really found its feet.

After a fair bit of growth post last time it was styled.
This tree has always been caught between an interesting trunk, shari and deadwood and an overpowering foliage mass. As you can see from the image above a lot of the great elements in the trunk are lost amongst the mass of green.
The easiest way to solve this issue was essentially to remove some foliage. After much staring and pondering while watering it on the benches I finally decided to make a drastic change.
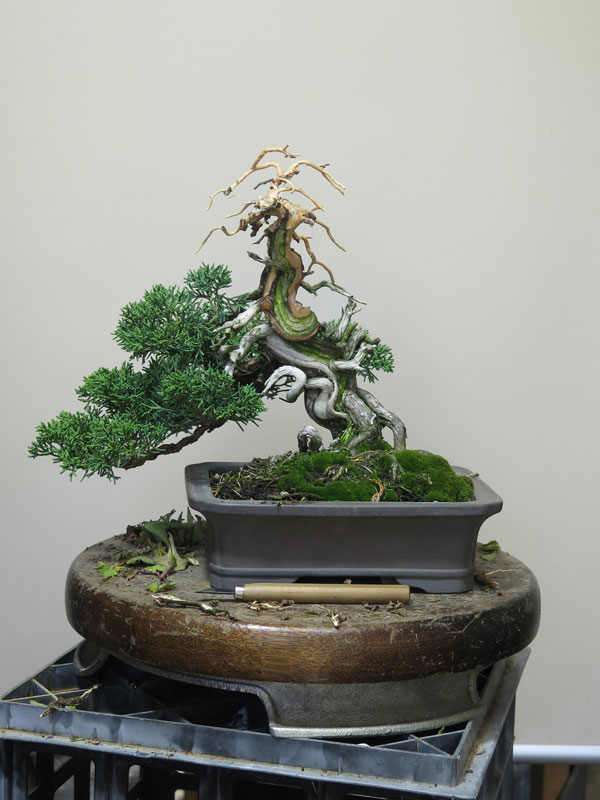
I cut the top half of the foliage off. You can already see the difference it makes and how the best features of the tree (being the trunk and shari) are now much more prominent.
I set about stripping the bark from the upper areas and and set it back on the bench for the dead wood to dry.
After a month or so it got a high pressure wash via one of my favorite tools and a coat of lime sulphur which has really made everything pop.
Next steps from here is a re-pot and a re-styling to put all the foliage into its new places. I will likely do this over winter in the coming months. While it does need a wire, you can get a sense of the new style already in its roughly pruned state.
Pots are the next challenge, with the rectangle now being very much the wrong dimensions. I have a few options with a couple below (they both look a little big due to foreshortening in the picture but i think both could work). I am leaning toward the square as it is a little smaller but I also like the hexagonal pot.
I will make the final decision after i have fully wired things out in case that changes my thoughts.
All in all i am pretty happy with the change and finally feel this tree has found itself. Until the next post………..
Wow, looks like almost a year since the last post. Time flys!
I’ve been doing bits an pieces since the last post, in the shed, teaching at clubs and doing the odd demo but for the most part have not been documenting much of it. Life has been pretty busy and typing up blog post is often down the to do list.
That said, i did remember to take a few (bad) phone pics of the below tree.
The tree in question was one i was gifted and had owned for a while. It was then was passed onto another friend, and then several years later it found it’s way back into my yard.
It started life as a garden nursery tree complete with pretty lumpy graft, leggy growth and circling roots. It was originally given to me as the original owner lived by the ocean and the salt spray was leading to it suffering. I nursed it back to health and cut most of it off, leaving two branches essentially. One became the main branch and the other the head. I tipped it on an angle to make better use of the swollen lower root base and gave it a first styling.
It was shortly after this first styling that i gave it to a friend who grew it here in Ballarat for probably close to 4 or 5 years.
Cut to a few weeks ago when i was visiting him and his collection and the tree ended up coming home with me once more. It had really filled in well and provided a heap of new options to explore so i decided to give it it’s second re-styling.
The basic steps i took are shown above, I removed a number of un-needed branches and thinned old needles, then made the major adjustment by pulling the main branch down with the help of a branch bending jack. From there it was just a matter of wiring out the foliage to fit the new style.
The tree sat on the back deck for a couple of days where i made a few adjustments as i got used to the tree. It had a weak first branch on the right hand side so those shoots got minimal wire but they all got mostly into place.
There is now some filling out to go but i have been feeding to build up the energy over autumn to set up next springs buds and i am expecting i will get much of the filling out i need next season.
All in all i really like this tree, and given it original owner has since passed away i am glad to have this tree back in the yard as a little memento of some good times we spent styling bonsai together. It’s also nice it spend some time with my other friend in between, it’s one of the unique things with bonsai that a tree can travel between many hands, each leaving its mark.
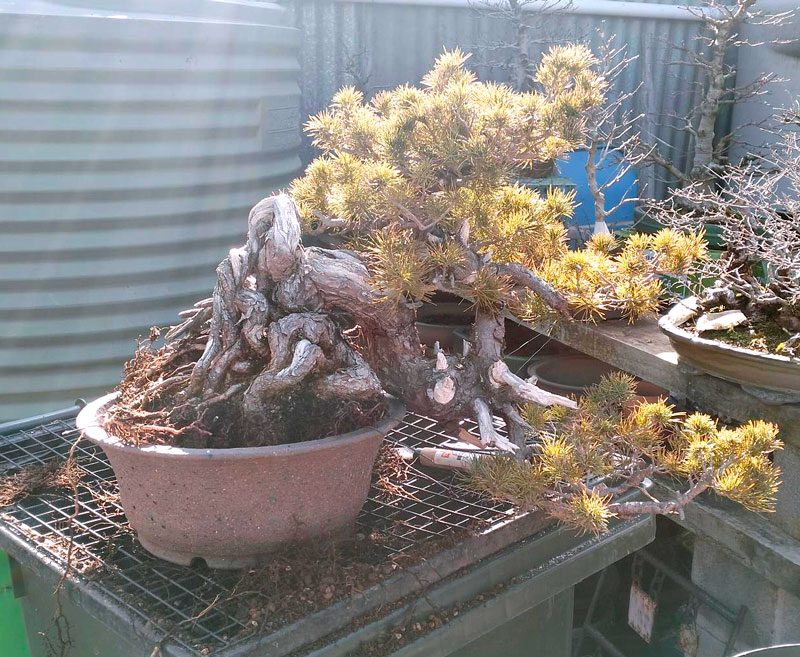
I’ve had this red pine a while now and first worked on it back in 2016. In the 9 years I’ve been growing it it’s been through a few phases and has been displayed, grown out, brough back in, maintained and generally been in and out of the workshop a few times each of the years I’ve owned it.
It’s even had a couple of post about it POST 1, POST 2
More recently it has really outgrown its previous style.
It’s pretty clear from the above image that the foliage has well out grown the trunk size. It feels heavy and makes the trunk seem thin and essentially out of scale.
I’d been thinking a lot about this tree, staring at it each day i was watering, pondering options and playing out scenarios in my head.
I’d always wanted a decent bunjin tree and this tree always seemed half way there, so after much thinking and with a whole lot of needle plucking on the horizon i decided to make the jump. With branch cutters in hand, i began to cut.


I took off the first, second, third, fourth and a bunch more branches as i worked my way up from bottom to top.
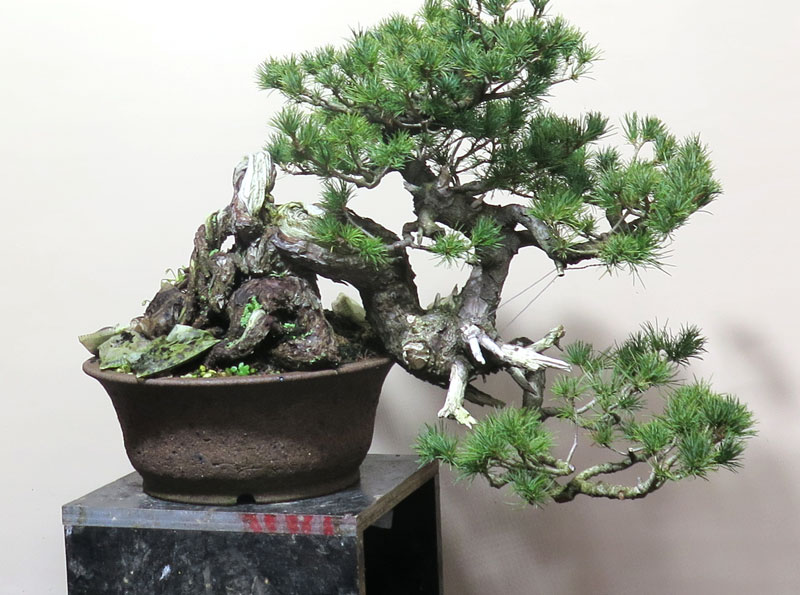
After more cutting and some wire i got the tree into its new shape.

I’m pretty happy with the new style. Looking back to the original styling in 2016, i think that this revision fits the tree even more than that first styling. Back in 2016 i didn’t have the growth i would have needed to make the above image so I don’t think it was something i had even considered back then. It really was a case of having to go on a bit of a journey to end up at this style. It highlights how Bonsai change over time and evolve and you have to be open to that to maintain, reshape and move bonsai through time.
It’s really worth actively reassessing your trees and always looking for new ideas and solutions. It can be really rewarding and provide some refreshing change, and in the case of this tree i think that approach has resulted in a better tree!
Of course, now the hunt for an appropriate pot begins………..
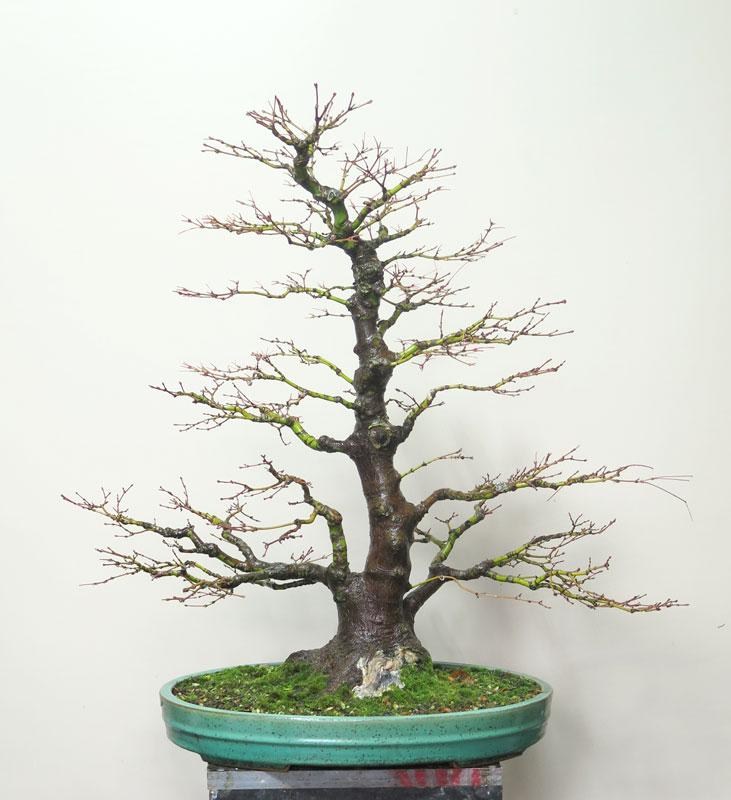
With the first days of summer now under our belts and some solid early spring growth it was time to begin this seasons tasks around the garden. First cab off the rank was this trident which found its way onto my benches recently.
It had been fully wired in winter, most of which had begun to bite in with shoots extending aggressively with an early warmth to spring.
I defoliated the tree and removed the old wire setting it up for its next flush, some new buds and further ramification. Its a very nice tree and I think will develop into something that will always have a space on my benches.


While there is a long way to go with this tree, I think the bones are all in place and you can already get a sense of what the tree might look like in the next 5 years once it has a lot more ramification.
Now I have a sense of where it is heading, I will likely leave a few shoots to run on the lower branches to increase their size a little given how quickly the upper regions are thickening.
Onto the next one!
There’s something satisfying about pinching Maples. I only really do this to trees in a refinement phase as it slows growth of the extending shoot and as a result keeps inter-node length short. Its a good technique to add that final tight twiggy-ness to the canopy. As it slows growth you probably dont want to use it on developing trees as it will slow down the rate of growth across the tree.
It’s also not really something that you can do in one hit, rather pinching a number of tips a day as they slowly open giving you a good reason to closely monitor and spend time with a tree over a number of days or even weeks. You have to wait until the first set of leaves opens and the next set just begin to unfold. Then you get in there and remove that shoot tip. The extension of that shoot will slow or stop and hopefully you will get much tighter bud spacing.
If you have a refined Maple, give it a go as the growth flushes out and see how you like the results.


