
You are currently browsing the tag archive for the ‘Australia Bonsai’ tag.
This is a bit of a different post covering a tree that has found its way back into my collection lately.
I originally grew this as stock from a cutting and put some early bends into the trunk line. Soon after the wiring of the cutting i gave it to a friend who did the bulk of the work in forming it into a tree and growing it on.
As luck would have it, the tree recently found its way back into my collection.
Stupidly, i didn’t take any before pics, but when i received the tree i re-potted it, changing the angle a bit and fully wired the tree removing a branch or two in the process. All in all, building on my friends work, its forming into an interesting little tree!

Above: The tree post re-pot and styling.
But…….. it still has a while to go.
Normally a shimpaku of this thickness i would keep as stock and grow hard and fast to thicken the trunk and develop the shari’s and live veins. Luckily we cut shari’s into the trunk last year but i still need to focus on developing trunk thickness and continue to develop the sharis as things thicken.
This is somewhat difficult in a tree that i don’t really want to grow out of shape or get too much larger. What i want is to thicken the trunks and keep the tree’s foliage well managed.
The solution is………. Sacrifice branches.
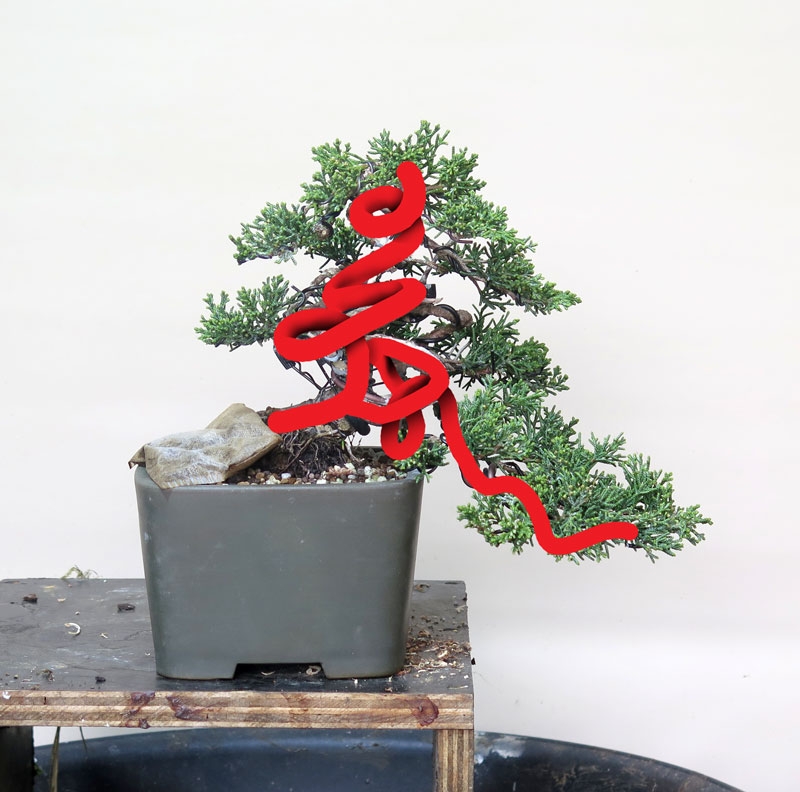
Above: The two main trunk/branch lines.
The tree is built off two main trunk lines as per the diagram above and ideally i would like to thicken both of these lines. To do this i will likely grow two sacrifice branches.

Above: likely locations of sacrifice branching (shown in pink).
I will locate two sacrifice branches (one per trunk line) but in slightly different locations. The sacrifice branch in the apex will be toward the top of the trunk line as i want the entire upright trunk to thicken.
The second sacrifice will be on the first branches trunk line, It will be located back from the first branch tip though, to avoid the branch holding the foliage from thickening too much, keeping it in scale with the other branches.

Above: the image in my head i am aiming for.
I will likely also wire the sacrifice branches into interesting shapes reinforcing the tree’s movement so i can use them as future jins.
To further facilitate this thickening i will be making a shari on the opposite side of the trunk to the shari’s we have already made. I’ve covered this a bit more in THIS post. I am hoping this speeds up the whole process quite a bit. Also keeping the majority of the foliage trimmed and compact should direct a lot of energy into the sacrifice branches which will be left un-pruned. Hopefully allowing them to grow quickly and do their work.
That said however, i do expect this process to take a number of years to get to the thickness level i am after.
This is one of my trees that was partly neglected over the last couple of years. It’s pruning only really focused on cutting back to the silhouette (due to lack of time), so while the canopy out of leaf looked twiggy and dense, the structure was not great and the beginnings of lumps and bumps were forming where too many shoots emerged from one place.
The time came recently to do some work on this tree and it was pruned back and re-potted.

Above: Pre-work. The tree looks dense and ramified but the beginnings of lumps were forming within the canopy. It was time to cut out some problems.

Above: After a cut back. I think about 50% of the fine twigs were removed. While this is a bit of a set back, with a year of strong growth i think i can probably get 3 or 4 flushes out of it and mostly replace what has been lost, but this time upon better structure.

Above: ….. and a re-pot. Not a dramatic change as its the exact same size, style and make of pot, just in a different colour.
This little tree stands 12cm from the rim of the pot which doesn’t really come across in the pics but it is a tree that really fits in the palm of your hand.
During this growing season i will be working towards rounding out the top of the canopy and increasing the ramification. I will do this via:
- Heavy feeding
- Outer canopy defoliation and cut back
- Selective pruning of twig structure to avoid growing more issues into the tree and;
- Possibly some limited wiring.
I will update again if the above is successful.
A very quick update post of THIS pine.
From where we last left off, the pine had been un-wired during the previous season and had grown out quite a bit, hence needing a little tidy up. Recently toward the end of this last winter, it made it into the work shop for a quick wiring before the candles got too fragile.
Above: de-wired and grown out of shape.

Above: The first step was bending the lower branch down further to try and separate the foliage masses a little more into individual zones.

Above: Post wiring.
I only wired what was needed which essentially meant only the main branches and sub branches were wired. I am pretty happy with the way it turned out and think it is evolving nicely.
For comparisons sake, below is how it was in 2021 vs. after the styling today.
the combination of a narrower apex area and a more separated lower branch all work together towards a solid slow improvement over the years.
I recently was gifted a number of very nice small trees from a close friend. They were all trees we had been working on together and that had got to a pretty nice point in their development.
One of the trees was this black pine.

Above: the tree as i received it.
We had previously worked this tree and during its last re-potting we have moved it into this semi-cascade position from a more upright posture.
After staring at it for a while i started to wonder if i could get some more out of it, so out came the plastic pot and I tested a few new potential angles.

Option 01: Use the rear as the front and tilt the tree. I felt this kind of straightened out the trunk (even if a little lumpy) and elongated it a little so I wasn’t completely convinced.

Option 02: the original front but a slight rotation and a decent tilt to the left. I liked this option as it shortened the trunk a little and added what looked like another bend in the trunk’s length.

Above: I only had a couple of pots available for the re-pot. A flared sided round pot and the original banded round one.
I ended up using the flared pot. I liked the flared side as it helped lighten the visual weight of the pot. It also will give some extra clearance for branches which i may want to place close in to the container.
Above: the tree all potted up. I couldn’t quite get the full rotation and as a result the top section of trunk is a little parallel to the pot edge. While it doesn’t bother me too much at this stage, I will likely try to get this further down in the next re-pot.
Of course with an angle change like this there will always be foliage that needs re-styling.

Above: you can see from the angle of the shoots just how much the angle of the tree has changed.
Surprisingly the roots were fairly easy to adjust to get to suit the new angle, with only a couple of finer ones ending up above the new surface level. For those i dressed them with a layer of sphagnum moss to keep things moist while the slowly adjust to their new position.

Above: Sphagnum moss covering a couple of exposed roots.
All in All a successful re-pot and angle change. Once the tree recovers and grows out, i will start to think about part 2 of this process and restyle and re-shape the foliage mass to suit the new angle.
This year i have gone a little Chojubai crazy with a lot of them on the go. The below tree hasn’t helped bench space matters at all as it has multiplied!

Above: the clump in it’s larger form.
I had originally been growing it as a larger clump but after seeing how it had developed since last re-potting i decided that there were actually two nicer smaller clumps within the mass of trunks.
So i set about breaking it up and finding pots for the two settings.

Above: The two smaller clumps that i split out of the larger planting.
I think both smaller plantings have some great characteristics in their own right and they should continue to develop into interesting trees.
I really love Chojubai and would recommend everyone gets a few into their collections!
I have re-potted most of my chojubai this year but this tree, i decided could go another season. That’s not to say it escaped the work bench…….
After another year of development it was again looking a bit ‘all over the place’ so i began by busting out the mini-pressure washer and removing the moss from the trunks and soil surface and pondered what to do next.
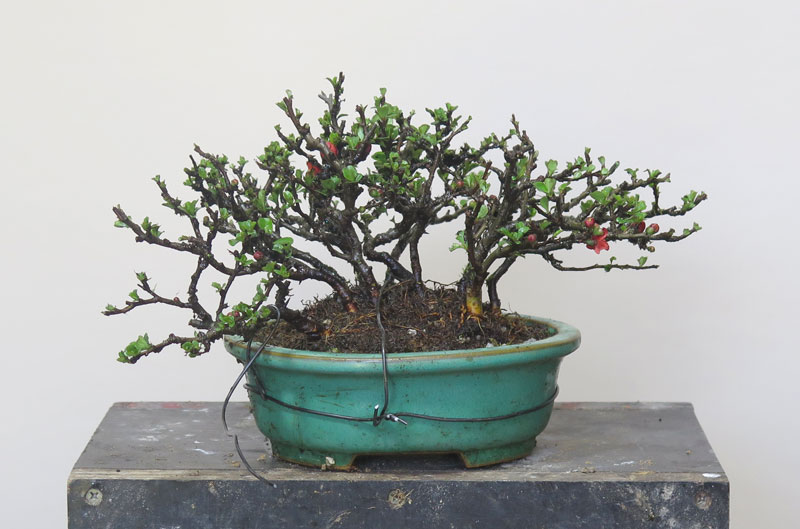
Above: Post clean up.
For anyone who grows small clumps, you will know just how difficult it can be to wire the individual trunk lines so in this case i Jerry-rigged a wire around the pot rim which i used to attach tie down wires to to lower and adjust the the various trunks and branches into positions i was more happy with.
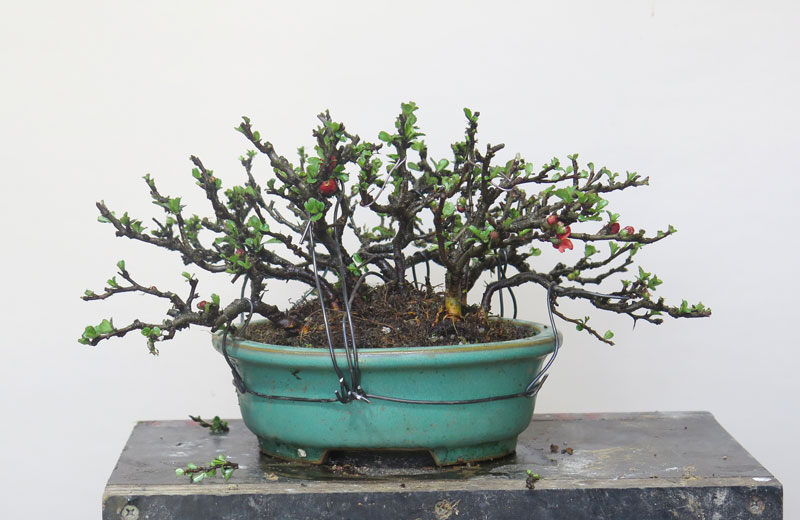
Above: Post adjustments
The aim was to spread the clump out a little more and even out the density of branching more evenly across the canopy. I started with the outer most shoots and worked my way into the center of the group as i went. I think it’s shaping up well.
Chojubai are a great species to grow. They are fast to develop, grow easily from cutting and as the above tree shows, you can go from a handful of cuttings to a little clump setting in a fairly short period of time.
I’ve just about finished my re-potting for the next season’s growth. It has gone fairly easily this time around for some reason despite the collection growing in size a little. While I wont be posting every tree, this will be one of a few posts capturing the most interesting re-pots of the year.
The first tree is a new tree to the collection. It’s what we think is a Crabapple. It arrived to me in a very shallow pot, which while it suited the tree, i wasn’t sure it was the best choice in my garden with the often hot summers.
So as a starting point i got it into my mix and a deeper pot. By doing that I now know what baseline i am starting with and if any issues do come up over the growing season i will not be questioning the roots or a soil mix i do not usually use.

Above: The tree sans pot. The hook root on the right of the trunk annoyed me so i took it off. i planted the cut root in another pot to see if if will shoot from a root cutting or not.
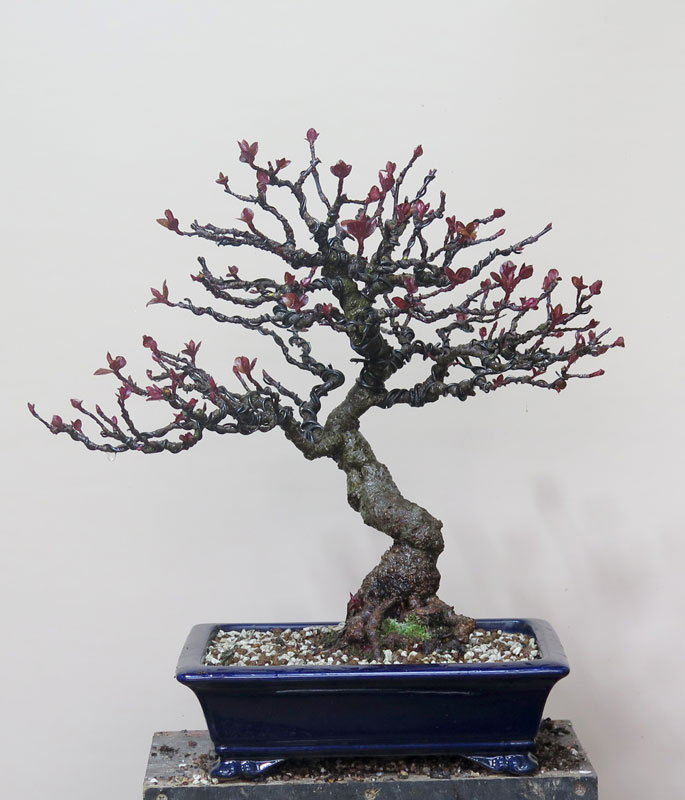
Above: Post re-pot. I ended up going with this navy blue Reiho pot which i liked. It goes well with the fresh red growth but time will tell how it looks when the foliage matures (and maybe turns green?)
As far as i know, the tree has never flowered so i will be doing my best this year to feed it up with some high phosphorus and potassium fertiliser with the hope it sets flower buds next year.
Bonsai social media always seems to target the dramatic, the big restyles and the rapid changes, but for most of what we do in bonsai happens slowly over long time frames. Step by step making small adjustments and building on what was built prior to slowly but surely move toward a refined goal.
I have recently been doing such tasks and the below shimpaku is one such tree that ended up on my bench to be thinned in preparation for this season’s new growth.
It was styled in a demonstration back in 2021, taking rough stock and turning it into something that could easily be imagined as a bonsai. Here’s the last time it was on the blog.
The other day i brought the tree into the workshop and gave it another round of work to set it up for another year of development. Images below outline the recent work.
Above: The tree in 2023 after being re-potted from a nursery container into its first Bonsai container. Note the density of the foliage and the width of the live veins.

Above: The tree in 2024 prior to beginning the work. Since the 2023 photo, i have reduced the live vein width a little (5mm?) showing more of the shari. The tree has begun to fill out but the foliage is in need of a thin, reinforcing the branch structure by removing foliage and branches i don’t need and leaving that which i do.
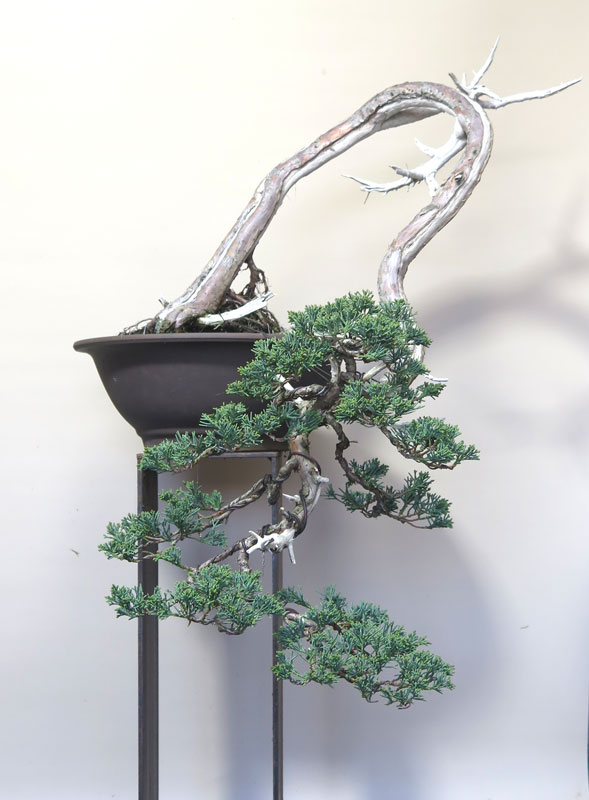
Above: the tree after the work. All that was done was some weeding and a thinning of the foliage. I am trying to get the branches to have an up turned profile showing some of the branch structure below the foliage clouds which i think is starting to develop. I did also adjust some of the wire and branches to help with this but for the most part only thinned. I had left a lot of extra branches on in 2023 so that that the foliage mass would recover and strengthen more quickly. Now that the tips i wanted to keep had grown strongly i was able to remove the excess. This will also leave some room for more growth and some light and air to get to the inner shoots.
There is still some juvenile shoots toward the rear of the tree so this season i will work on growing them out into adult scale foliage. I will also keep an eye on the live vein with the idea to reduce its width further.
You cannot see from these images but there are two live veins. One on each side of the trunk. This should setup the trunk to grow in only one axis and begin to flatten out like a board. Ideally i would like these live veins half their current width. I will slowly narrow them over a couple of years as the tree develops. Its a longer term process but something i will be managing over the coming years. I go into the process a bit more here if you’re interested.
All in all i am pretty happy with how this tree is progressing, it has a way to go but seems to be heading in the right direction.
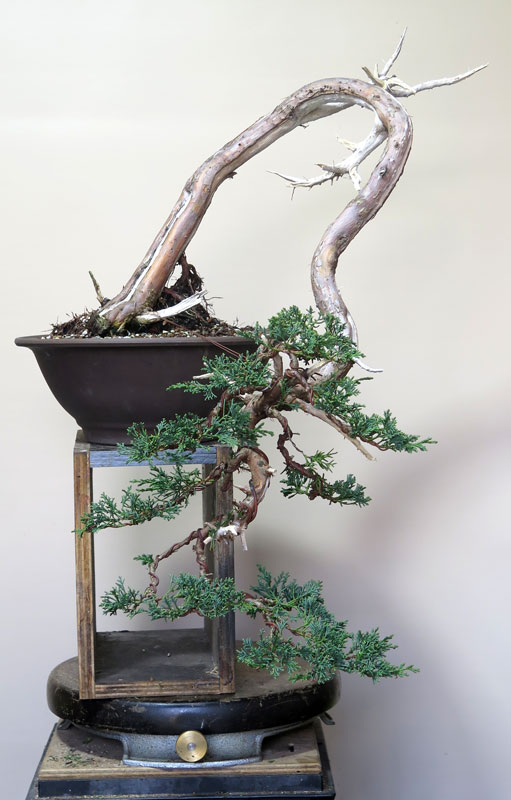
I finally got around to finishing the last round of work on the this tree.
Since i wrote the last update on this tree i have been slowly adjusting some of the deadwood and mulling over various adjustments and future plans.
It really needed an angle change and a better pot. As luck would have it I have just got back from a trip to Japan where I found a pot I thought might work well with this tree.
Upon arriving home, being at the beginning of re-potting season I got straight into getting this tree into its new container. I think it is a good fit. I like the colour, shape and size and it should leave a decent amount of soil available for the tree to grow strongly and fill in over the next season.
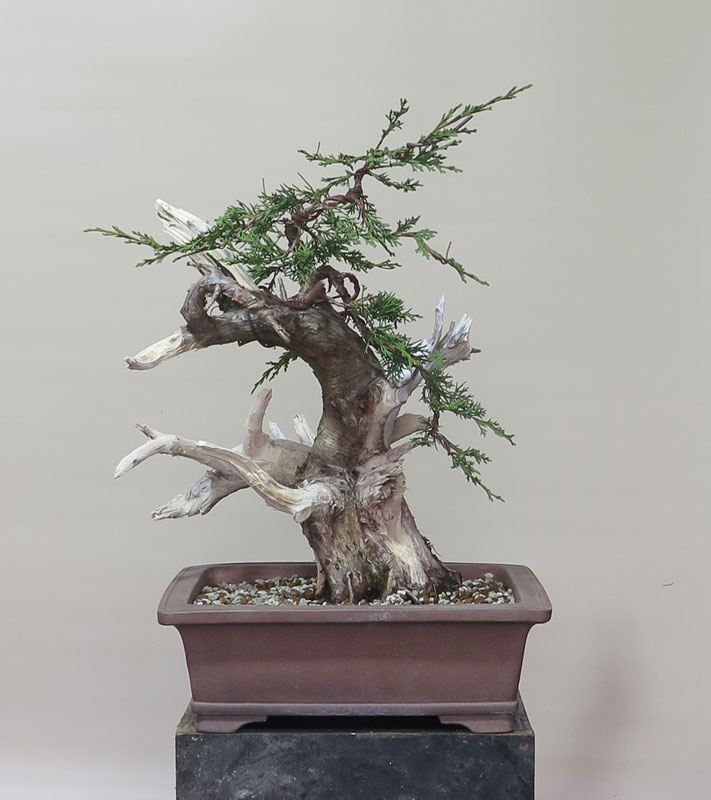
I messed around with fronts and planting angles a fair bit and landed on the above.
It’s so good to have the tree now potted at what is at least very close to the final angle and into a pot that is much nicer proportioned than it’s previous home.
I am glad i re-potted this tree this season as i found a lot of old garden soil in close to the trunk that i was able to remove and replace with bonsai mix. It should set things up for a bright future.
I have a number of other junipers i will be grafting in the next couple of months and will try to get pics as i do. It is a great way to produce bonsai material as you can see from the above tree.
What to do with boring stock? Good stock is out there but often hard to find or expensive. On the flip side, straight, untrained whips are available not only at bonsai nurseries but at almost every general nursery as well not to mention you probably have a number of neglected cuttings that you took years ago struggling along in the ‘ill get to it later’ area of your backyard.
Which gets me to today’s post. After going through the recent batch of stock that came into my garden these 3 plants were by far the least inspiring. Long, leggy, dead foliage and a general lack of interest in the trunks. Essentially material i would usually ignore if i was in the market for bonsai stock.

But material like this can be a good opportunity to begin something that ends up being interesting and potentially great, all at the work of your own hands.
The stock above is getting to the point where most people would give up on the idea of getting a tree with good movement out of the fairly stiff and straight trunk lines. But for certain species, and especially shimpaku juniper material like this can pose a good opportunity if found for the right price.
First you need to clean up the material.

I tend to remove dead shoots, competing trunk lines and thin the branching aiming for a general spread of branches at good intervals along the trunk. In the case of the trees above i also removed strong branches as well i want these to end up more on the Bunjin side of the style spectrum and therefore I only want short compact branches.
I then applied raffia to the trunks. I don’t often use rafia but due to the thickness of these whips and the tight bends i intended, applying the raffia was a worthwhile addition.
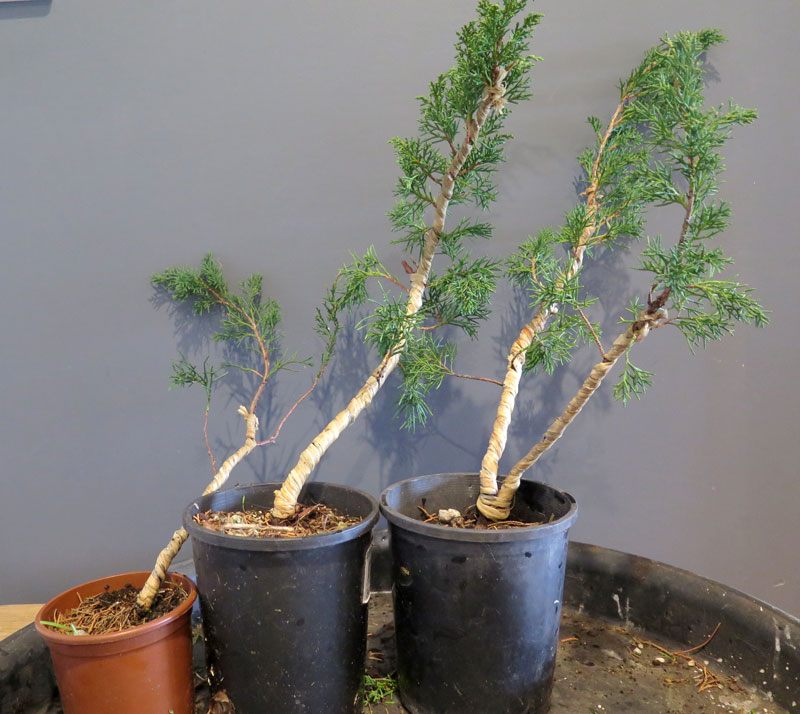
Wire goes on next, I ensure that the wire is coiled on in the same direction as the raffia beneath. This is done so that as i bend, i can also twist the wire in the same direction the rafia was applied in. Having the raffia and wire both tighten to the trunk hopefully provides support to the inner fibers, rather than these wrappings loosening off and allowing room for breakage.

I applied two wires up each trunk and spaced the wraps apart rather than doubled them up together. This provides more points of contact along the trunk and more support along the bends, hopefully further reducing the chances of breakage.
Now comes the fun part. The bending.

The trees were bent making sure to twist the trunks in the same direction that the wire and raffia had been applied, essentially tightening it all down against the trunk.

I also wanted to introduce this twisting for the next phase of the process that will happen after the bends have set, Shari.

As the bark on the tree also twists as the trunk and raffia and wire are twisted through the bends, the sap lines will twist and spiral around the trunkline. This means that removing bark along these sap lines will create sharis that also spiral around the trunk as it moves along its length. While you can on young stock force a twist in the live vein via cutting a spiral, the effect you get from twisting the trunk originally is far easier and i think a superior end result. A tree that has been twisted like this will also have the heart wood fibers twist and follow the twist of the shari making any carving via fiber pulling automatically follow the shari lines.

All in all a productive morning, turning some trees with no potential into material i am pretty excited to continue to develop into the future.
All the trees were bent pretty hard with some cracking and complaining heard from each one. I am not worried too much about their survival as they can tolerate this fairly easily and as this is the first time i have worked them i am not loosing much of a time investment if they fail. Nothing risked, nothing gained, and if you are going to do a high risk process on a bonsai it might as well be before it becomes valuable.
I hope the above inspires a few of you. The starting material for this technique can be found in most peoples backyards, most bonsai nurseries and every club sale day. You can grow these whips from cutting fairly quickly and easily also if you are struggling to find it in the wilds.
I would recommend everyone give it a go, its a very easy way to create good material at a very low cost. Why not make a heap and sell some on! People are always after twisty junipers and you will be helping to lift the average of quality stock in this country!
