
You are currently browsing the tag archive for the ‘Juniperus chinensis’ tag.
What to do with boring stock? Good stock is out there but often hard to find or expensive. On the flip side, straight, untrained whips are available not only at bonsai nurseries but at almost every general nursery as well not to mention you probably have a number of neglected cuttings that you took years ago struggling along in the ‘ill get to it later’ area of your backyard.
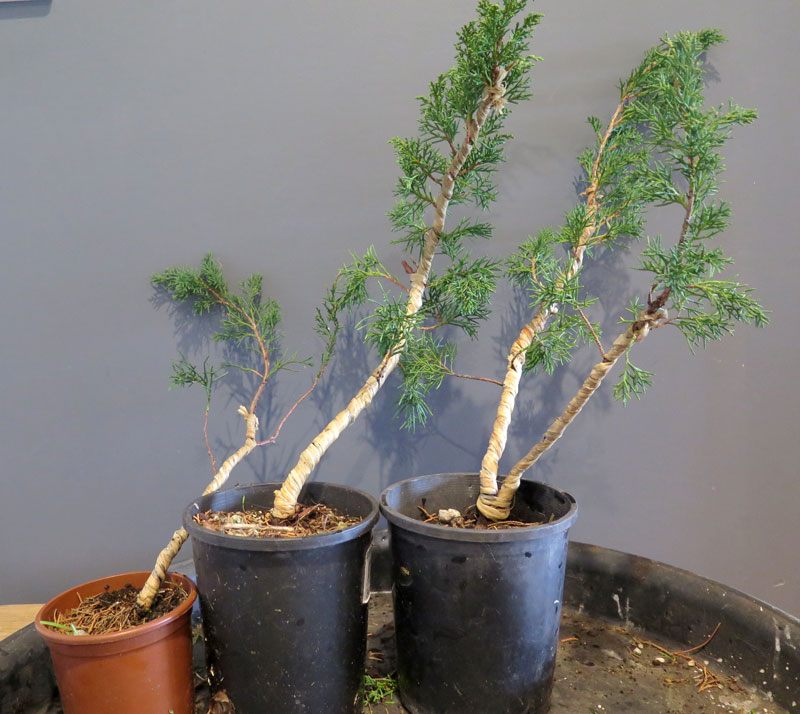
Which gets me to today’s post. After going through the recent batch of stock that came into my garden these 3 plants were by far the least inspiring. Long, leggy, dead foliage and a general lack of interest in the trunks. Essentially material i would usually ignore if i was in the market for bonsai stock.

But material like this can be a good opportunity to begin something that ends up being interesting and potentially great, all at the work of your own hands.
The stock above is getting to the point where most people would give up on the idea of getting a tree with good movement out of the fairly stiff and straight trunk lines. But for certain species, and especially shimpaku juniper material like this can pose a good opportunity if found for the right price.
First you need to clean up the material.

I tend to remove dead shoots, competing trunk lines and thin the branching aiming for a general spread of branches at good intervals along the trunk. In the case of the trees above i also removed strong branches as well i want these to end up more on the Bunjin side of the style spectrum and therefore I only want short compact branches.
I then applied raffia to the trunks. I don’t often use rafia but due to the thickness of these whips and the tight bends i intended, applying the raffia was a worthwhile addition.
Wire goes on next, I ensure that the wire is coiled on in the same direction as the raffia beneath. This is done so that as i bend, i can also twist the wire in the same direction the rafia was applied in. Having the raffia and wire both tighten to the trunk hopefully provides support to the inner fibers, rather than these wrappings loosening off and allowing room for breakage.

I applied two wires up each trunk and spaced the wraps apart rather than doubled them up together. This provides more points of contact along the trunk and more support along the bends, hopefully further reducing the chances of breakage.
Now comes the fun part. The bending.

The trees were bent making sure to twist the trunks in the same direction that the wire and raffia had been applied, essentially tightening it all down against the trunk.

I also wanted to introduce this twisting for the next phase of the process that will happen after the bends have set, Shari.

As the bark on the tree also twists as the trunk and raffia and wire are twisted through the bends, the sap lines will twist and spiral around the trunkline. This means that removing bark along these sap lines will create sharis that also spiral around the trunk as it moves along its length. While you can on young stock force a twist in the live vein via cutting a spiral, the effect you get from twisting the trunk originally is far easier and i think a superior end result. A tree that has been twisted like this will also have the heart wood fibers twist and follow the twist of the shari making any carving via fiber pulling automatically follow the shari lines.

All in all a productive morning, turning some trees with no potential into material i am pretty excited to continue to develop into the future.
All the trees were bent pretty hard with some cracking and complaining heard from each one. I am not worried too much about their survival as they can tolerate this fairly easily and as this is the first time i have worked them i am not loosing much of a time investment if they fail. Nothing risked, nothing gained, and if you are going to do a high risk process on a bonsai it might as well be before it becomes valuable.
I hope the above inspires a few of you. The starting material for this technique can be found in most peoples backyards, most bonsai nurseries and every club sale day. You can grow these whips from cutting fairly quickly and easily also if you are struggling to find it in the wilds.
I would recommend everyone give it a go, its a very easy way to create good material at a very low cost. Why not make a heap and sell some on! People are always after twisty junipers and you will be helping to lift the average of quality stock in this country!
As you may or may not be aware, I have recently undergone surgery on my right wrist. Being right-handed, this has put a fair dent in my bonsai plans of late.
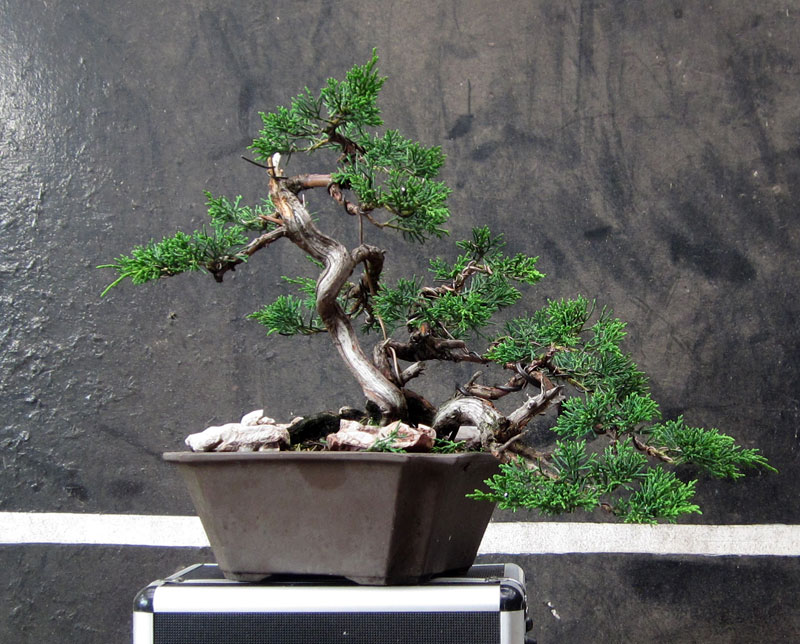
A few nights ago after work I decided to do something about it and tried wiring up a small juniper.

Before the work
I have been working on this tree for a few years now, slowly chasing the foliage in closer to the trunk and replacing leggy growth with tighter growth. I decided that it was about due for its first styling so that I could create the bones to grow and fill in the foliage upon.
Considering that my right arm was in a cast I think the wiring went ok. It’s not show ready but it never was going to be. It has a few more years before it is going to be anywhere near presentable.
I really wanted to get some fine sand paper into the bark to reveal the orange / red texture below the outer layers but the cast proved too clumsy. Something to look forward to once the pins from the wrist are removed after the next operation.
The little shimpaku from the front.
I find that when wiring junipers and particularly shimpaku, that preparation is key to a good result. Pruning unwanted growth and thinning what remains so that you end up with an evenly dense canopy not only makes the end result look better but it also makes for more balanced growth and an easier job while wiring.

As seen from the right

and from the back side
All in all I am pretty happy with the results considering that most of the wiring was done one-handed. I guess it just goes to show that interesting trunk movement is half the battle. That being said, the tree is only just beginning its journey as bonsai and should see many future wirings to come.
Following on from yesterdays post I thought it would be good to include some examples of approach grafts that were at Taisho en while I was studying. The two examples below are using approach grafting for two different reasons. The first is grafting roots onto an upper section of a trunk to shorten a bonsai. The other is using the technique to both replace foliage and graft on new roots.

What do you do when you want to shorten the trunk of a species such as Tsuga that doesn't aerial layer well? Approach graft!

Here you can see some new roots being grafted to a Tsuga trunk. The roots have been wrapped in cloth and are both watered and fed as if in a standard pot.
The taxus tsuga above was an interesting bonsai with an un-interesting lower trunk. The image of the bonsai could be greatly improved by shortening the trunk and hence roots were approach grafted onto the trunk.
The below juniper was undergoing a major change too. It was a tosho or japanese needle juniper (Juniperus rigida). It was very large stock extending about 2-2.5 meters in length. It had some great movement and excellent jin/shari. The future for this tree was to break it up into sections. By grafting new roots and new foliage along the live vein at key points the large piece of stock would be able to be broken down into 3 or 4 bonsai, all with nice movement and good foliage. Shimpaku juniper was grafted onto the tree instead of more tosho as it is a more popular species and therefore easier to sell once the separation is complete.

As you can see this is a large piece of stock that is both too big to become an exhibitable bonsai (by Japanese standards) and the foliage is that of needle juniper which is not popular in Japan at the moment. How would you improve this material? Approach grafting.

In this case roots are being grafted onto a section of live vein in order to allow the entire trunk to be split up into smaller individual bonsai.
Hopefully from these two posts you can see the possibilities that this technique can provide. The ability to manipulate your stock and bonsai is a powerful tool in the bonsai artists arsenal. Shortening trunks, adding branches and changing foliage types can be controversial in some bonsai circles but I think that when push comes to shove the results speak for themselves.
I have been quite lucky that I have been able to visit a number of Japanese nurseries (SEE HERE). I love seeing the high quality trees and amazing level of finish and polish that these trees posses, but what I have also found very interesting during these visits is looking into the back of house areas where bonsai are in various stages of transformation.
Air layers, grafts and other techniques are all on display out the back of most nurseries. It not only gives you a look into these techniques but also gives you some ideas on what sort of material to apply these techniques to.
One such technique is approach grafting.

A needle juniper is slowly changing its clothes. Soon it will be a much more valuable shimpaku. The white lump is the rootball of the scion which is wrapped in towel to protect its roots.
While I was studying at Taisho-en I was able to see this technique used to improve a range of stock. Shimpaku were given smaller foliage. Needle junipers were given shimpauk foliage. Roots were moved closer to the foliage to shorten trunks. It was obvious that after only a short stroll through their back of house that this was a valuable technique.
The technique itself, whether you are grafting on new roots or new foliage, is rather simple.
- Find a scion whip of the same species around 1-2 pencils thick and slice a sliver of bark off opposite sides at the point you want the whip to be grafted.
- Cut a channel in the trunk the same depth as the whip is thick.
- Widen this channel with a sharp knife to ensure clean cuts. The width of the channel should make a snug fit for the cut down section of scion.
- insert the scion into the stock trunks channel. Ensure that the cambium layers meet up accurately along the top edge of the channel cut.
- Fix the scion into the channel so it will not move or become miss-aligned. You can tie it with grafting tape or use a nail or two, screw etc.
- Cover it all in some type of sealant and wait for it to take.

I drew up a quick diagram to help explain the technique a little.
The scion whip can be from several sources. It could be a long branch doubled back on itself and grafted into the trunk, or could be a small whip that is growing in its own pot. If your scion is of the second type you may need to wrap the root ball in hessian or towel if the root ball ends up in a strange position after being grafted.
How long does the graft take to be successful? That is a difficult question. It is species dependent, growth dependent and also depends on how well you aligned the cambium layers in the first place. Although you can have success with poorly aligned cambium layers in this technique due to the face that both scion and stock support themselves before the graft takes, it is much faster to align the cambium correctly from the get go. I would say that most approach grafts would need one to two years to take. After that you could begin to reduce the original foliage over time and slowly let the new grafted foliage take over.
All in all it is a very useful technique that can be use to get you new roots, new foliage and generally improve difficult stock.
In the next day or so I will be posting a few examples to further illustrate the technique.
To see some real life examples have a look at “Approach grafting 2”.
The tree below is one I worked on a couple of years ago. It is a large Shimpaku Juniper that had some great deadwood. When I was working on it, it was in the process of having some new roots grafted onto it. Because of this the styling was kept to just main branches, leaving the tips somewhat free so as not to stress the tree too much.

The tree before any work May 2009. There is a foam box that is holding soil for the grafts at the base. The layer was on the tree so that the deadwood would be brought closer to the soil surface and give the tree a more solid base.

After several hours wiring.
On my latest trip to Japan I re-visited Taisho-en and was reaquainted with this tree. The grafts had been a success and the tree had found a new home in a new bonsai pot.
It’s always nice to see trees you have worked on after some time apart. I get a similar feeling to that of seeing an old friend. When I saw this tree in the nursery I took my time looking over it and revisiting the familiar curves and lines of the trunk and branches.

The tree as of January 2011. The angle of the tree is a little more upright now and the base appears much more solid now it is lower in the pot. If you look closely you can see a tuft of foliage at the base that is still attached to the root graft.
I wonder if we will cross paths again.
The tree in this post was another i worked on while in Japan. It arrived at the nursery one day and was in need of a re-think and re-style.
The major change was to stand it up.

Before the work.
I first wired the tree, keeping the small second trunk and then re-potted it into its new upright position.

After the work
As the tree had its angle changed so dramatically it needed time to re-establish a new rootball that could support it in its new position. In the mean time a bamboo prop was used to take the weight of the tree while the rootball became stable enough to support itself.
Unfortunately some of the lower shari had been buried in the previous potting angle and as a result had rotted. I feel that the base would have appeared much more impressive had it still had deadwood at its base.
It was a nice tree to work on, but at the time i guess it got lost amongst all the other high quality trees in the nursery.
This was by no means a top tree but looking back at it now I would kill to work on material such as this in Australia.
I guess I will have to sharpen the shovel and keep an eye open for urban junipers in friends gardens.
I like growing and working on shohin sized bonsai. This Shimpaku was another that I was lucky enough to style while at Taisho-en, Japan.
It had all the makings of a good bonsai, but had become overgrown and needed to be styled.

This is the small Shimpaku before the work began.
The trunk line had an interesting twist and the shari and live vein had started to contrast with one another nicely.

And this is the tree after styling
This work was really just a wiring exercise. I was able to position most of the foliage into good positions but it really needed a year or twos growth to fill out some of the weaker branches. The foliage was positioned in a way to allow the viewer to see the nice twists in the trunk and shari.
All in all it is a very nice tree that can only improve as it ages. This was definitely a tree I wished I could have put in my suitcase before I left.
The following tree was a large Shimpaku (Juniperus chinensis) I worked on towards the end of my first stay at Taisho-en, Japan.

Before the majority of the work (first branch wired)
It is a tanuki (or phoenix graft) which had a couple of issues.
The first problem was that the grafted foliage was of a very large and coarse variety which at the time of styling was not particularly popular with buyers in Japan. They were more interested in the fine dense foliage of the itoigawa shimpaku from the Niagata region and similar fine shimpaku varieties.
The other problem was that the live veins were not entirely convincing in how they were attached to the deadwood.
Having said that I still feel that the tree ended up an impressive bonsai and I am proud that I was allowed to have an imput into the tree future.

After many hours wiring
This is the first post i have made on this new blog. Hopefully these posts will be fairly regular and will record whats happening in my garden and any interesting things i come across. I will also try to include a few bits and pieces from my studies at Taisho-en in Japan.
As a start i will kick things off with this small shimpaku i styled on my last visit to Taisho-en.
![]()
