
You are currently browsing the tag archive for the ‘Shari’ tag.
Just a quick post today tracking a task I do on the semi regular to develop the junipers that have deadwood and shari features.

Above is yet another of my trees in desperate need of a wire. While I didn’t wire it today, iI did do a little thinning of the foliage in preparation for summer growth and a future styling. The main task i completed however, was the widening of the shari’s on the tree.
If you’re interested in seeing the tree 10 years ago, HERE’S it’s first post.
I do this task every couple of years to slowly reduce the sizes of the live veins which speeds up trunk thickening (or more like widening) and develops the shari’s texture.
The technique it’s self is fairly straight forward and involves removing a couple of mm of bark along the edges of the shari. It is a fairly safe process as you have to be pretty unlucky for the branches above to be reliant on the narrow strip of bark but it does pay to make sure that you are not removing all of the bark from directly below branches.

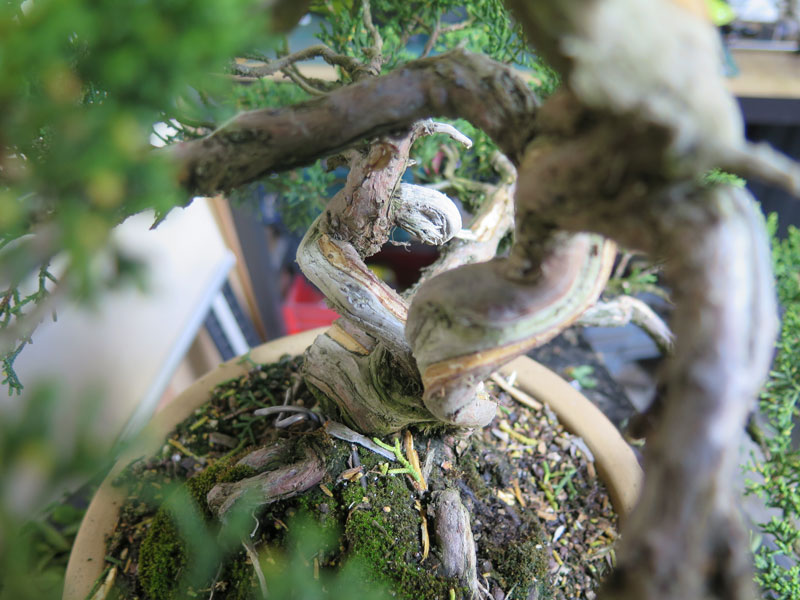

You can see the freshly exposed shari in the images above.
By reducing the size of the live vein you direct the same amount of sap (to supply the foliage above) through a thinner section of bark and as a result it tends to thicken in this area much more quickly compared to a larger area of bark supporting a similar amount of foliage. If you then have live veins on each side of the trunk they will grow outwards and appear to thicken the trunk much more quickly (if only in one side to side dimension.)
The other benefit of doing this technique over time is that you get a great texture on the shari areas. As you expose these new areas of shari, you are exposing younger heart wood and as a result you get lines appearing between the younger and older area of shari. You can see this quite clearly in the images above where there is a year or two age difference between each line. You can end up with an almost finger print like pattern on the shari with no need for carving and its a fairly effortless way to achieve a nice texture.
The tree below is one I worked on a couple of years ago. It is a large Shimpaku Juniper that had some great deadwood. When I was working on it, it was in the process of having some new roots grafted onto it. Because of this the styling was kept to just main branches, leaving the tips somewhat free so as not to stress the tree too much.

The tree before any work May 2009. There is a foam box that is holding soil for the grafts at the base. The layer was on the tree so that the deadwood would be brought closer to the soil surface and give the tree a more solid base.

After several hours wiring.
On my latest trip to Japan I re-visited Taisho-en and was reaquainted with this tree. The grafts had been a success and the tree had found a new home in a new bonsai pot.
It’s always nice to see trees you have worked on after some time apart. I get a similar feeling to that of seeing an old friend. When I saw this tree in the nursery I took my time looking over it and revisiting the familiar curves and lines of the trunk and branches.

The tree as of January 2011. The angle of the tree is a little more upright now and the base appears much more solid now it is lower in the pot. If you look closely you can see a tuft of foliage at the base that is still attached to the root graft.
I wonder if we will cross paths again.
The following bonsai is one of the first trees I collected a number of years ago.
It is a radiata or Monterey pine (Pinus radiata). I quite like the species to work with but i am still trying to really get a grip on how to best grow and refine them. Perhaps i should make a future post on this subject.
Before it began its life as a bonsai it was located on the edge of a pine plantation where it had grown on a road batter. It had a very interesting curve in the trunk which was either from machinery running it over at some stage of its life or from it trying to seek the light through the long, tangled grass in which it was growing.
After collecting it took a couple of seasons for it to recover and become strong enough to be styled.

The tree before is life as a bonsai. It was needle plucked and readied for its first styling.
I styled is initially at a club night as part of a demonstration. At this time i wrapped the trunk in electrical tape as a substitute for raffia and put a second large bend in the trunk. The bend seemed quite severe to those watching at the time but the little pine bent easily. I then wired it fully and placed the foliage.

The first branch bent into position before the major bend was made.

A top view taken some time after the first styling. The dotted line shows the trunk line. The second bend is the one made during the first styling.
The tree recovered well and I lived with its style for some years while working on ramifying the branches. I didn’t mind the style but, I always thought there was something not quite right about it.

The bonsai was growing well after its first styling. It was un-wired and soon needed work.

The back side. I had often looked at it from this side and thought about a possible front.

The front after a re-wire. It was around this time that the shari seen in the next images started to develop.
Even after a re-wire the style still was not sitting well with me so, i decided to take it to a critique session by a visiting Japanese Professional, Hirotoshi saito. He suggested that we do re-style and stand the tree up roughly 90 degrees. So, a few days later the tree was styled. It was quite a dramatic change but definitely one for the better.

The results after the second re-style.
That was back in July. The tree was very healthy and had grown strongly, as a result there were multiple places where wire was cutting in.

The pine after its spring growth.

A side view.

The back. From this view you can get an idea of the extent of the shari that naturally developed. Hopefully i can extend this over time to the front of the lower trunk.
It was time for some work. I plucked and cut needles to allow more light and air into the interior of the tree and also removed most of the wire. I was happy to see that most of the branches had set in position.

The tree after the work.
The tree is far from finished and i will need to re-wire it again this winter. Pines with movement such as this are common in collected pines in europe but you rarely see them in Australia.
Hopefully if everything goes to plan it will have a bright future in its new upright style.
I just thought I would add a quick before and after of a large white pine I styled while at Taisho-en.
It one of the largest trees i have worked on to date. It had quite a good canopy of foliage to work with and some nice features such as the shari on the lower trunk and the interesting kink in the first branch.
It was a big undertaking and took the best part of two days to fully wire. The planting angle was changed and the foliage was adjusted to suit. Some heavy bending was needed to compact the first branch as can be seen from the reenforcing bar next to the trunk.

Before
Working on large trees is a little bit strange. You have to work very closely to the tree in order to apply wire and position branches but due to their size you cannot get a true understanding of how it looks in connection with the rest of the tree. When working on smaller sized trees often all it takes to see the tree in the whole is just leaning back in your chair.
When working on larger material you end up regularly walking a few paces away to look at what you have done in conjunction with the rest of the tree’s form.

After the work
You can get an idea of the size of this tree by looking at my fingers at the top of the blue screen. I was holding the screen above my head with arms close to full stretch.
