
You are currently browsing the tag archive for the ‘Taisho-en’ tag.
Both my bonsai and personal life have been busy of late. I am fortunate that this year I have been invited to demonstrate and run workshops across Australia for local club, groups and the AABC National Convention. On top of this travel I just begun winter styling of clients trees. It looks like I will have a fairly full book of client trees, workshops and demonstrations that combined with a young child, a house half way through renovations and a full-time job doesn’t leave a lot of time to work my own collections.
Today’s post is actually about a tree I worked on a year ago whilst in japan.
It was a small shimpaku juniper that Oyakata asked me to wire and style prior to taking it to auction the following day to be sold.

Prior to the work
I initially wanted to tilt the tree to the right so that the first bend would come in contact with the soil giving the appearance of a much larger trunk but Oyakata didn’t want to re-pot as the auction was so close and as a result we utilised the existing angle and front.
It turned out to be a fairly straight forward re-style and Oyakata told me it sold well at the auction.
Post work.
Looking back on trees like this it really gives me the incentive to start growing my own material to this standard. I now have a backyard big enough to experiment with a whole lot more stock so I am looking forward to starting this process off this year. Who knows, in ten years time I might have a whole lot of these ready for display………..
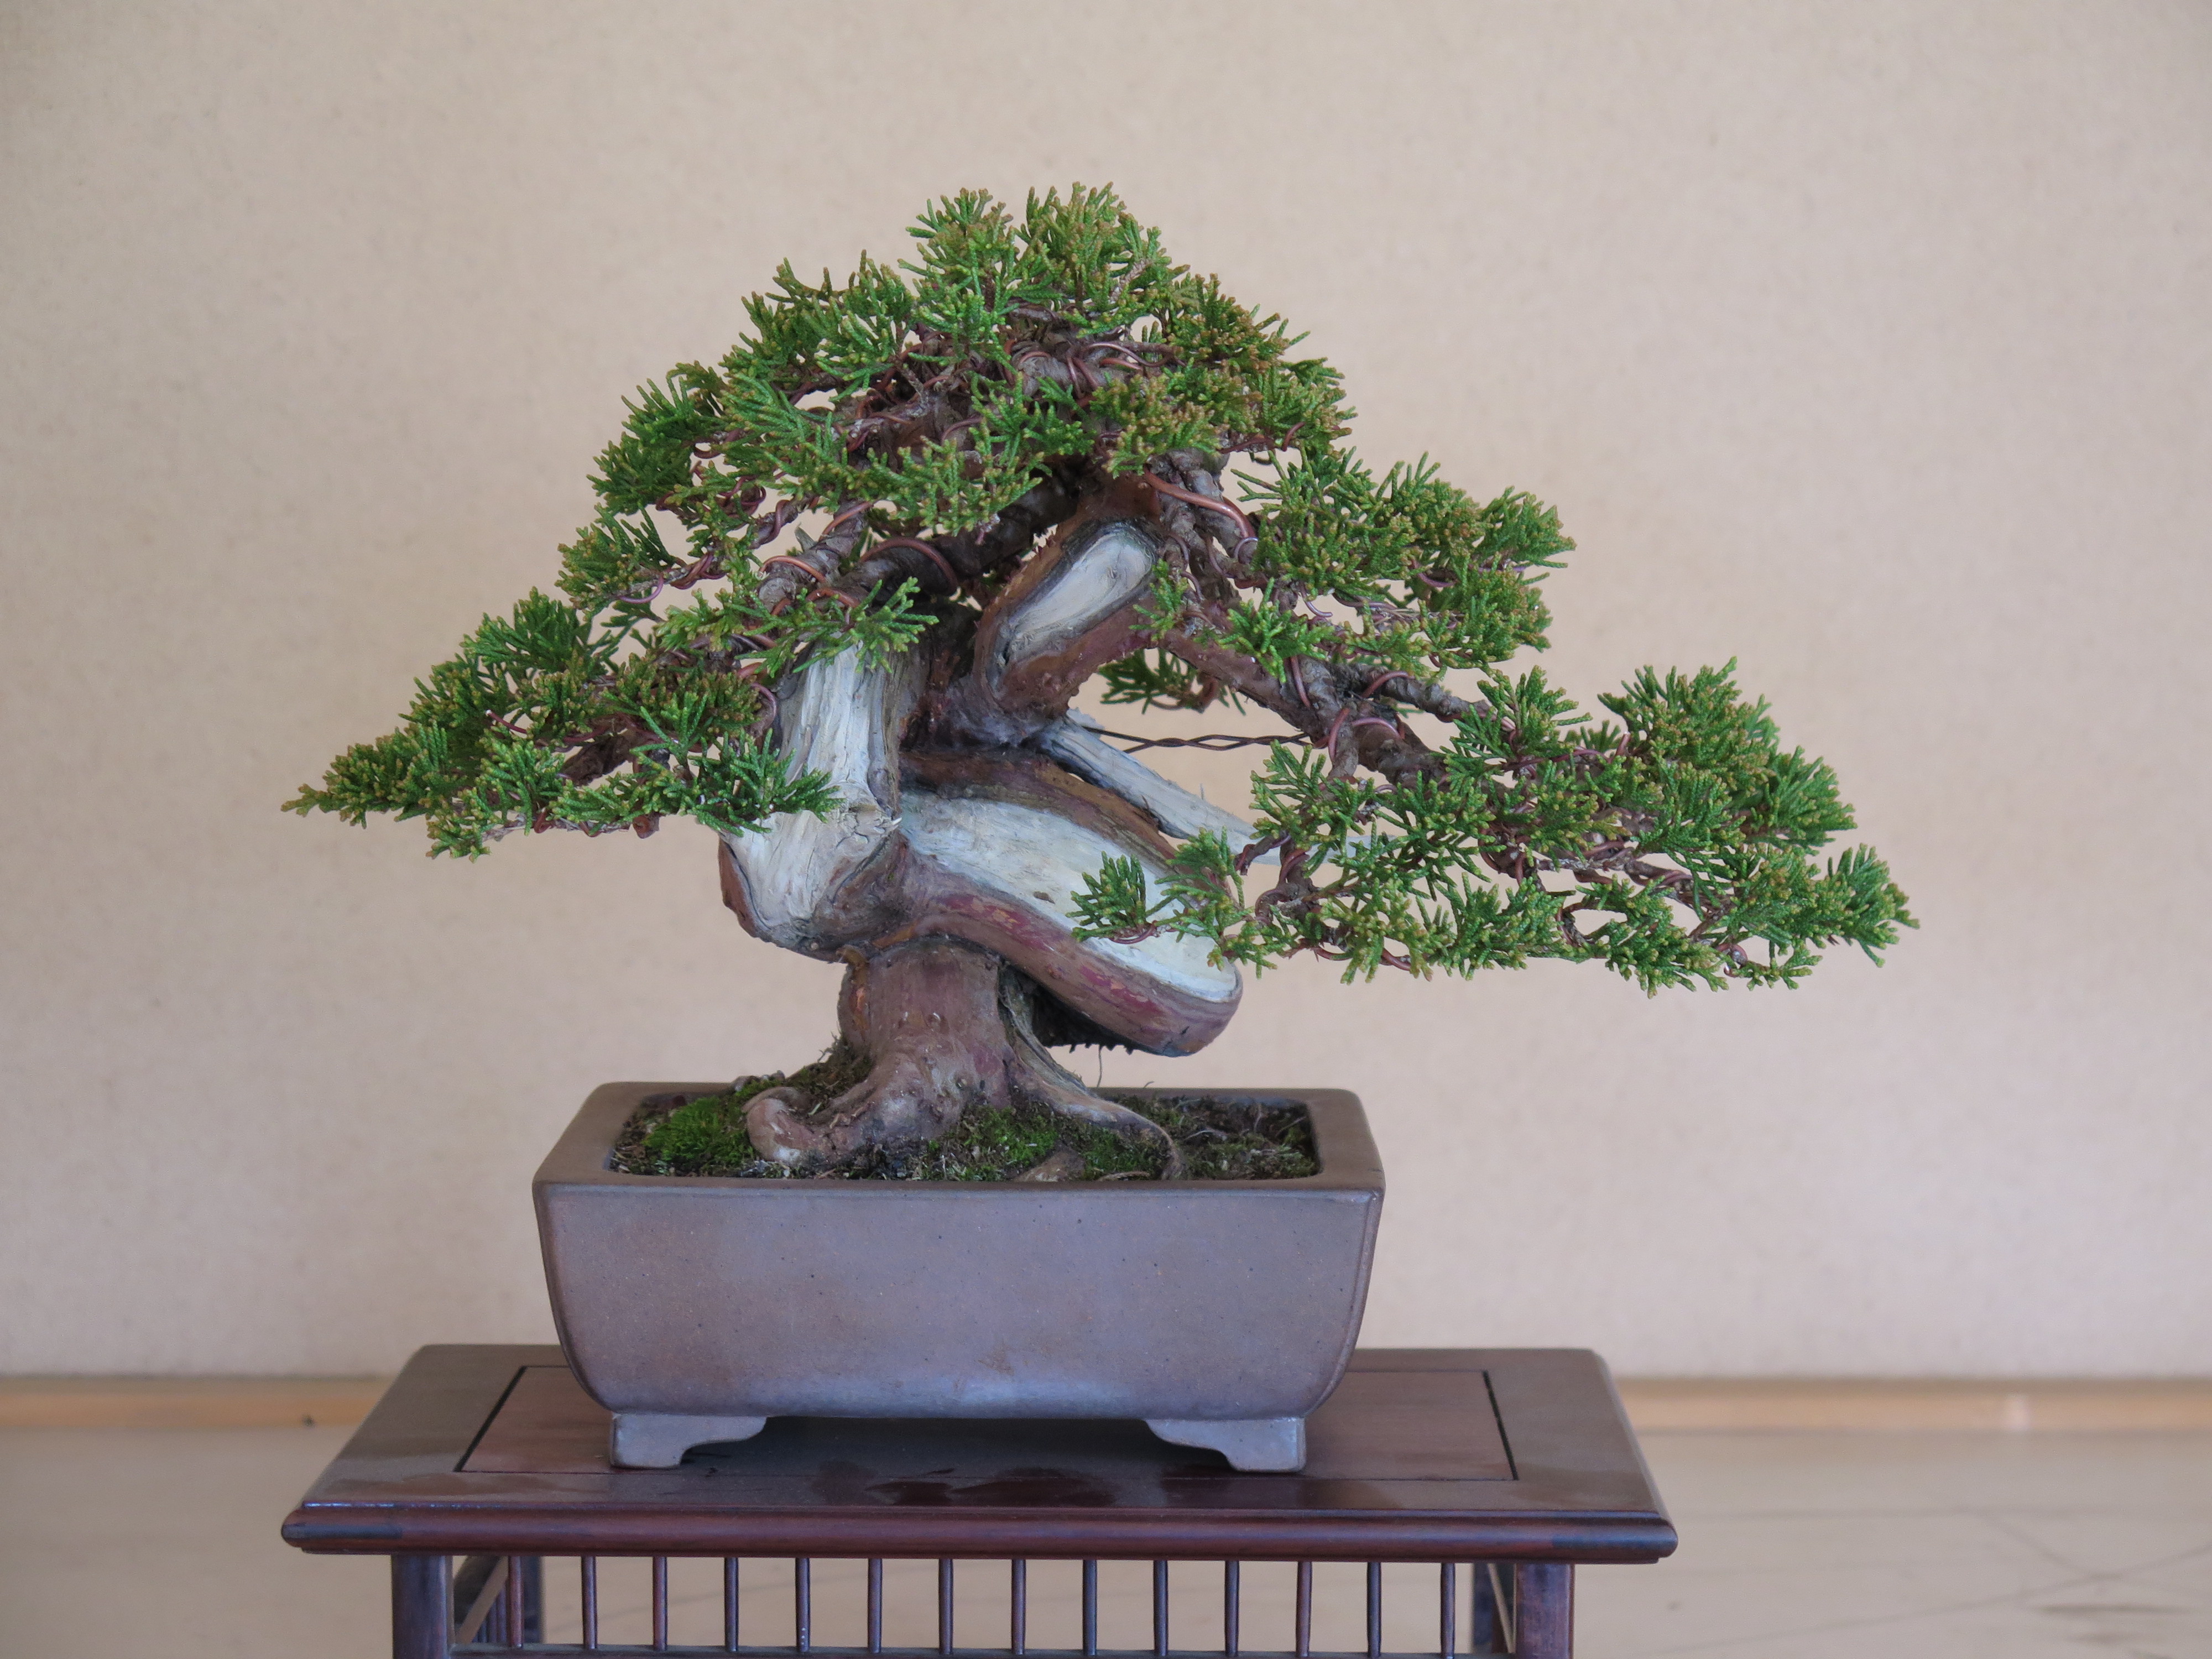
The tree below is one I worked on a couple of years ago. It is a large Shimpaku Juniper that had some great deadwood. When I was working on it, it was in the process of having some new roots grafted onto it. Because of this the styling was kept to just main branches, leaving the tips somewhat free so as not to stress the tree too much.

The tree before any work May 2009. There is a foam box that is holding soil for the grafts at the base. The layer was on the tree so that the deadwood would be brought closer to the soil surface and give the tree a more solid base.

After several hours wiring.
On my latest trip to Japan I re-visited Taisho-en and was reaquainted with this tree. The grafts had been a success and the tree had found a new home in a new bonsai pot.
It’s always nice to see trees you have worked on after some time apart. I get a similar feeling to that of seeing an old friend. When I saw this tree in the nursery I took my time looking over it and revisiting the familiar curves and lines of the trunk and branches.

The tree as of January 2011. The angle of the tree is a little more upright now and the base appears much more solid now it is lower in the pot. If you look closely you can see a tuft of foliage at the base that is still attached to the root graft.
I wonder if we will cross paths again.
I just thought I would add a quick before and after of a large white pine I styled while at Taisho-en.
It one of the largest trees i have worked on to date. It had quite a good canopy of foliage to work with and some nice features such as the shari on the lower trunk and the interesting kink in the first branch.
It was a big undertaking and took the best part of two days to fully wire. The planting angle was changed and the foliage was adjusted to suit. Some heavy bending was needed to compact the first branch as can be seen from the reenforcing bar next to the trunk.

Before
Working on large trees is a little bit strange. You have to work very closely to the tree in order to apply wire and position branches but due to their size you cannot get a true understanding of how it looks in connection with the rest of the tree. When working on smaller sized trees often all it takes to see the tree in the whole is just leaning back in your chair.
When working on larger material you end up regularly walking a few paces away to look at what you have done in conjunction with the rest of the tree’s form.

After the work
You can get an idea of the size of this tree by looking at my fingers at the top of the blue screen. I was holding the screen above my head with arms close to full stretch.
The below picture is of a branch I wired in Japan. It was actually the first piece of material i was allowed to place wire on.
When I first arrived at Taisho-en my duties were watering, sweeping/ cleaning and preparing hot water for the days tea. I did this for a few days as well as helping move the odd tree or other general task around the nursery. I also watched a lot. I watched people styling, pruning and working on a range of different tasks. I was actually enjoying the whole process even though i hadn’t really touched a bonsai yet.
One day Oyakata (Mr. Urushibata) brought me a branch that had just been cut off a white pine that was undergoing a re-styling and instructed me to ‘do wiring’. I was given a small space in the studio and was given some aluminium wire. I proceeded to wire that branch as well as i could. At the time it was the most advanced branch i had ever wired. Previously i had only seen pine ramification like that in books. Looking back at it now all i can see is errors in my wiring but at the time i was pretty happy with the result.
Oyakata was a little surprised. He seemed pleased with what I had achieved, although he said i had wired the branch too flatly. He then proceeded to adjust my work and explained how important volume within a branch was. I learnt a lot from that one cut off branch.

The first branch i was allowed to wire.
I passed my first test and that afternoon i was given my first tree to wire. A small Ezo spruce. It was a tree that was hidden up the back of the nursery. It didn’t look like much to start with but i was excited.

The Ezo Spruce before the work.
The apex was pruned out and a lower branch was wrapped in cloth (we couldn’t find rafia) with the intention of bringing it up to form a new crown.

The Ezo Spruce after the work
The tree was wired to the tips and I positioned all the branches and foliage. I then showed the results to Oyakata.
He again adjusted my work and explained why he was doing so. This was how my learning was to progress through out my stay. I would work on a tree without much help and then Oyakata would adjust my work and explain why. I learnt a lot over the course of my stay and every new tree I worked on had less and less adjustments made by Mr. Urushibata. Sometimes he would lower a branch a little or adjust some foliage, sometimes he would cut off some branches and sometimes he would make me cut off wire and re-apply it. Some trees had a lot of adjustments made others had none.
This process of working taught me a huge amount and I am very grateful that I was able to do it.
The Spruce and branch above were the beginnings of a very steep learning curve. I look back at them now and see a few things that I would do differently now as I am sure i will do when looking back at my current collecting sometime in the future. Although i may not be on as steep a learning curve as i was on my first visit, i am constantly learning from those around me and from my observations of my own bonsai. Hopefully i can spend some more time at taisho-en in the future and continue to improve.
The tree in this post was another i worked on while in Japan. It arrived at the nursery one day and was in need of a re-think and re-style.
The major change was to stand it up.

Before the work.
I first wired the tree, keeping the small second trunk and then re-potted it into its new upright position.

After the work
As the tree had its angle changed so dramatically it needed time to re-establish a new rootball that could support it in its new position. In the mean time a bamboo prop was used to take the weight of the tree while the rootball became stable enough to support itself.
Unfortunately some of the lower shari had been buried in the previous potting angle and as a result had rotted. I feel that the base would have appeared much more impressive had it still had deadwood at its base.
It was a nice tree to work on, but at the time i guess it got lost amongst all the other high quality trees in the nursery.
This was by no means a top tree but looking back at it now I would kill to work on material such as this in Australia.
I guess I will have to sharpen the shovel and keep an eye open for urban junipers in friends gardens.
I like growing and working on shohin sized bonsai. This Shimpaku was another that I was lucky enough to style while at Taisho-en, Japan.
It had all the makings of a good bonsai, but had become overgrown and needed to be styled.

This is the small Shimpaku before the work began.
The trunk line had an interesting twist and the shari and live vein had started to contrast with one another nicely.

And this is the tree after styling
This work was really just a wiring exercise. I was able to position most of the foliage into good positions but it really needed a year or twos growth to fill out some of the weaker branches. The foliage was positioned in a way to allow the viewer to see the nice twists in the trunk and shari.
All in all it is a very nice tree that can only improve as it ages. This was definitely a tree I wished I could have put in my suitcase before I left.
The following tree was a large Shimpaku (Juniperus chinensis) I worked on towards the end of my first stay at Taisho-en, Japan.

Before the majority of the work (first branch wired)
It is a tanuki (or phoenix graft) which had a couple of issues.
The first problem was that the grafted foliage was of a very large and coarse variety which at the time of styling was not particularly popular with buyers in Japan. They were more interested in the fine dense foliage of the itoigawa shimpaku from the Niagata region and similar fine shimpaku varieties.
The other problem was that the live veins were not entirely convincing in how they were attached to the deadwood.
Having said that I still feel that the tree ended up an impressive bonsai and I am proud that I was allowed to have an imput into the tree future.

After many hours wiring
This is a tree I styled on during my second stay at Taisho-en, Shizuoka, Japan. It is a Tosho (Needle Juniper) that was most likely collected.
I had seen it during my previous stay and had helped graft shimpaku foliage onto the live vein via the process of approach grafting. Subsequently, for what ever reason the shimpaku whip died and the tree grew out to a shaggy silhouette. Mr. Urushibata had decided that instead of trying to graft the foliage a second time that he would instead have me re-style it utilizing the original foliage.

The tree before the work
As tree had grown out so much it had to be pruned quite severely but enough remained to establish a good structure upon which future ramification could be built.
Tosho are an interesting species to work with. They display an ancient image (especially if you are lucky enough to have material such as this) and the contrasts between deadwood, live vein and the blueish hue of the foliage make them quite unique.
They are not the easiest species to style as they can be quite uncomfortable to work with. As their name suggests, their foliage is needle sharp and pierces your skin with almost every touch. This negative is countered by so many of the good features of this species. Even the dry heart wood rewards those who endure the sting with a magical sweet scent.
Personally I do like the fact that the tree leaves a mark on you. Days later while my hands were stinging while washing up under a cold tap I would find my mind drifting back to the tree that left the marks.
Sometimes things are worth a bit of a struggle.

The Needle Juniper after the work
I hope that this tree is at the nursery when i next find the time to get back there as i would love to see how it is progressing and possible have a opportunity to feel its sting again.
