
You are currently browsing the tag archive for the ‘Ulmus parvifolia’ tag.
So it looks like spring is on it’s way early this year with Trident Maples and Chinese Elms in my garden already swelling their buds. This might not seem all that strange depending on when you are reading this post from but ‘down under’ we are still in July (at time of writing) and I don’t normally even consider repotting until mid to late August and often run into September and beyond.
NOTE: (for those in the northern hemisphere, the months of June, July and August are our winter. For the Americans who don’t have metric winters; a short summary of the above might be that we are 64 ⁄ 79 ths of the way through winter and trees are budding out.)
I was lucky this year that I had a YouTube celebrity come over and help me out.
For those interested, his YouTube channel “Jeff’s Bonsai” can be found HERE.

Jeff is a great guy and we had a great day together and it only cost me a bowl of reheated left overs for his lunch!
I had forgotten how nice it was to have company when doing bonsai. So much of my work is done on my own down the back of the garden in my little shed. I suppose that social isolation generally has only increased with Covid so it was a really nice change to have someone else around lending a hand.
I think together we repotted 12 or 13 trees in half a day or so. I don’t think I could have done half as many in that timeframe, so thankyou Jeff.
The other thing you might notice from the above image is the black mesh screen on top of my green waste bin. This was another idea I got from Jeff (noticed in one of his videos). The night before he arrived I welded up the screen to easily and cleanly get all the old soil into the compost bin without risking the tree or tools falling in. It worked a treat!
As for the trees we re-potted, eventually many of them may make it to the blog but in the mean time a couple you might recognise from older posts are below.


Thanks again to Jeff. With his help we have broken the back of what can often be an overwhelming and desperate race against swelling buds. Hopefully I can trick him into helping again!
I have been trying to keep my collection from growing any larger with mixed success over the last few months. What makes it especially hard is when you help friends dig stock out of their growing rows at their nursery.
This years visit to Shibui Bonsai was much like last years in that a lot of nice stock was dug (which I am sure a lot will be featured in the coming seasons catalogue). Although a lot caught my eye, I was well-behaved and none of the ground grown stock came home. That is not to say I didn’t bring anything back to the benches…….
For a while now I have been meaning to grow some small twisted mini’s to use as accents in 3 point displays. On the benches at Shibui, Neil had a range of interesting little chinese elm root cuttings that I thought would be perfect for the project so I brought one home.

The cutting out of its original pot
Today I wired the cutting to enhance some existing curves and then re-potted into a much smaller container in which I plan to start to grow a small crown from.
Often working out how to secure a small tree into a small pot which only has one drainage hole can be difficult but I have found the method shown below works well.

tie-in wire secured to a larger wire.
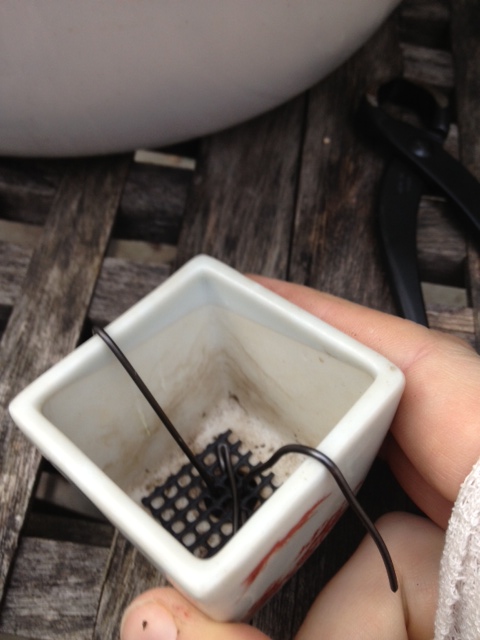
Mesh installed and tie in wires ready to accept the tree.
The pot itself is by no means a museum piece but it is a well made Marufuji production pot. Being a little on the large side will serve it well to help the tree establish some new ramification. Once I am happy with how the ramification is progressing I will look for a more suitable pot anywhere up to half the size of the current container.

The roots were reduced accordingly.
For such a small cutting the tree had grown a number of large roots all of which I removed and or shortened to fit into its new home.
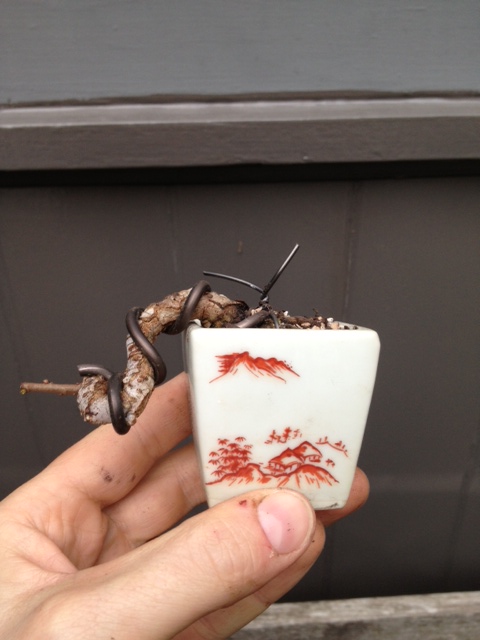
Potted up but before I trimmed the tie in wires.
After half an hours work the tree had found its new planting angle and its new pot. It is by no means a masterpiece but I think once I can develop some ramification it could make an interesting companion to a larger tree.
I think this little tree will make a nice addition to the collection in the coming years and being so small it shouldnt effect the space I have too much. In fact I probably have a whole lot of room for trees of this size.
Well, the inevitable happened and another tree has found its way into my collection.
While at a friend’s place I spotted the below corky bark Chinese Elm on his sale benches and decided I could make something of it. It had great taper, nice bark, some interesting movement and only a couple very small scars. Another bonus was it was of a size that would see it make use of several pots I have gathering dust on the shelves at home. For those interested, the tree is from the same grower that produced my other Cork Bark Elm.

The tree as i bought it.
Once I got it home I made a few preparations to set it up for next years growth. I cut off the taper-less apex section of trunk which also removed a lumpy section. I then reduced some of the heavy branches and pruned off any shoots that were not going to become part of the future structure. I think in the next few days I will have a go at bending the first left branch down a touch but we will have to see how that goes.

Ready for springs growth
I will probably re-pot it back into this container this year so I can get some fast growth out of it next season. Once I have the main branches and the start of secondary growth set I will pot it up into a bonsai container where I can start the ramification process. For now all it needs to do is grow, especially the new leader. It needs to really thicken up to continue the line of the trunk. This species is such a strong grower I should have the trunk-line and base branching set after a year.
The tree I worked on this weekend was a corky bark elm. It’s a tree a friend grew and I purchased from him a year or so ago.

The tree as I received it.
When i bought the tree, the trunk was covered in moss and the branch structure was difficult to see through the foliage. Once it was home, the first step was to prune the tree and clean the trunk and root base.

After a prune and clean up.
After cleaning the trunk and nebari and giving the foliage a good prune a few things became obvious. Firstly the tree had a good nebari thanks to the work my friend did while developing the stock. The trunk on the other hand was not bad but had a gentil curve in it which for some reason seemed awkward. The branch locations were ok but would require a fair amount of work to form an upright tree.

Un-potted
A season passed and I finally got around to re-potting. Re-potting was my chance to change the planting angle of the tree and really think towrads the future of the tree.

An Option?
I had toyed with the idea of making this tree a semi cascade while it was potted but once I bare-rooted the tree and tried it in a few semi-cascade positions I wasn’t entirely convinced. I spent some time tilting the tree this way and that, changing fronts, imagining grafted branches until I finally settled on a design.

Cambium layer exposed.
I pruned a few branches and also exposed some cambium in a couple of areas. The tree was to become a raft. Elms root very well but I felt a few areas of exposed cambium could only help speed rooting along the trunk up. I also put a couple bits of wire on the main branches to set the basic structure of the tree.

The final outcome.
This is a fairly one way solution. In order to get the trunk to lie over I have had to cut off half of the nebari making standing the tree up in the future not really an option. That said I am sure you would agree that this clump or turtle back style transformation is definitely one that has improved the tree for the better. The tree has a long way to go and it will be interesting to see how the corky bark copes with the close soil contact, that said I think that in the future it will grow into an interesting tree. Depending on how it leafs out, I will most probably give it a prune and full wire some time in mid summer. Hopefully by this time next year it will have rooted enough along the trunk to get it into a more shallow pot and really start its journey as a bonsai.
I am still slowly working through my collection and preparing for winter. This weekend this Chinese elm was cleaned up along with a couple of other trees.

Before the work.
The tree I worked on had recently undergone a re-style. Upon re-potting last year I also decided to change front slightly. This required a bit of pruning. As I began to prune I realised that the initial branch structure had been grown too quickly and lazily on my part. Many branches were too thick, had little taper and had messy structure. I decided that the change in front would also be a good time to re-structure the ramification so I pruned hard.

The same tree a year or two ago prior to re-styling.
Re-styling an established tree can be a hard step to take but ultimately having this tree go backwards for a couple of years will mean that in the future it will be a much better tree. Luckily chinese elms are strong growers and rebuilding the ramification should be a fairly quick process.
The work I did this time around was mainly removing leaves that had not yet fallen off and cleaning the trunk of moss and also cleaning up the soil surface.

The soil and trunk need a clean up.
Keeping your bonsai clean of moss and fallen leaves and other debris achieves a few things. First, it makes the tree look better which I always find makes me take better care of it. I also find that doing work that makes you look closely at your trees you become more familiar with them and it often reveals what future work will need to be done in coming seasons. The last thing a good clean often does is it reduces the hiding places for pest insects and places for their eggs.

A large caterpillar that was living under the moss growing on the trunk.
After a general clean I pruned the long growth and then sprayed with lime sulphur.

After the work.
All the tree needs now is a wiring and a re-pot sometime prior to spring. I am toying with the idea of lengthening the canopy on the left side and possibly growing a low branch from the left side of the hollow. I guess I will grow one and see how it goes next season, i can always cut it off if it doesnt work out.
I am pretty happy with the pot it is in at the moment. I was never really 100% on the last oval pot and feel this one suits it a lot better.
The pot is a production Reiho. Reiho is one of my favorite production potters from Tokoname. Although the photos don’t really capture it, the pot really changes moods depending on the sun. Sometimes in low light it looks almost black, and then in full sun it turns to an almost ultra marine blue. you can kind of see it by comparing the colour in the first pic with that of the soil surface photos. Hopefully next season I will get some good colour on the tree so I can see the yellow leaves set off against the dark blue fo the pot.
