
You are currently browsing the tag archive for the ‘Australia Bonsai’ tag.
As I managed to get some time to work on my trees this last weekend, I though it was a good opportunity to do some grafting before my black pines woke up too much. I like to do grafting on black pines just before they start moving in spring. For bud grafting this is important as once the sap starts to move in a big way any cuts made to hold grafts tend to flood with sap before placing the scion which makes them a little less successful. Approach grafts on the other hand are a little more forgiving but if I can I try to do them around the same time so that the burst of energy that comes with the first flush of candles extending goes into healing the graft site.

The graft site will be at the base of the thick bare section of trunk.
I have decided to graft this tree as it has a rather large bare section of trunk. If I can graft a new leader to the base of this I can build a much smaller and more compact tree with the new graft’s growth. Obviously this will be a longer term project but I figure why go down a long road just to end up at a mediocre tree. If this graft takes and the tree develops as I imagine it will be a far greater result in the future than had I just persevered with the existing structure.

The start of the process, a cut in the trunk.
The first step is to create a cut for the graft branch to sit inside. I like to make the cut about 1/4 smaller than the branch that is going to be inserted into it. I start by making the cut with a small saw. I try to make the cut so that it is wider at the rear of the cut than at the front edge. usually this takes two cuts, one slightly slanted upwards and a second slightly downwards. This flared cut will help the scion branch to lock into the cut.
Once I have made the first pass with the saw I clean up the cut with a knife so that I have clean and neat surfaces upon which the graft can be placed.

Some bark removed from the graft branch.
Next I remove a small slither of bark from either side of the scion branch. Make sure that you check where to make these cuts prior to getting the knife out as it is important that these cut surfaces line up with the cut surfaces you made with the saw. I usually find that the knife cute that clean up the saw cuts combined with the cuts on the scion branch tend to eliminate the 1/4 under size that was initially cut with the saw.

The graft made.
The Scion branch can now be inserted into the cut in the trunk. The fit should be snug and tight. Small adjustments might be needed to be made to the channel in the trunk to make sure things are all snug. If the channel is on the large side it is best to chock the scion branch so that it contacts firmly with the lower surface of the channel cut. (I use small twigs as chocks.) As sap runs from the roots up, contacting the lower surface will ensure that the graft has a better chance of taking than had it only contacted the upper surface. Either way, the scion should be firmly touching at least one cut surface on the channel in the trunk.

Sealed and held tightly in place.
Finally you simply seal the graft union and hold the scion firmly in place so that it cannot move and disturb the graft before it has had a chance to take.
The speed at which the graft takes will depend on the amount of growth you allow to occur on the scion branch and above the graft site. Obviously the more the trunk and scion branch grow and expand the more chance the graft has of taking. I would hazard a guess that this graft will be taken by the end of this coming seasons growth. Having said that I will probably cut off the growth above it in stages so it may be two seasons before I actually sever the scion branch from its original source.
Re-potting this year has been a rushed affair where I have been doing it when ever I have time. Mostly this seems to be under garden lights after work. Spring seems to be a little early this year which hasn’t helped as the schedule has had to be brought forward. Having said that, I have nearly got through all my trees. I have a handful left to do that I hope to get done this coming weekend.
As i have been in a rush there hasn’t been much time (or good light) to take many pics. Most of the re-potting I have been doing has been fairly un-interesting anyway and mainly just renewing of soil and replacing the trees into the pots that they came from.
One tree I did get to do during daylight hours was a trident maple. The pics i took were with my phone to see how that would work out and as you will see they are fine in good light (see the buds pic) and not so great when the light was getting low when i had finished re-potting the tree.

Buds starting to move
I talked about this tree with Boon while he was in Melbourne and also Hirotoshi saito. They both thought that the tree should be rotated slightly to the right. I had been tossing up whether or not to do this for some time before speaking to them but their advice made me decide to go ahead and try it. I am glad I did. A small tweak such as this 15 degree turn makes a lot of difference.

Left: the tree in August 2011. Right: the same tree, August 2012.
The reason I had been debating whether or not to make this change lay in the nebari. In the 2011 picture you can see that the nebari’s spread has a somewhat flat side to it which was facing the front. When it was rotated this formed an angle which is a little strange although there are a few good results of this change. First the slight thickening about 2/3rds of the way up disappears and there is more movement in the trunk. Also the branching is better from this new front.
I also tilted the tree forward a little. this moved the root ball a little and raised the soil in the rear of the pot a bit. I will correct this next re-potting once the roots re-establish themselves in the new position. I think i will also try to move the tree a little more to the right, i shifted it a bit this year but having seen the photos i think it could move over some more.
If you are interested in more of the re-potting process you can see the pics from last year HERE.
I have just got back from a weekend at a friends place, Shibui Bonsai. Shibui Bonsai is located in North east victoria about 3 and a bit hours from Melbourne and specialise in ground grown stock. I try to head up each year to help Neil (the owner) dig a few rows of tree out of the ground. Neil grows a range of species and this year we dug Tridents, Chinese Elm, Japanese black Pine, and Japanese Maple. In some of the other rows Neil had Chinese Quince, Shimpaku and a range of other desirable bonsai species that will probably come out after another season.

Matt swinging a shovel while Neil prunes the dug trees.
Having been up over a number of years now it has been great to see how trees develop over time. As trees are dug and pruned, they are sorted into those that might need to go back in the ground for another year and those that are ready to begin their life as bonsai. The digging went quickly this year as the trees had only been in the ground for a season and as a result didn’t have many large roots. The trident maples had really nice compact root-balls and as did the black pines which was a nice result and should make for them establishing into training pots much more quickly.

A batch of root over rock tridents, root and top pruned waiting to be potted up.
At this time of year Neil likes to dig the trees, prune them and then heal them back into a growing trench where they will happily sit dormant until they are potted up in a few weeks time.
Once potted up they spend around a year re-establishing themselves in the new pot before becoming available for sale.

Last years Tridents on the sale benches.

Some larger tridents.
Once we had finished the day’s digging we went for a drive into the local forest to have a look at a few things of interest. We checked out the old gold diggings while looking for native orchids in amongst the leaf litter. I think some of the native orchids would make excellent accents. Neil pointed out a few of the colony forming species as the most suitable and easy to grow. It is illegal to collect them from the wild but luckily they are available from local growers if you can hunt them down. I will definitely be keeping my eyes out for a few in the future.

The beautiful white trunks of the Brittle Gum.
I always enjoy heading up to Neil’s place. It’s a beautiful part of the country and it just happens to have an excellent grower there as well.
If you are interested in visiting Neil’s Nursery I believe you can via prior arrangement. His details are found on his website: http://shibuibonsai.com.au/ For those that can’t make the drive to his place, he does also sell regularly as local club shows and will be at the Bonsai society of victoria’s show this October.
Prior to the recent AABC convention, I was asked to style an established Japanese white pine that had reached a stage where it needed some work to get it back on track.
It had been worked on a number of years ago during a workshop held by Hirotoshi Saito where the second trunk was bent upwards from what was a heavy first branch. Since then the tree has grown out with the occasional branch guyed down from time to time and with some trimming to keep the growth somewhat compact. What the tree was desperately needing was a full wiring and styling.

As the tree arrived in my garden.
I cut a good amount of branches off and had to do some heavy bending to move the apex from leaning towards the back to leaning forward. Most of the work was sorting out branch structure and setting basic branch positions to prevent thickening in areas that you might not want it in the future and providing structure for the tree to grow into.

Some of the removed branches.

After a couple of days wiring.
The tree will really benefit from a couple of years growth to fill out some areas such as the apex, but it now has a solid base structure to build upon further in the future.
The graft in this trees case is quite noticeable at the moment but I think that once the white pines park begins to crackle it should start to blend in much more. How long will that take? Who knows. I think 10 years would start to see the process beginning.
You don’t see many White pines in Australia and particularly of this size. It will be a good tree to keep an eye on as it progresses in the coming years.
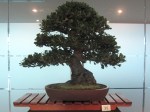
While I am going through my photos from the convention I thought I might share a few of the bonsai that were on display. The below pics are only a selection of the trees that were on display as I didn’t have the time I thought I might to take photos of the full exhibition. Enjoy.
-
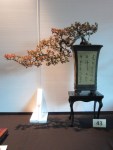
- Chinese Elm
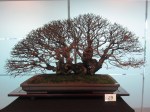
-
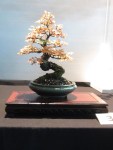
- Chinese Elm
-
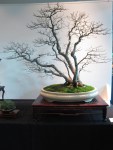
- English Elm
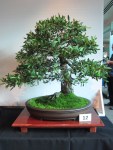
-

- Banksia
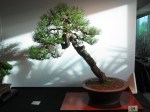
-

- Radiata Pine, Trident Maple
-

- Plum
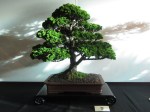
-

- Radiata Pines
-
- Calistamon
-
- Banksia
-

- Washington Thorn??
-

- Juniper
-

- Chinese Elm
-

- Trident Maples
-

- Olive
-

- Cedars?
-
- English Elm
-

- Japanese Black Pine
-
- Maritime Pine
-

- Chinese Elm, Trident Maple
-
- Shimpaku
-

- Radiata Pine
-

- Alder??
-

- Radiata Pine
-
- Chinese Elm
-

- Needle Juniper
-

- English Elm
It has been a busy couple of weeks. Autumn has begun and with it a range of seasonal tasks. I have been madly plucking Japanese black and Red pine needles. Here in Melbourne we have a convention coming up for which I have to prepare a few trees so I tried to get my needle work out of the way early on.
It took a long time this year. What hadn’t really dawned on me until now was that needle pruning takes more and more time each year. Now this is not a bad thing, its more a by-product of a successful technique. As ramification increases, so does the amount of needles you have to remove. Where last year I was removing needles from one candle there are now two candles at that location that need needles removed from them. Not only are there more needles to pluck, but also the space you have to pluck them in becomes more and more cramped forcing you to use tweezers to negotiate the cramped conditions.

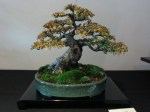
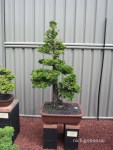
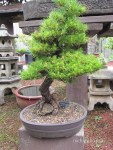
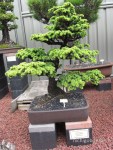
2008

2009

2012

2012 after needle plucking.
The above tree has wholly been grown in Australia and has come great leaps and bounds since I learnt how to properly care for it during my first trip to Japan. It is becoming a nice little tree although it is not perfect and it bears the marks of many of my early mistakes. That being said it has taught me a lot and although I have though about selling it on a couple of occasions I think now I would find it a little hard to part with. After all I have invested a huge amount of time into it.
Perhaps this is something to keep in mind when deciding on how large your collection should grow. How much time do you have, and will this time be enough to maintain your trees to a high level? Bearing in mind that as your trees improve and refine, in turn their maintenance times increase. I really enjoy growing pines but I am very aware of the time I have to spend on them each year. Needle plucking, pruning, wiring and candle work all add up. On a tree that is starting to get refined I am guessing I would be sending 6-10 hours on each of them over the year. When you add up all the pines you grow and then the time you spend on them, combined with the tasks you have for all other species you grow you begin to realise that there is a limit to how many trees you can look after to a high level. I lean towards keeping a smaller collection that is well maintained rather than a larger collection that doesn’t get the attention it deserves. That said it is hard to turn down a good tree.
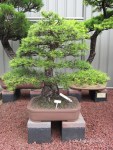
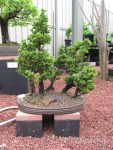
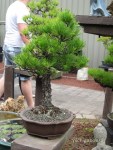
Amongst the display trees that I saw at collectors corner (which can be seen HERE and HERE) I noticed that a large percentage of the display trees were Pinus Radiata. In fact the first tree that greets you once you enter the nursery is a big old Radiata.

The welcome tree
This tree has been in possession of the nursery for a number of years and has always been an impressive bonsai. So impressive it seems it needs to be chained down!

Old bark
The old bark that the tree exhibits is beautiful and the crackled plates of bark seem in a good scale with the rest of the bonsai.
Now why does this tree have a post of its own? Well I thought that this bonsai was a good example of some of the problems that these old radiatas face. From a distance the tree seems to be full of foliage but upon closer inspection a different story is told.

A main branch
As you can see from the above image the foliage is only on the tips of long leggy branches. This is a problem. The tree has no inner buds and no fine inner branches to cut back to. What this means is that the outline of the tree can never be reduced without the aid of grafting as at least from what i have found and the experiences of other local growers with the species, Radiata’s dont bud onto old wood well.
What does this mean for this tree? Well I think it needs a major re-working. It is always nice to project the future onto trees so I will have a quick go at making a list of the things I think needs doing short of feeding aggressively, watering etc.
- The branches have all grown upward. The first port of call would be to correct this by doing some heavy bending on each of the main branches, bending them down to just below horizontal.
- Wire all the sub branches and prune growth back where possible. This would have a two-fold effect. Bringing the foliage down would allow for light to get into the inner areas of the tree as well as taking the dominance out of the tips. A tip that is pointed upwards will always grow strongly from the tip. If it is horizontal it is more likely to bud along its length.
- Feed feed feed. If you are to hope of getting budding on old wood you will need a healthy, strongly growing bonsai.
- I would then look at grafting opportunities to start re-introducing growth into inner areas of the branch structure.
I think with a work routine something like the above the tree could be vastly improved. A nice tree as it is (Age tends to excuse many faults) but I think it could be better. If it were ever to come up for sale I am sure I could find room for it at my place.
After seeing this tree I began to think if these problems are some that I might be facing with my Radiatas in the future. Hopefully through regular styling I can avoid the upward branch problems but I am a little concerned about the lack of back budding. Hopefully one day I will unlock the key to this dilemma. Perhaps in this case it is a result of a thick canopy shading out inner growth?I think the above tree had just been heavily thinned as my memory of it in previous visits was of a much denser canopy.
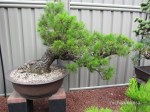
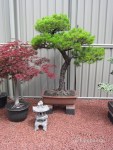
Either way, in the mean time I will keep on experimenting with my trees and keep dreaming about other people’s trees that I would love to own. One such tree that caught my eye at the nursery was the pine below. Again another Radiata.

Interesting?
Interesting or ugly?
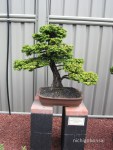
I keep finding myself being drawn to trees with problems. I think I enjoy both looking at these bonsai that challenge the rigid frameworks some people use and also love to work on them to try to use those awkward features to form a design that works in a classical sense.

The heart of the problem or the heart of the opportunity?
Again I think the age displayed by this tree excuses a lot of the faults and in a way the faults in branch placement almost add to the ancient feeling the tree exhibits. Would I change things? Most probably yes, but I would like to live with the tree for a long while first to get to know each of its quirks.
Again I think with some creative styling and a total wiring this could become a very interesting tree. Another I could easily make room for at home.
It is interesting to note that this tree also seems full of foliage from a far but on closer inspection it is actually quite leggy and bare on the interior. Now I am not sure if this is a result of age or whether this is due to too thick a canopy being kept that has shaded the interior, killing the inner shoots. Hopefully it was a lack of light and not just the result of the species growth habits. If it is just a lack of light I can rectify this on my own trees.
Well i hope you have enjoyed these trees as much as I did. I always like to see old radiatas. I like to look into them and see if they will give away any hints that may lead to a future technique or method for getting them to back bud on old wood. Perhaps I will never find it, but I will definitely enjoy looking for it.
On that note, does any one out there have old radiata or Monterey pines? How do you grow them? have they ended up leggy? I would love to hear from you. Please comment below or email me at the address on the left of my website.


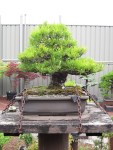
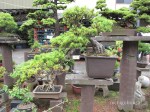
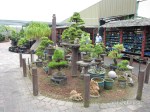
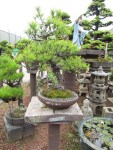
Recently I visited the newly renovated Melbourne nursery Collectors Corner. Collectors Corner maintains a moderately large collection of old display trees of a quality that are hard to find on public display else where in Melbourne. Many of the bonsai had been recently re-potted and were showing the results of this work with flushes of healthy spring growth.
I would love to get my hands on some of the display trees as i think with a couple of years refinement they could be very good bonsai.
The renovations are a great improvement on the old setup even though the overall size of the display seems to be a little smaller the bonsai are much easier to see and appreciate. Well worth a visit if you are in the area.
Some photos are below. I will upload a second lot in my next post.


The following trident maple was ground grown by a friend. Since digging it up I have slowly been preparing it for its future life as bonsai.
One of the things I wanted to do this year was to set a first branch in an area where there was no branching. I used a rough version of approach grafting which I hope to explain below.
Now the method I am using is not as exacting as it could be. The reason for this is the species I am using (Trident Maple). Tridents are very fast growing and forgiving. They also fuse very quickly which is the trait I am hoping to take advantage of in this instance.

Making the cut.
Approach grafting is a fairly straight forward technique. I wrote about it in regards to conifers in two parts HERE and HERE. To approach graft conifers you have to be fairly exact when lining up the cambium layers. Using the below variation you can be a bit less exact if using thin barked deciduous trees.

The finished cut.
Firstly you cut a channel roughly the width and depth of the whip you wish to graft.

The pinned whip.
You then insert the whip and secure it in place so that as it grows it is forced to grow into the cut channel, during which time it grows together with the trunk, fuses and makes the graft.

Hammer time.
In this example I used map pins to secure the graft. I find that the round surface of the pins heads does less damage to the growing and thickening whip than using square-headed pins or those with sharper edges.

The second pin secured.
In this case two pins were used to secure the whip. As Trident maples grow quickly and have relatively thin bark the whip and cut channel should graft together in a relatively short time as they heal and thicken. What is good about this technique is you can use very young whips as you do not need to expose the cambium layer. By not having to expose the cambium layer you avoid having to expose a large percentage of the cambium in the form of a wound and therefore increase the chance of the whip surviving and growing strongly.

Sealed, wired and ready to grow.
After setting the graft I like to lightly wire the whip and direct the tip upwards to ensure it will grow both strongly and leave the graft site at a desired angle.
This graft will be left to grow for the season so it can thicken, fuse and graft itself onto the trunk. I will cut it off the parent whip once I can see a difference in thickness between either side of the graft site. As the graft begins to take it should start to draw sap from the trunk and become noticeably thicker from the graft site onwards.
After I finished placing the graft on the trident maple I decided it was also a good time to clean up a graft on a Chinese Quince from last season. If you look closely you can see the difference in thickness between the grafted branch and the stub that use to be connected to the parent whip.

A successful graft
You can just see the stub below the branch junction where the whip was cut once it had taken.

Stub removed.
I like to leave the stub on for a while until I see the graft growing strongly. I think keeping wounds away from the graft site at least until you are sure the graft is successful is a good idea.

Sealed and finished.
To complete the process it is as simple as cleaning up the stub from where the whip was once attached and sealing the wound. Once the wounds heal and the graft grows for a season or two it will become increasingly difficult to tell that it was a grafted branch.
It is a very simple process all in all and one I use quite often. It can be used with a range of thin barked deciduous trees that show signs of fusing easily. It is an easy technique to do and most of the time returns great results. Some example species to try might be, Trident Maple, Japanese Maple, Chinese Quince, ficus species and other species with similar bark traits.
