
You are currently browsing the category archive for the ‘Re-potting’ category.
Wow, it’s been a while since last posted. Life has been busy but bonsai has been still been ticking away in the background (mostly after dark / kids bed time). At the moment, re-potting is in full swing with the first warm days hinting at springs approach.
Looking at the last post I made, (https://nichigobonsai.com/2022/09/05/the-tree-previously-know-as-sonare/) I thought it only fitting to re-visit this tree as it was interesting to see how much this tree has developed in 12 months.
I re-potted it into a new shaped container which i think suits it more and gives it a little more root room, which in turn i hope converts to a season of healthy foliage growth to further fill out the silhouette.


2022 on the left and 2023 of the right. The grafts certainly seem to have taken well and are now thriving! I think i can comfortably say this is a (grafted) Itoigawa juniper now.
I have a bunch more re-potting posts to come which should give updates to some previously featured as well as some new to the blog trees. Until then……
Chojubai are one of my favorite species. Very easy to grow and propagate and providing you are looking to grow small clumps, they can be developed very quickly.
The trees in this post were essentially grown from a number of cuttings all struck in one pot. They have established good root systems and are now growing into nice clump style bonsai. They have a long way to go and ideally I’d like the canopy to perhaps double in size but the bones are there for some nice trees.
This tree is a little over potted as it had spent the last year in a much smaller pot and i am looking to build it’s strength this season. 
First bonsai pot for this clump 
Only a year or two from cuttings. Again the first bonsai pot for this tree.

The first tree was from a close friend who passed away. He had grown it from a cutting that came from a plant that was originally imported in the early 1990’s along with some impressive maples by a prominent Victorian grower. It sat in isolation in this collection for years before we realised what it was and how lucky we were to have it in Australia. Since that point it found its way into the hands of several growers who have propagated it and distributed it so that it will stay available to the Australian bonsai community going forward.
The great thing about growing these is every time you prune you end up with a pile of cuttings which in turn become new bonsai. If you don’t have one, they are fairly well available in Australia and at least at Victorian shows, I often have seen them for sale on club tables.
With all they have going for them; Small leaves, tiny profuse red flowers and fast growth rate everyone should be growing this species!
For those that already grow them, there is an argument for repotting them in summer which is another interesting option. Michael Hagedorn has a good series of articles on Chojubai over on his blog for those interested including going into detail into the repotting in summer technique (CLICK HERE).
So I have a number of trees that are very much projects which are finding their ways into bonsai containers for the first time. I thought it was worth posting them as much as a record for myself to catalogue their progress on the blog. They are all fairly rough but have some promise. Enjoy.
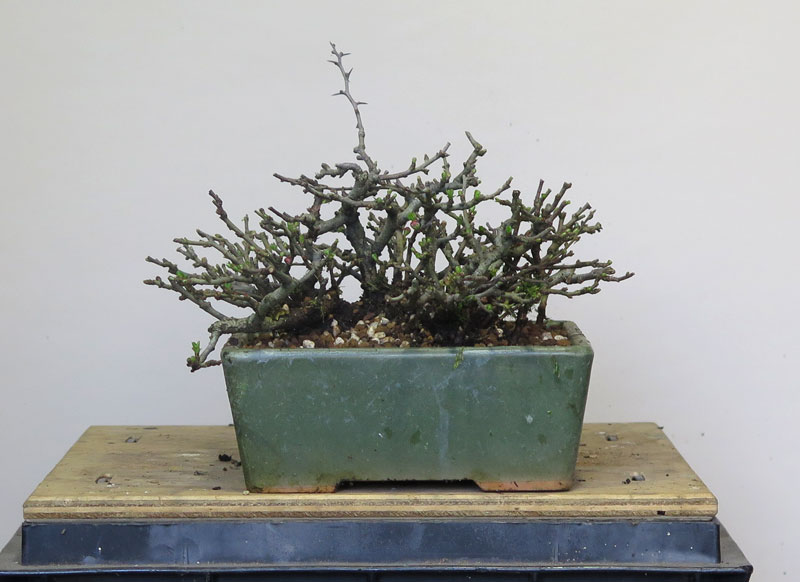
A small trident that I inherited from a friend who passed away. It was all much the same as its current form although much longer/larger. I cut it back hard to the interesting base and am slowly re-growing the branching and canopy. 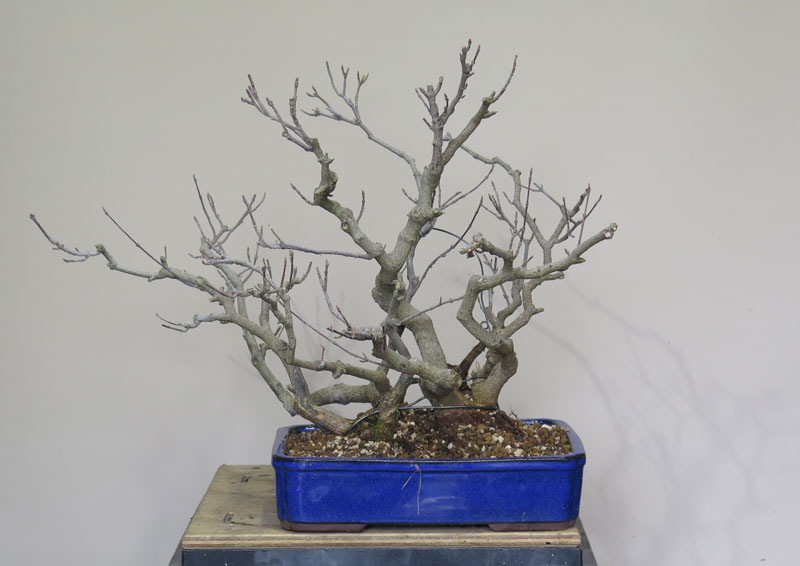
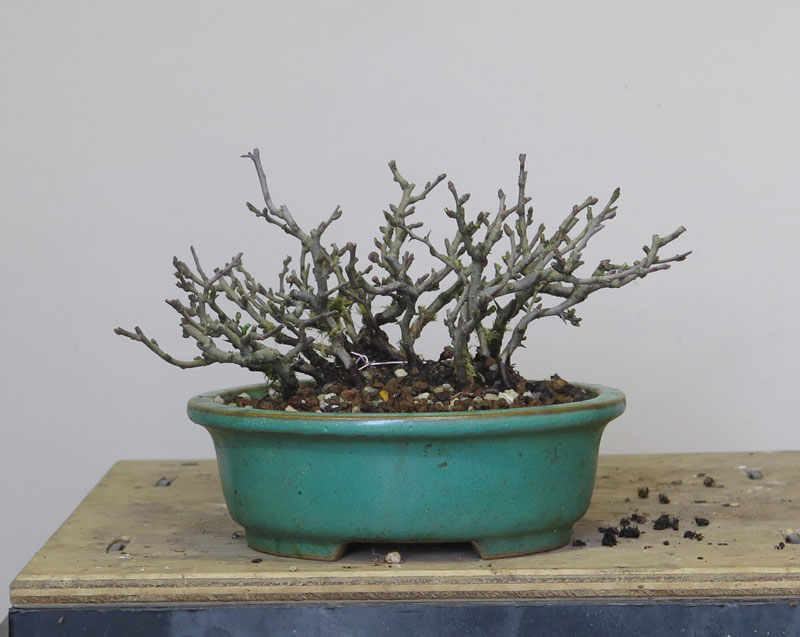
Another inherited tree, this clump is a collection of old branches I air layered from a larger tree that I am in the process of re-growing. Horrible overly bright pot, I know.


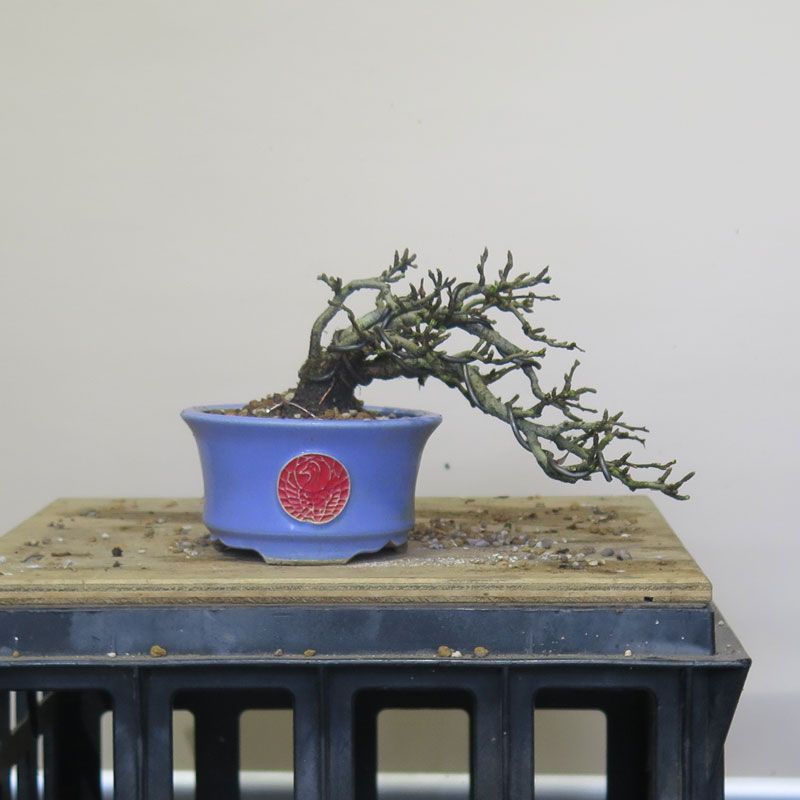
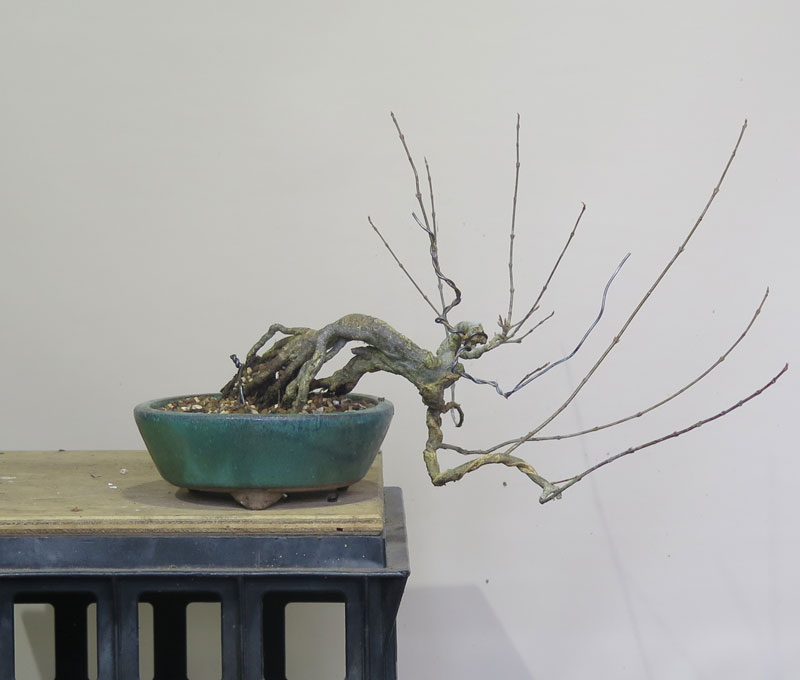
The above trident is one i picked up from Neil at Shibui Bonsai. I was attracted to it for the ‘loop the loop’ root on the front of the rock which was a little unusual. I have since been growing the branches and trunk-line to try to have some of this twisty and bendy movement.
You can see where the trunk was originally cut at the first branch. The scar has almost completely healed over and should continue to smooth out over the coming years.
Neil grows some great (if not the best in Australia) root over rock trees and has pretty much perfected the technique to get the tree to tightly clasp the rock. Check out his page (link above) as he often has interesting things for sale as the new ground grown stock is dug and prepared for sale.
Today’s update is a fun little English Elm that was styled last season. Post on that styling below:
Today’s work was a fairly simple repotting into a lovely Koyo pot. I really love these pots and am always happy to use them with my trees.

The tree is probably ready for a re-wire but as English elms are one of the later trees to leaf out I will try to squeeze that in between repotting my remaining trees and bud burst.
I really like this lumpy little tree. its a bit ugly and has some strange bumps but I think that they all add to its character. I recently sold its brother to a friend so i will likely be hanging onto this tree for a long time.
Another quick update on a tree I recently styled. The below pine has really started to shape up post styling and I figured it was time to get it out of the terracotta grow pot and into a bonsai container.
I potted it up in the pot from the tree in the last post which was the only spare pot I had that roughly came close to fitting the tree. Its not a bad match but I will see if I can locate a better pot for it in the next couple of years (square perhaps??).

Interesting to note the foliage colour seems much darker since the restyling photos, hopefully an effect of the water change and health returning to my trees. This tree has a long way to go but it seems that its future is back on track.
Just a quick post as part of the on-going repotting series. I repotted this pine which i recently worked and featured in this previous post:
Pretty simple work all in all just a change in pot. It’s not a perfect fit but I don’t mind it all the same. before and after below:


It will be interesting to see how this tree goes after the re-pot. It is in a fresh mix and this year I am potting most of my collection in Akadama, pumice and scoria in fairly equal proportions. I haven’t used this mix before but have heard good things so I am looking forward to seeing how it performs. Should be an interesting 12 months.
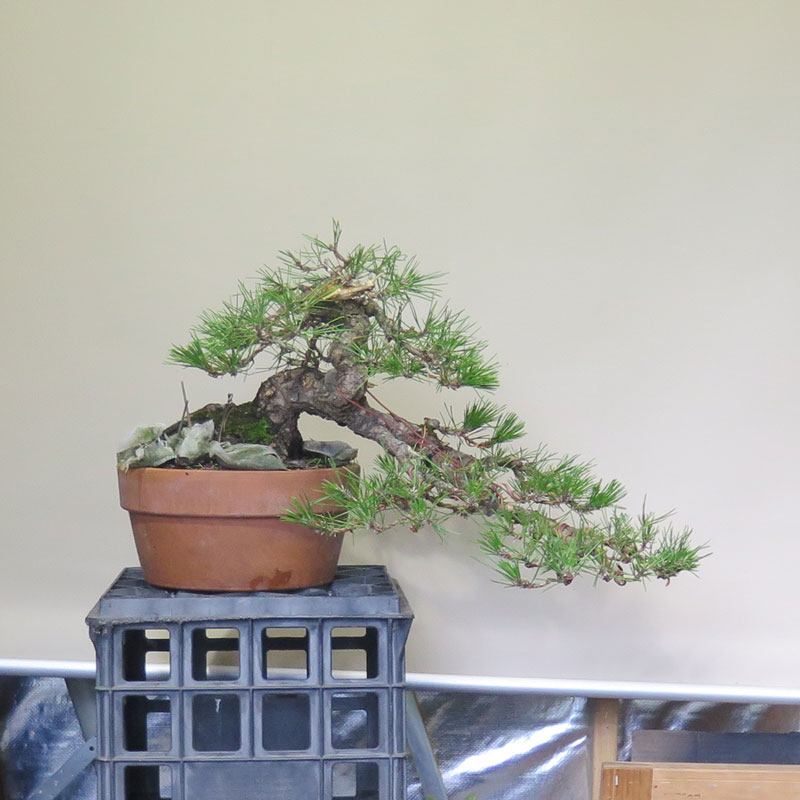
I am trying to repot a handful of trees each weekend in the lead up to spring to get ahead of the growth that seems to be quickly approaching. One of the trees I potted last weekend was the below, tall Japanese white pine.
The little pine didn’t start it’s life as a white pine and in fact was collected (liberated) from a local pine plantation’s roadside where it had self sown. I collected it really only to test as grafting stock.
It had some nice bark and a strange curve atop an otherwise straight trunk. It was also very thin which meant it had a small root ball and was easy to collect.
Turns out that it took the graft really well and the white pine foliage I grafted on has thrived.

After the graft being successful I think I let it grow out for a couple of years before I cut all the original foliage off. Essentially I was able to replace the long (20cm-ish) and shaggy original pine foliage with neat and compact white pine.
After the experiment was confirmed a success, I decided I should probably do something with it so I styled the tree and finally got it into a pot.

I really like how this one has turned out for what was just an experiment. It has a lot of development and growing to do before it is any more than styled stock but I think its off to an interesting start. I am really liking the tall-ness of this tree and it has made me want to go and dig a handful more so I could graft them and assemble a group. I did have to remove the tap root this re-potting but it had few feeder roots growing from it so fingers crossed it is a quick recovery.
So it looks like spring is on it’s way early this year with Trident Maples and Chinese Elms in my garden already swelling their buds. This might not seem all that strange depending on when you are reading this post from but ‘down under’ we are still in July (at time of writing) and I don’t normally even consider repotting until mid to late August and often run into September and beyond.
NOTE: (for those in the northern hemisphere, the months of June, July and August are our winter. For the Americans who don’t have metric winters; a short summary of the above might be that we are 64 ⁄ 79 ths of the way through winter and trees are budding out.)
I was lucky this year that I had a YouTube celebrity come over and help me out.
For those interested, his YouTube channel “Jeff’s Bonsai” can be found HERE.

Jeff is a great guy and we had a great day together and it only cost me a bowl of reheated left overs for his lunch!
I had forgotten how nice it was to have company when doing bonsai. So much of my work is done on my own down the back of the garden in my little shed. I suppose that social isolation generally has only increased with Covid so it was a really nice change to have someone else around lending a hand.
I think together we repotted 12 or 13 trees in half a day or so. I don’t think I could have done half as many in that timeframe, so thankyou Jeff.
The other thing you might notice from the above image is the black mesh screen on top of my green waste bin. This was another idea I got from Jeff (noticed in one of his videos). The night before he arrived I welded up the screen to easily and cleanly get all the old soil into the compost bin without risking the tree or tools falling in. It worked a treat!
As for the trees we re-potted, eventually many of them may make it to the blog but in the mean time a couple you might recognise from older posts are below.


Thanks again to Jeff. With his help we have broken the back of what can often be an overwhelming and desperate race against swelling buds. Hopefully I can trick him into helping again!
I have been busy re-potting in the last few weeks and finally managed to get around to doing a project tree that I have been growing for a couple of years. When I first acquired the tree I placed 6 or so root grafts onto the trunk. 3 took and 3 failed. Since then I have been meaning to replace the failed grafts but for what ever reason, every time I have had this tree out of its pot I havent been able to do the grafts.

The Arbortech and the faulty nebari in the back ground. You can see the two vertical scars from last attempt.
The first failures were all down to the fact that the channels that accepted the new shoots were too shallow. As the approach grafted seedlings thickened, they simple pushed away from the trunk instead of fusing. I originally cut the channels with a knife and was only able to cut so deep.
This years remedy was the Arbortech! I do very little machine carving but this tool does get a bit of work this time of year as it is excellent for cutting graft channels.
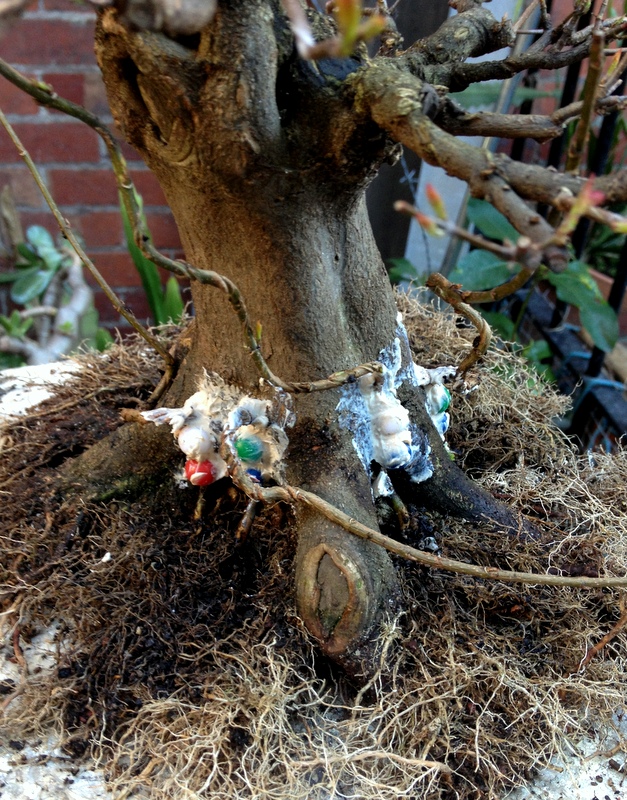
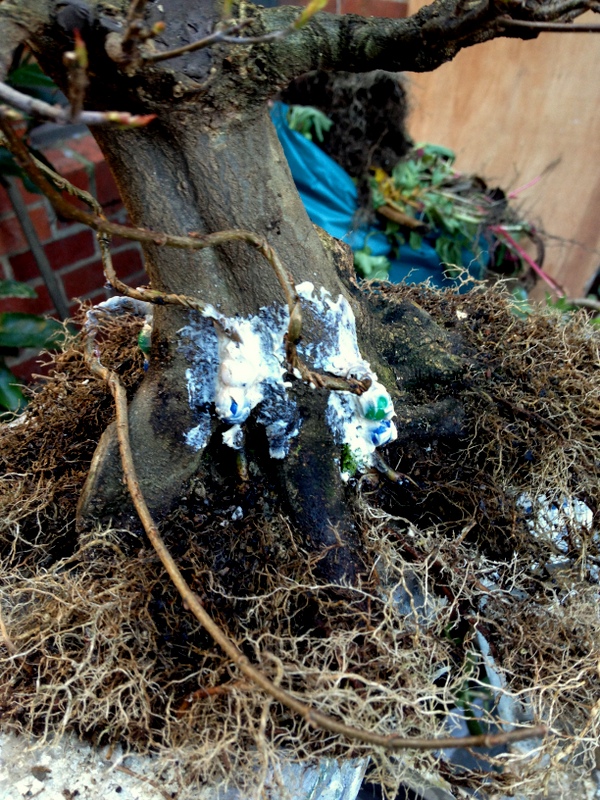
The four new grafts.
The process is dead simple. It is much the same as any other approach graft except instead of using a branch from the same tree you use seedlings as your grafting material.
The basic idea is that you cut a vertical channel in the trunk where you would like some new roots. You then insert a seedling into the channel and adjust it until the seedling’s roots are at the same level as the existing nebari. Then you fix the seedling into the channel (I used big map pins), seal it all up with cut paste and let it grow. Soon enough the seedling will thicken and fuse with the trunk. Cut off the top of the newly grafted seedling and you have new roots where there were previously none. For a better breakdown of the general theory see these two posts. Post 1, Post 2.
This year, the seedlings look a little strange as they are all from the batch of seedlings I bent the year before. Having said that, the bendy little trunks were very useful as I was able to use the first bend to create a good angle for the new roots to leave the trunk from.
The bendy seedlings are care of a project I started last year.
The new grafts were generously coated in cut paste and then the whole lot was potted back into its training pot.
I imagine that by the end of this rapidly approaching summer the grafts should have taken and I will be able to shorten them back before then some time the following year cutting them flush with the trunk.
Hopefully I remember to take a few pictures along the way.
I have been trying to keep my collection from growing any larger with mixed success over the last few months. What makes it especially hard is when you help friends dig stock out of their growing rows at their nursery.
This years visit to Shibui Bonsai was much like last years in that a lot of nice stock was dug (which I am sure a lot will be featured in the coming seasons catalogue). Although a lot caught my eye, I was well-behaved and none of the ground grown stock came home. That is not to say I didn’t bring anything back to the benches…….
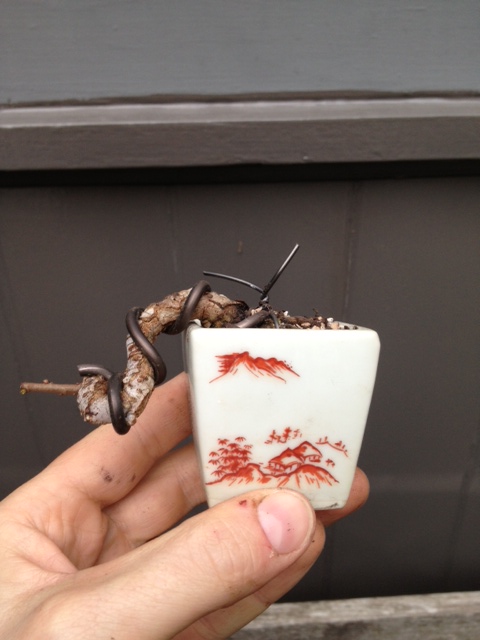
For a while now I have been meaning to grow some small twisted mini’s to use as accents in 3 point displays. On the benches at Shibui, Neil had a range of interesting little chinese elm root cuttings that I thought would be perfect for the project so I brought one home.

The cutting out of its original pot
Today I wired the cutting to enhance some existing curves and then re-potted into a much smaller container in which I plan to start to grow a small crown from.
Often working out how to secure a small tree into a small pot which only has one drainage hole can be difficult but I have found the method shown below works well.

tie-in wire secured to a larger wire.
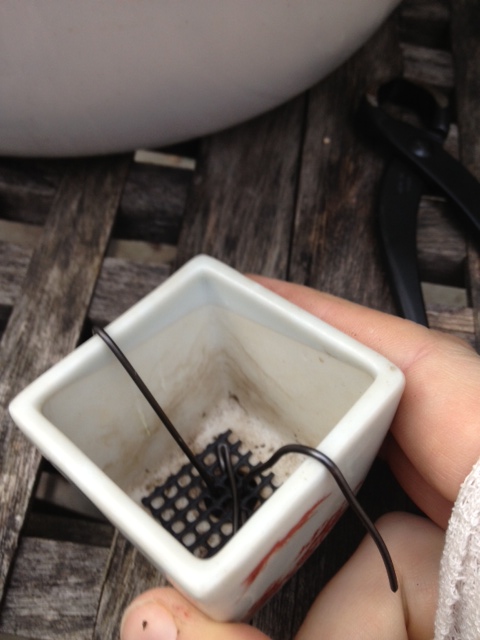
Mesh installed and tie in wires ready to accept the tree.
The pot itself is by no means a museum piece but it is a well made Marufuji production pot. Being a little on the large side will serve it well to help the tree establish some new ramification. Once I am happy with how the ramification is progressing I will look for a more suitable pot anywhere up to half the size of the current container.

The roots were reduced accordingly.
For such a small cutting the tree had grown a number of large roots all of which I removed and or shortened to fit into its new home.
Potted up but before I trimmed the tie in wires.
After half an hours work the tree had found its new planting angle and its new pot. It is by no means a masterpiece but I think once I can develop some ramification it could make an interesting companion to a larger tree.
I think this little tree will make a nice addition to the collection in the coming years and being so small it shouldnt effect the space I have too much. In fact I probably have a whole lot of room for trees of this size.
