
You are currently browsing the tag archive for the ‘Styling’ tag.
This is a bit of a different post covering a tree that has found its way back into my collection lately.
I originally grew this as stock from a cutting and put some early bends into the trunk line. Soon after the wiring of the cutting i gave it to a friend who did the bulk of the work in forming it into a tree and growing it on.
As luck would have it, the tree recently found its way back into my collection.
Stupidly, i didn’t take any before pics, but when i received the tree i re-potted it, changing the angle a bit and fully wired the tree removing a branch or two in the process. All in all, building on my friends work, its forming into an interesting little tree!

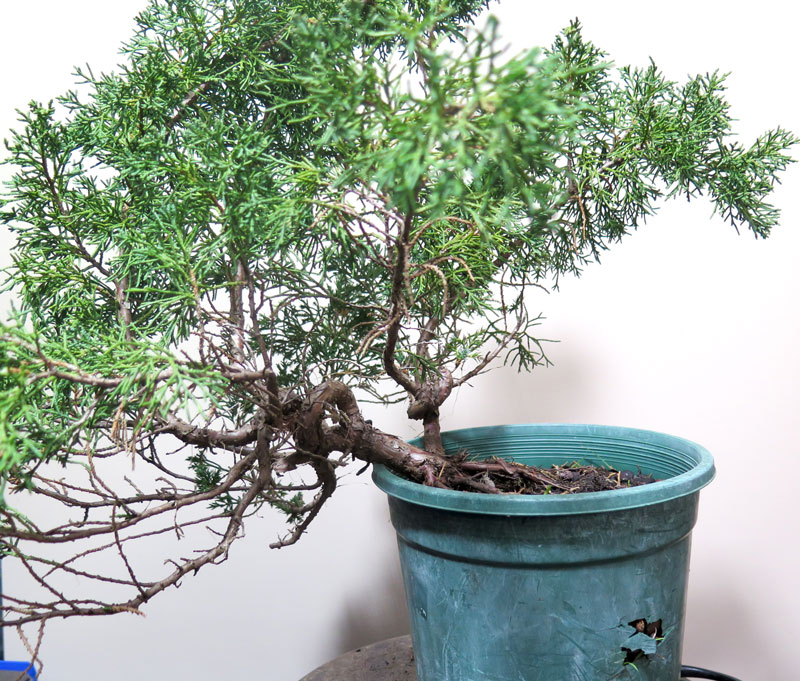
Above: The tree post re-pot and styling.
But…….. it still has a while to go.
Normally a shimpaku of this thickness i would keep as stock and grow hard and fast to thicken the trunk and develop the shari’s and live veins. Luckily we cut shari’s into the trunk last year but i still need to focus on developing trunk thickness and continue to develop the sharis as things thicken.
This is somewhat difficult in a tree that i don’t really want to grow out of shape or get too much larger. What i want is to thicken the trunks and keep the tree’s foliage well managed.
The solution is………. Sacrifice branches.
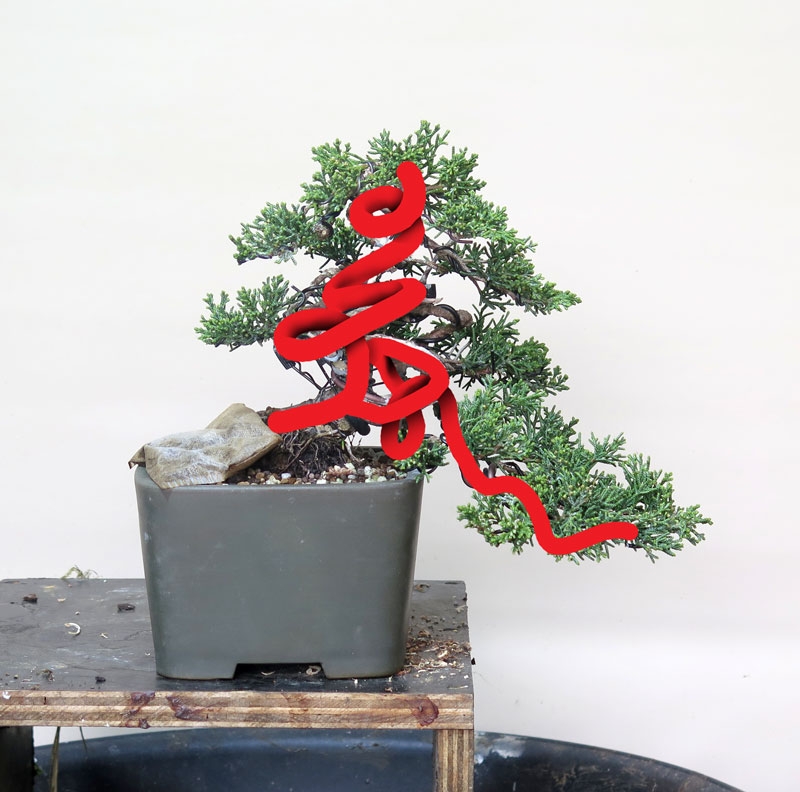
Above: The two main trunk/branch lines.
The tree is built off two main trunk lines as per the diagram above and ideally i would like to thicken both of these lines. To do this i will likely grow two sacrifice branches.

Above: likely locations of sacrifice branching (shown in pink).
I will locate two sacrifice branches (one per trunk line) but in slightly different locations. The sacrifice branch in the apex will be toward the top of the trunk line as i want the entire upright trunk to thicken.
The second sacrifice will be on the first branches trunk line, It will be located back from the first branch tip though, to avoid the branch holding the foliage from thickening too much, keeping it in scale with the other branches.

Above: the image in my head i am aiming for.
I will likely also wire the sacrifice branches into interesting shapes reinforcing the tree’s movement so i can use them as future jins.
To further facilitate this thickening i will be making a shari on the opposite side of the trunk to the shari’s we have already made. I’ve covered this a bit more in THIS post. I am hoping this speeds up the whole process quite a bit. Also keeping the majority of the foliage trimmed and compact should direct a lot of energy into the sacrifice branches which will be left un-pruned. Hopefully allowing them to grow quickly and do their work.
That said however, i do expect this process to take a number of years to get to the thickness level i am after.
A very quick update post of THIS pine.
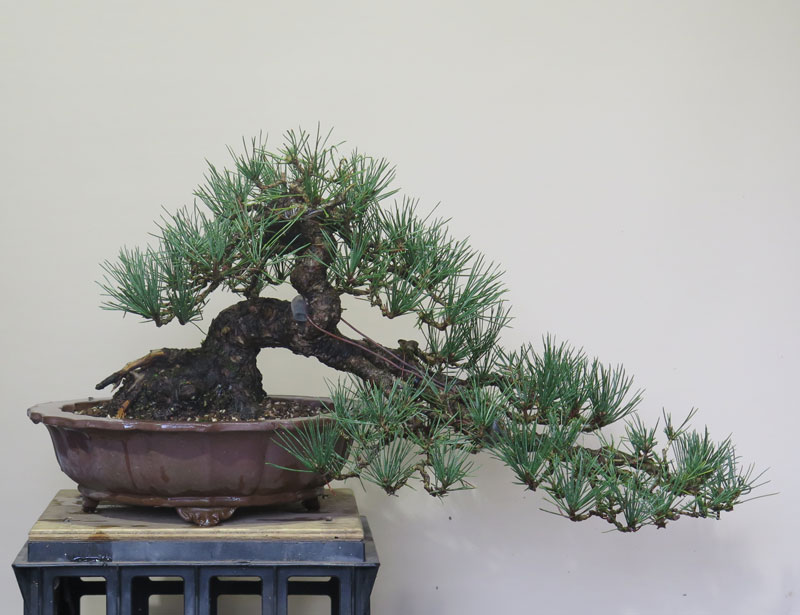
From where we last left off, the pine had been un-wired during the previous season and had grown out quite a bit, hence needing a little tidy up. Recently toward the end of this last winter, it made it into the work shop for a quick wiring before the candles got too fragile.
Above: de-wired and grown out of shape.

Above: The first step was bending the lower branch down further to try and separate the foliage masses a little more into individual zones.

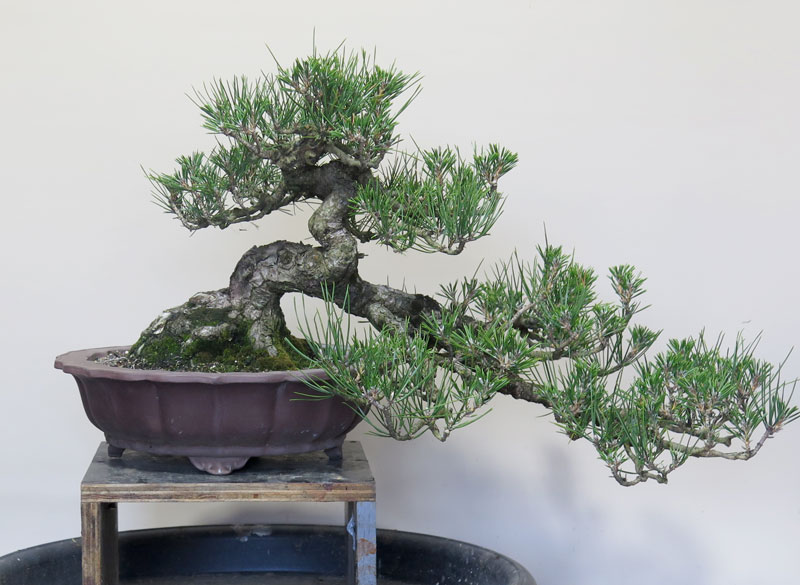
Above: Post wiring.
I only wired what was needed which essentially meant only the main branches and sub branches were wired. I am pretty happy with the way it turned out and think it is evolving nicely.
For comparisons sake, below is how it was in 2021 vs. after the styling today.
the combination of a narrower apex area and a more separated lower branch all work together towards a solid slow improvement over the years.
What to do with boring stock? Good stock is out there but often hard to find or expensive. On the flip side, straight, untrained whips are available not only at bonsai nurseries but at almost every general nursery as well not to mention you probably have a number of neglected cuttings that you took years ago struggling along in the ‘ill get to it later’ area of your backyard.
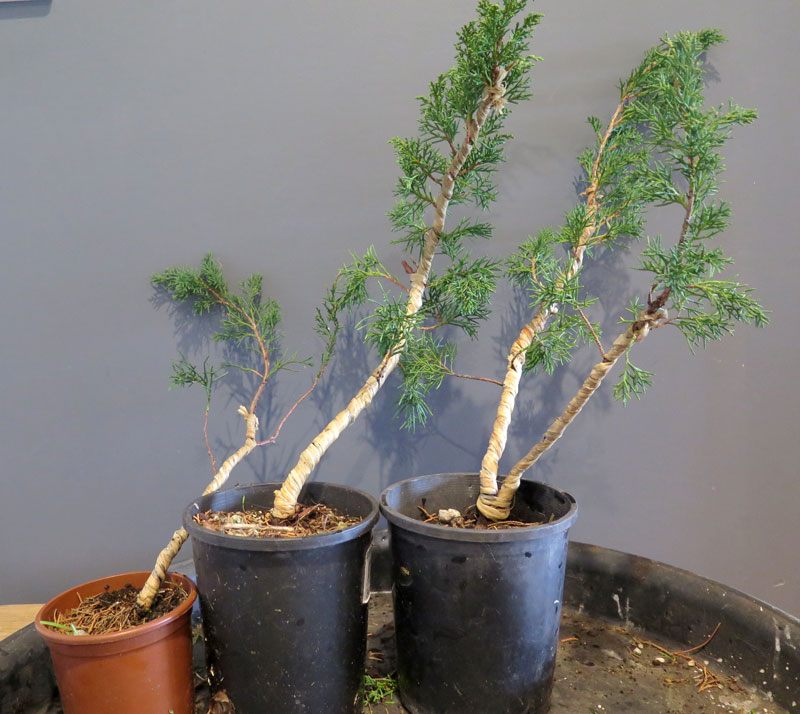
Which gets me to today’s post. After going through the recent batch of stock that came into my garden these 3 plants were by far the least inspiring. Long, leggy, dead foliage and a general lack of interest in the trunks. Essentially material i would usually ignore if i was in the market for bonsai stock.

But material like this can be a good opportunity to begin something that ends up being interesting and potentially great, all at the work of your own hands.
The stock above is getting to the point where most people would give up on the idea of getting a tree with good movement out of the fairly stiff and straight trunk lines. But for certain species, and especially shimpaku juniper material like this can pose a good opportunity if found for the right price.
First you need to clean up the material.

I tend to remove dead shoots, competing trunk lines and thin the branching aiming for a general spread of branches at good intervals along the trunk. In the case of the trees above i also removed strong branches as well i want these to end up more on the Bunjin side of the style spectrum and therefore I only want short compact branches.
I then applied raffia to the trunks. I don’t often use rafia but due to the thickness of these whips and the tight bends i intended, applying the raffia was a worthwhile addition.
Wire goes on next, I ensure that the wire is coiled on in the same direction as the raffia beneath. This is done so that as i bend, i can also twist the wire in the same direction the rafia was applied in. Having the raffia and wire both tighten to the trunk hopefully provides support to the inner fibers, rather than these wrappings loosening off and allowing room for breakage.

I applied two wires up each trunk and spaced the wraps apart rather than doubled them up together. This provides more points of contact along the trunk and more support along the bends, hopefully further reducing the chances of breakage.
Now comes the fun part. The bending.

The trees were bent making sure to twist the trunks in the same direction that the wire and raffia had been applied, essentially tightening it all down against the trunk.

I also wanted to introduce this twisting for the next phase of the process that will happen after the bends have set, Shari.

As the bark on the tree also twists as the trunk and raffia and wire are twisted through the bends, the sap lines will twist and spiral around the trunkline. This means that removing bark along these sap lines will create sharis that also spiral around the trunk as it moves along its length. While you can on young stock force a twist in the live vein via cutting a spiral, the effect you get from twisting the trunk originally is far easier and i think a superior end result. A tree that has been twisted like this will also have the heart wood fibers twist and follow the twist of the shari making any carving via fiber pulling automatically follow the shari lines.

All in all a productive morning, turning some trees with no potential into material i am pretty excited to continue to develop into the future.
All the trees were bent pretty hard with some cracking and complaining heard from each one. I am not worried too much about their survival as they can tolerate this fairly easily and as this is the first time i have worked them i am not loosing much of a time investment if they fail. Nothing risked, nothing gained, and if you are going to do a high risk process on a bonsai it might as well be before it becomes valuable.
I hope the above inspires a few of you. The starting material for this technique can be found in most peoples backyards, most bonsai nurseries and every club sale day. You can grow these whips from cutting fairly quickly and easily also if you are struggling to find it in the wilds.
I would recommend everyone give it a go, its a very easy way to create good material at a very low cost. Why not make a heap and sell some on! People are always after twisty junipers and you will be helping to lift the average of quality stock in this country!
This post will likely be the first of many documenting this tree’s progress from stock through to ‘bonsai’ over the next few years.
I haven’t had a post like this for a long time because I have been actively reducing my collection to a more manageable size, which hasn’t seen much rough stock make it onto my benches. At the same time, the trees i have kept continue to develop and become refined which hasn’t really seen much rough development type work, until………..
Recently myself and a friend came across a large amount of stock which you will likely start to see show up on the blog as we develop it and progress it towards a higher level of refinement.
It’s actually a bit of a funny story really how we ended up with all this material.
A good mate Dave, (well his name is not Dave, i am using Dave to give him some anonymity, his name is actually Jeff) did a drastic cut back of his collection at the recent Bonsai Northwest show. He sold somewhere in the vicinity of 25 trees leaving his collection compact and manageable. Now Jeff didn’t want to expand his collection much beyond this level but he did want to add a single Juniper to the mix, something a little less refined than what he had previously sold so he had a project to work on and develop.
I respect Jeff’s general approach to bonsai. He has had previously a huge collection and has cut it back savagely on several occasions. I have asked him about this and he essentially came to realise that what he really enjoyed about the bonsai process was taking stock and refining it, styling it and making it into what would be accepted as a bonsai. From this point forward however, he got little enjoyment from the often mundane ongoing refinement and maintenance, so he now builds a collection, then sells of components of it and starts the process a fresh with new owners enjoying taking his creations deeper into the refinement phase. It takes a fair amount of self reflection and self honesty i think to come to such a realisation and then decide that its ok to select a component of the bonsai process that you enjoy and are good at to focus on, essentially being somewhat unique in your bonsai practice compared to the general community.
Anyway, i digress.
So Jeff had told me he wanted just one new juniper, and as fate would have it i had just visited another good friend Kris’s new garden where he had just put aside a bunch of junipers and pines he wanted to get rid of.
Kris is another grower I really respect. He is pretty humble and wouldn’t admit the following but he produces some really great stock and trees, all of which he has produced by reverse engineering Japanese photos of shohin bonsai and rough material. The stock he passed on to us was in the throw out pile so don’t use the below as examples of his work, but just know he has produced some amazingly good material over the years.
So to cut a long story short, after taking Jeff to get a single tree, we ended up leaving with 30 pieces of material and left a pile of pines to be picked up at a later stage.
Essentially that is how Jeff set out to get one tree and came back with 30.
Needless to say, you will be seeing a lot of this stock on the blog being worked and developed over the coming years.
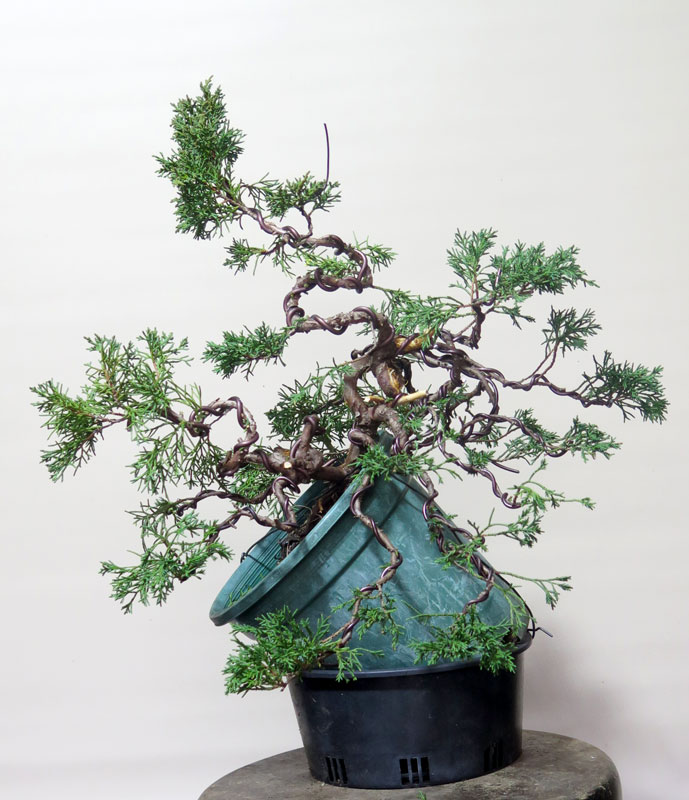
Below is is one of the first I have worked, and have named ‘The Octopus’.
Like most of the stock, this is its first real styling since being wired for movement during its early creation. The material need to develop its foliage and trunk further so it will be grown as styled stock in development rather than go into a bonsai pot. As a result the ‘final’ image below looks scrappy and messy. This is somewhat intentional as all I want to achieve this styling is to establish some branch positioning and trunk lines. As they are setting in place, i will also work to tighten up and get back budding on the areas that will become future branch pads. During this process it can look unruly as health, vigor and growth are what i am targeting over neatness.
Typical of most stock that has been grown uninterrupted for a number of years, this tree was full of dead shoots, old pruning stubs and leggy foliage. Cleaning up that was the first priority which gave me a better understanding of the branches and trunk movement. For anyone overwhelmed or stuck on a piece of material i cannot recommend doing a basic foliage and trunk clean up enough. Doing this clean is how you get to know the material and you often discover features within the tree and get ideas for the styling moving forward.
Post cleanup, i began to introduce some shari into the two main trunk lines.
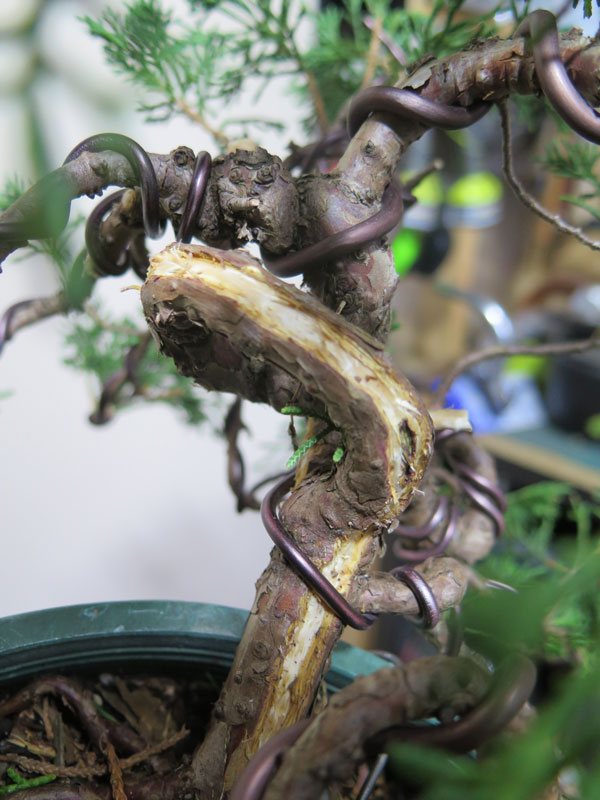

Above: The beginning of shari’s trying to follow the trunk movement.
The incorporation of shari into juniper bonsai are beneficial on a few levels.
Firstly from a design sense, the shari adds a great white contrast to the green foliage and orange trunk line acting almost as a highlight to draw your eye into the movement.
Secondly, by reducing the area of live trunk but maintaining a similar amount of foliage above forces the trunk to thicken the existing live areas at a rate faster than if the whole trunk was growing. You see this in live vein creating where the vein ‘muscles up’ and bulges as a large amount of sap and resources is channeled through a reduced area. This can be manipulated further by leaving the live areas of bark in spots you want to thicken, ie. a live vein either side of a trunk will only see the trunk expand in those directions, creating more side to side thickening than if a similar amount of growth was to occur on a fully live trunk. But i digress again……
At this point i hadn’t really thought about angles, fronts or trunk-lines so after some pondering and some wiring i shaped the tree into a strange composition that i quite liked. I aimed to continue the movement that Kris had formed early on and also establish some flow within the composition which in turn directed branching and the likes. As i said above i was really just looking to set main lines so the end result is a bit messy. Neatness and refinement will come in future years.
It’s certainly going to be an unusual one. you can see why i have decided to call it ‘The Octupus’ with its twisted limbs going out in all directions.

I think i have set a good base building on the early movement in the lower trunks. I have also done a bit of a bad rough sketch which is below to mostly remind me of the direction it is heading.

From here a lot of growing needs to happen which will likely see this tree staying in larger grow containers for at least a few more years. I really want to thicken the trunk lines while also developing shari’s and the live veins. This is something that simply takes time but i think i will be able to simultaneously work on the foliage pad as i go, hopefully minimising the overall development timeline.
Anyway, that’s all for today, keep an eye out for the other trees from this batch which i will post as i get them worked on.
Today’s post is a quick update on a tree that has been in the works for a number of years. I am not sure when I dug this originally but it was certainly a while ago, five years ago perhaps?
The juniper was originally a Sabina Juniper that came from a local school that was removing the garden bed in which it was planted. A good friend put me onto it and we both dug this and a couple of other similar trunks.

Once I had brought it back to some health from the original dig I set about grafting the foliage over to Itoigawa. While Sabina foliage is fine, after many years persevering and working on trees with sub par foliage i now look to grown trees with the best characteristics. With the amount of time you put into your bonsai i don’t want to be investing that time into a foliage characteristic that will always have down sides. Hence the grafting.
I ended up with two grafts that took and have been growing them out and strengthening them over the last couple of seasons prior to thinking about styling.
I finally got around to doing a rough first styling last night.

Obviously the tree has a long way to go, judging by the timelines with THIS tree, it will be another 2-3 years before this bonsai starts to properly take shape.
That said, it was good to get into this styling and set some structure that the future of the tree will grow upon.
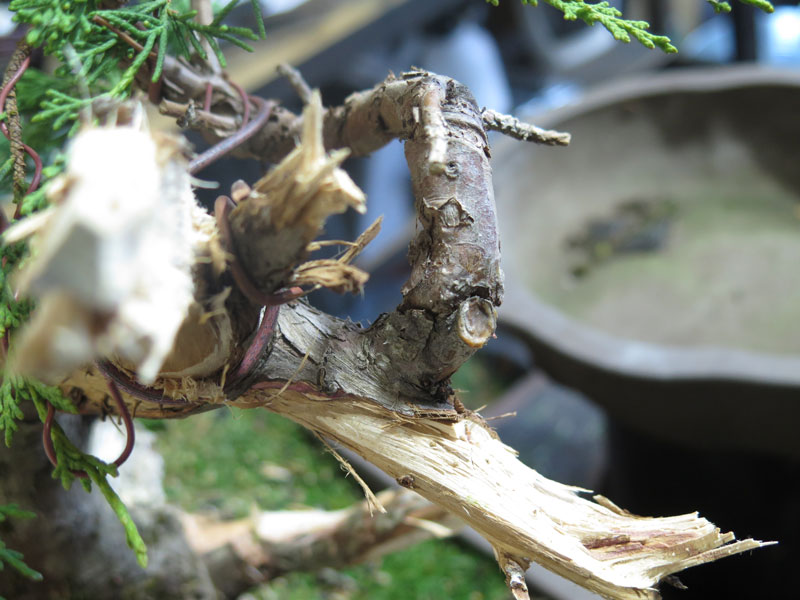
As I worked my way through the basic pruning of the tree i decided to move the direction of the tree back towards the right hand side. As part of this re-directing of the movement of the trunk over to the right, i also began modifying the deadwood to reinforce this movement. I will also need to grow the top of the tree further over toward the right as the tree progresses.
The dead wood still needs a lot of work, i need to spend a bit more time going over the bark and finding the live veins and cleaning dead bark from the deadwood sections as well as continuing to carve the shari and jins.
For carving I very much prefer hand tools for this carving. Chisels, large slip-joint pliers, branch splitters and various other tools all get a good work out. It’s a much slower way of carving but I think it creates a much more natural end result.
The one electric tool I do use is a wire brush on either an angle grinder or drill to strip hard to remove bark and smooth out the fibers from the hand carving………. But carving techniques are probably a topic for another post.
I am looking forward to finishing stripping the old bark so I can get some lime sulphur onto the wood and begin to get the contrast between all the colours to develop. This winter i plan on spending some more time on the dead wood so will post an update when it is further refined.
I also need to start thinking about what pot to put it in. I have a trip to Japan later this year to visit family and will keep an eye out while I am there but I’m still not entirely sure what style to use. If you have any ideas or good examples I’d love to hear about it in the comments below.
A number of years ago we visited Onomichi in southern Japan as a bit of a side trip during a family visit to Japan. I fell in love with the town for some reason. While i cant really put my finger on it, something just ‘clicked’. Its ocean setting, industrial history, creative new industries side by side with their traditional counterparts and of course the amazing shimanami kaido (well worth riding the bike trail if you are so inclined), the hilly landscape, querky old buildings, yellow trains etc all played their part I suppose.
While staying there, we walked to the peak of one of the small hills in the area and managed to stumble across this red pine.
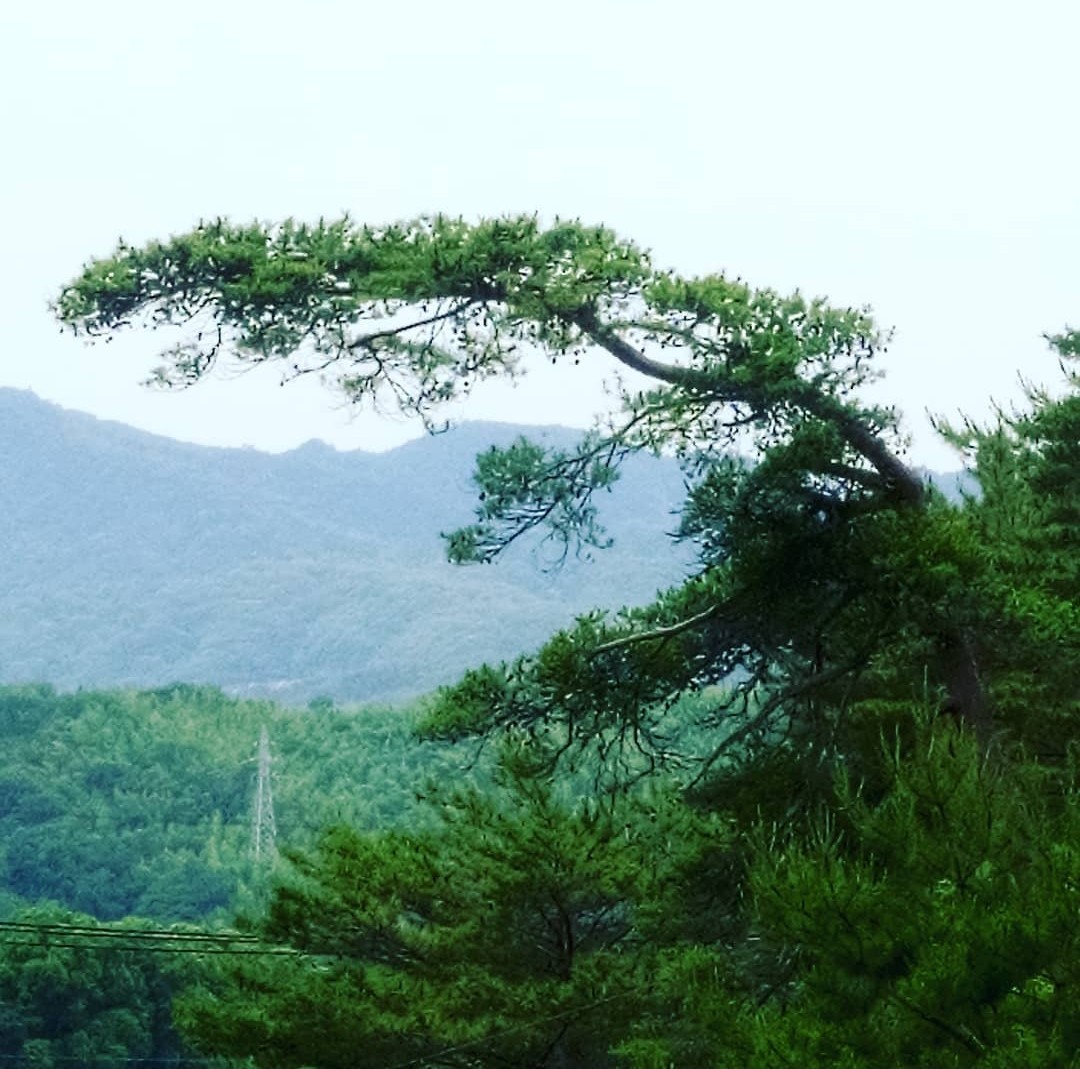
I really liked it, and again, while i cant really put a finger on why i liked it, it again ‘clicked’.
…….Cut to this week, I am looking through some travel pic and stumble upon the above red pine again. As fate would have it I was also trying to think of what to do with one of my black pines.
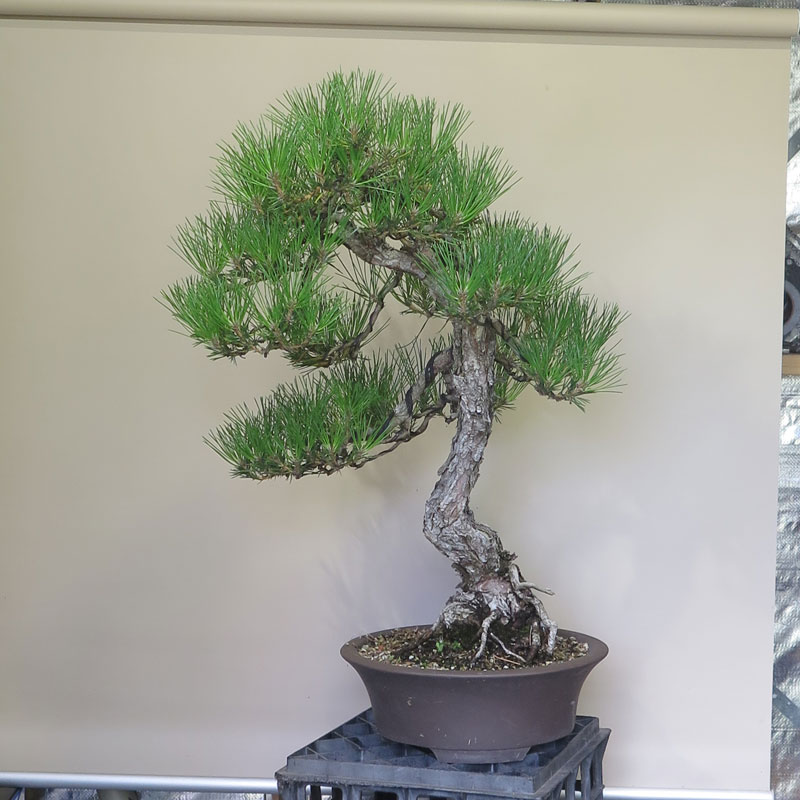
I had another tree that was styled very similarly and I was never quite sure that my collection was large enough to have two very similarly (and kinda of poorly) styled trees, so I would often catch myself staring at this black pine trying to figure out what i could do with it.
When I came across the Onomichi pine picture I had a light-bulb moment and wondered if i could capture the ‘vibe’ of this pine in the (now desperately needing styling) black pine on the benches.
…….. Now vibe is an interesting concept. Bonsai is a whole lot of different things to a whole lot of different people and that’s OK. In fact i think the myriad of different ideas and approaches is what makes it interesting.
For me, i am not really about making miniaturised, scale models of trees. I think what i like to do is try to capture the feeling of trees and or what my sub-conscious is drawn to in trees. It might be an element of a tree (canopy shape, branch movement, strange feature) a feeling that you get (hugeness, ancient-ness, calmness etc) or just somehow trying to reinterpret the spirit of a tree that i am drawn to. I amso am drawn to graphic shapes in the trees i style which is probably from my Landscape Architecture background. I think in summary I’d call it capturing the ‘Vibe’.
So One night I set myself up in my workshop and set about working towards imparting some of the spirit of the Onomichi pine into my black pine.

I’d anticipated a restyling at some point and had pruned and thinned back the foliage last autumn. The tree had been let grow freely the previous season and i think the above image reflects how desperately it needed work!
Now it’s probably on the late side of timing regarding styling black pines. We are entering an El’nino weather phase and the growing season has arrived much earlier than usual so i was caught a little off guard. Candles are extending so i had to be super careful when wiring so as not to break any but think I got away with it.
The process was fairly simple, I chucked on some tunes and switched between looking at the original Onomichi pine image and trying to impart some of it’s ‘vibe’ into the black pine. It was a fun exercise although I’m not sure how successful it was. You are always limited by the material in front of you so of course the end result is not a mirror image but it certainly has turned out being styled in a way i wouldn’t normally have approached the tree.

I quite like the end result but something still bothers me about it.
I think I am going to put it in a spot i can look at it each day and try to work out whats not quite right about it and tweak it over a period of the next few weeks (or leave it as is potentially).
It was a good exercise to go through and I’d recommend it for those with favorite trees and bonsai that share the basic structure. I had to actively go against my baseline styling urges in a number of instances and I learned a lot by doing that that will likely be part of my future work.
As far as the tree’s merit as a bonsai…………. the jury is still out…….. It’s certainly a more interesting tree compared to what I started with and the fact it will now trigger memories of a great family holiday and a favorite place I think will cement it place on my benches for many years to come.
I don’t grow cedars myself but I have worked a number of nice ones over the years. The tree below is no exception.
It is owned by a good friend of mine who had just got it back after it spent a number of years with someone else. It was a little weak when he got it so he had spent some time letting it gain strength once more…….. which gets us to the below (terrible quality phone pic) image.

I’d love to take all the credit for this tree but really all I did was follow the bones that were there. I compressed the apex a little and moved some things about, all in all I was just bringing out the qualities that already existed.
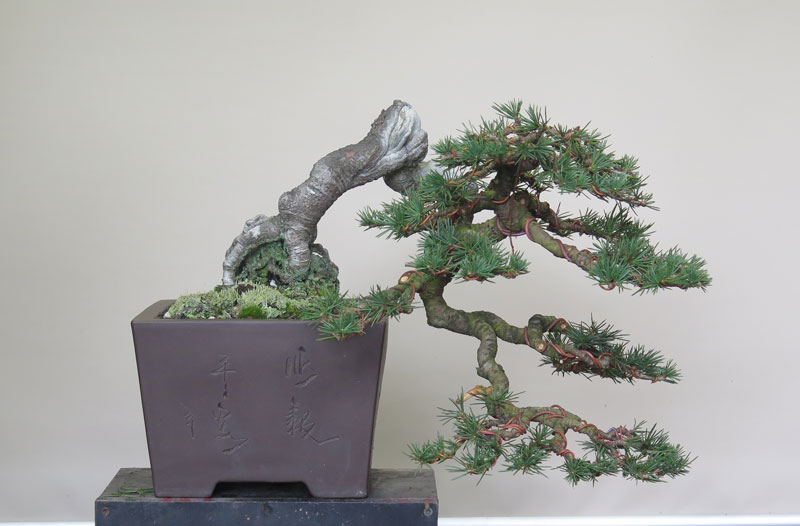
The tree still has a ways to go but it is covered in buds in all the areas you would want to fill out (like the bottom branch) so I’m pretty confident that even after one year the tree will look full and much more developed.
On a side note, the roots remind me of a hand grabbing at the soil. Try to un-see it.
Life as always is busy but lately things have been flat-out. I have been juggling a two-year old, full-time work, managing our house’s extension, working customer trees, digging/collecting material and also travelling Australia (Perth, Sydney, Canberra, Bendigo, Geelong and Brisbane) as an AABC tutor giving lectures, demonstrations and workshops. As a result the blog has suffered.
Hopefully I can kick start the blog in the coming months. I have a number of posts lined up and I am sure there will be things of interest to share as the growing season heats up.
Today’s post is a small red pine that I worked for a good friend towards the start of winter.
It is rare to see red pines in Australia and particularly rare to see ones as good as this one. It underwent a fairly major transformation during the styling which in my opinion has set it up to be one of the best red pines of this size in the country (at least from those I have seen). It still needs a little filling out but it’s bones are set for it to grow into a really nice tree into the future.

The material prior to beginning. Nice colour and full growth which left a lot to work with.

The material prior to beginning. Nice colour and full growth which left a lot to work with.
Most of the work during the styling involved dividing the few branches up into multiple smaller pads that were in better scale and harmony to the size of the tree. Those were then used to accentuate the movement and direction of the trunk line.
There is still a number of areas that need to fill in with further ramification but I think it is certainly off to a great start.
After saying that red pines are rare in Australia my next post will be about another taller tree that is also of very high quality. Until then……..
Just a quick post for today. I was going through some old holiday photos (mainly bonsai pics) and came across a small Japanese White Pine I had worked on in Japan.
I am really getting more and more into shohin sized trees. They are really challenging to grow well yet are easy to handle and take up much less bench space, which is a plus.
The challenge with this tree was to create enough detail in the foliage by means of multiple layers to give the illusion that it was in fact a much larger tree.

Before

After
Of course half the battle is starting with good stock which this little tree certainly falls into the category of.
Hopefully I can start producing some stock similar to this in the coming years.
One of the trees I worked on last year was an informal upright Mugo Pine. I think that it was originally received by its owner as essentially a piece of topiary. He then worked it over a few years into a bonsai form.
I was asked to wire the tree and refine its image.
The tree had a few issues that this round of work has tried to iron out but it will certainly benefit from further refinement as it progresses.
The trees branching was incredibly dense in part due to its previous life as topiary which had lead to a large mass of ramification. It was also compounded by the tendency of Mugo pines to have multiple shoots at each branch tip which further compounded the dense look.
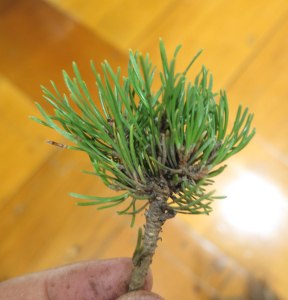
Multiple growing tips on a typical shoot.
My first action was to remove unnecessary sub-branches and take many of the branches back to a much simpler structure which in turn reduced the foliage density. I also reduced the remaining shoots on the tips to two shoots which further reduced the density and allowed for light and air to reach into the inner structure to aid back budding.

Some of the sub-branches removed from the first branch.
After the pruning work the aim of the styling was to break the large pads and masses of foliage into smaller pads to create a higher level of detail and structure.

The tree before the work.
I ended up removing close to 50% of the foliage which lead me to go a little bit easily on any heavy bending. Ultimately i would like to bend the thick first and second branches down a little more than they are currently and work on some of the dead stubs that were left long to die back slowly.

The tree after.
All in all the tree has been improved and is growing nicely into its new form. Perhaps this coming winter it will be ready for a re-visit.
