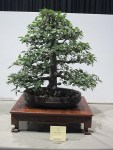
Winter is a hard time for me and my bonsai. For the most part, when I arrive home from work it is dark and cold. This makes working on my trees something I only tend to do on weekends. That being said I did get motivated one night after work to do some pruning on my Trident Maple (seen here and here).

Tridents grow quite quickly and within a year they can put on a lot of twiggy growth. A lot of this growth is not suitable to build future ramification on so it must be pruned off. Quite often it seems like you are taking two steps forward and one step back but the removal of twigs that are not formed correctly will ultimately make for a better bonsai in the long run.

Before and after pruning. The red lines show approximately where I made cuts.

At this point in this trees life I am looking to start to build fine twigs. Most of the vigorous growth over the last year has helped to form secondary branches but it has grown with internode gaps that are too long for the tips of a branch. As a result I have pruned to remove these long internodes, reduced all branch divisions to two and generally tried to form a better structure within the branch.

A lot of my trees were grown a little too quickly and as a result their branches do not have as good a structure as they might. I am now cutting a fair amount of  those branches back and trying to correct the structural problems. One of the main problems I have in my trees is that the branches do not have a main branch line with sub branches but instead have several main lines. This makes the branches look full very quickly but in the long-term you do not get the taper and look you would if the branch was grown otherwise. It all comes back to pruning. Sometimes you have to set a tree back a little in order for it to progress.

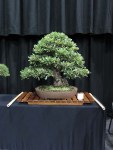
The tree before and after. (poor lighting care of my kitchen.)

This tree will be re-potted in the coming months and may also have its branches fine tuned a little with some wire which should then make it ready for the start of spring.

Right now Melbourne is deep within the throes of winter, in fact, judging by the temps we are right in the middle of it. It seems that my quince has other ideas. It has been steadily waking up and has just started producing new growth as if it is spring time.

New Growth.

As a result I have had to re-pot. This is the second re-potting I have given it since I have owned it and was pleasantly surprised by the root-mass I found after the hard treatment it received after its first re-potting.

Looking at the roots from beneath. You can see that the roots that were growing downwards have been removed leaving an almost solid wooden base..

The tree went back into the same pot is was in previously. One thing you may notice is that a lot of my trees are in green pots. There is a reason for this. Where I live most pots of this age were in green tones. Around that time there was a local grower that hated blue pots and as a result of his experience and influence this lead to very few blue pots being bought during this time. As a result all my pots (which have mostly been bought second hand from other local members) are mostly green.

The tree re-potted.

I have not yet seen flowers on this tree. Hopefully this year I will get a few. I am not sure if this tree is mature enough to flower or not, or for that matter how old a quince has to be before flowering. If anyone reading this has an idea please post in the comments.

New buds.

A lot of people have told me that the quince is an early riser and recently I was reading through some old Bonsai Today magazines where in one article they suggested re-potting in autumn due to the early growth and flowering. I think I will give that a go next year.

I have begun to re-pot some of my deciduous bonsai. I like to re-pot my pines closer to spring time so I do my deciduous species a little earlier in order to leave plenty of time for the conifers.

The tree in today’s post is an English Elm (Ulmus procera). I picked it up at a local bonsai show last year. I have always liked clump style bonsai and am always on the lookout for suitable stock (which is quite hard to find). When I saw this little clump I quickly grabbed it.

The Elm after a year in my care.

Since owning it, I have fed, pruned and wired a little. It proved to be a very strong grower so I defoliated 3 times during the growing season. After the 3rd time it did not bud out as strongly as I would have liked which means I will only do two defoliations this coming season.

As the tree had been in a rather large terracotta pot it had developed a large rootball, as a result a fair amount had to be pruned off in order to get it into a bonsai pot.

The underside of the rootball showing the cuts where some lager roots were removed.

This re-potting I concentrated on removing all downward growing roots. This lead to a large percentage of the rootball being removed. Although Elms are strong trees I thought that I would not prune the surface roots as much as I might otherwise due to the large amount I had already removed from the rootball.

The surface roots.

As you can see from the above image there are a number of large un-tapered roots. In the next re-potting I will be looking to reduce these roots to introduce some taper and delicacy to the rootbase. For the time being though, these roots will help the tree recover from the loss of the larger part of its previous rootmass.

If you read my post “Two pots” you will be familiar with the two pot options I had for this tree.

The two pots I had to choose from.

Although I like both choices I ended up chosing the left hand pot.  What i found interesting was how each pot gave the tree a different feeling. The left pot ( ) gave the tree a more spreading feeling while I felt that the right pot ( ) made the clump appear much taller. The beauty of liking both the pot/tree combinations is that I will happily alternate which pot I use in future re-pottings to give the clump a new feel each year.

The prepared pot (minus tie-in wires)

For its size the Yamafusa pot had a good number of drainage holes, each of which needed mesh screening to prevent the soil media falling out and to prevent some of the larger pests getting in.

The potted Elm.

The Elm was then tied in firmly and soil worked in around the rootball. I feel the pot is a good fit to the clump and the green of the pot should work very well with the yellow autumn colours I hope to get next year. This clump has a long way to go before it is a good bonsai but it is now firmly on its way. Hopefully heavy feeding combined with defoliation will add a fair amount of twiggyness and branching to the tree to further enhance its image.

This last weekend I looked through some pots to find something suitable for an english elm clump that I will be re-potting in the coming months. I ended up choosing two pots. Both pots had a number of similarities and I thought that a post comparing them might be interesting.

The two pots were made by Yamafusa and Ina Genzou.

Yamafusa

Yamafusa Hanko (signature)

I really like Yamafusa pots, especially the green glazes. They have a great speckling and richness of colour that varies subtly across the pot.

Ina Genzou

Ina Genzou Hanko (Signature)

This is a Ina Genzou pot, I don’t know a lot about his work and is the only pot of his that I have. I like the pot but the finish in a few areas seems a little rough in contrast to other areas of the pot which are more visible and have a nicer finish.

Both pots were glazed green and both of round shapes, one is a circular shape and the other an oval.

The Yamafusa pot from above

The Genzou pot from beneath.

Comparing the glazes is interesting. I am always fascinated by the vast differences in similar glazes. Both pots are green, both have speckles in their glazes yet both are very different. If you look closely at both pots you can see the influence the different clay colours have in the zones where the glaze thins out.

The Yamafusa glaze

I find that Yamafusa’s green glazes really glow. When you look closely you can see that the colour changes depending on its thickness. At the top of the pot’s rim, hints of the clay beneath sneak through changing its tone.

Ina Genzou's glaze.

Ina Genzou’s glaze on the other hand is similar yet has some subtle differences. It seems to have a bit more milkiness to it. It has speckles yet they are smaller and the rim has beautiful drips. Somehow the colour seems slightly duller and more uniform. the colour of the clay where is can be seen through the glaze gives a very different colour change to that of the Yamafusa.

As you have seen from the previous photos these two pots at least on the surface seem very similar. What sets them apart for me is the smaller details. In fact detail is what really makes the difference for me when it comes to pots. In the next two photos I will look at one area of the pots. The drainage holes. Drainage holes are rarely seen when a bonsai is planted in a pot but when ever I purchase a pot I always try to look at the finish of these areas to determine quality. These details don’t necessarily mean it is a good pot or that it is a bad pot but I think that a pot that has well finished details will often set itself apart.

Yamafusa's Detail (drainage hole)

The Yamafusa pot’s drainage holes have been finished with a bevel both inside and out. This makes the holes look well finished and considered. It may seem a small touch but it is the details like this that really show that whom ever made the pot took the time to finish it to a high standard.

Ina Genzou detail (Drainage Hole)

The Genzou pot’s drainage holes are a little rougher. it appears as if they were punched or cut through the pot’s base and then not cleaned up or finished. I am sure they will drain and function just as well as the yamafusa pot but the visual appearance of them looks a less refined.

Does this make it a worse pot? Probably not. Both pots will work very well as bonsai containers. But should you have to choose between two similar pots a detail like this might be the deciding factor.

In the case  of the elm clump I think I will actually use the Genzou pot due to its added depth but that decision will have to wait for a few more weeks when I begin re-potting.

Both pots are from the cheaper end of the spectrum but both have some great qualities that could really add to the image of your bonsai.

I am still slowly working through my collection and preparing for winter. This weekend this Chinese elm was cleaned up along with a couple of other trees.

Before the work.

The tree I worked on had recently undergone a re-style. Upon re-potting last year I also decided to change front slightly. This required a bit of pruning. As I began to prune I realised that the initial branch structure had been grown too quickly and lazily on my part. Many branches were too thick, had little taper and had messy structure. I decided that the change in front would also be a good time to re-structure the ramification so I pruned hard.

The same tree a year or two ago prior to re-styling.

Re-styling an established tree can be a hard step to take but ultimately having this tree go backwards for a couple of years will mean that in the future it will be a much better tree. Luckily chinese elms are strong growers and rebuilding the ramification should be a fairly quick process.

The work I did this time around was mainly removing leaves that had not yet fallen off and cleaning the trunk of moss and also cleaning up the soil surface.

The soil and trunk need a clean up.

Keeping your bonsai clean of moss and fallen leaves and other debris achieves a few things. First, it makes the tree look better which I always find makes me take better care of it. I also find that doing work that makes you look closely at your trees you become more familiar with them and it often reveals what future work will need to be done in coming seasons. The last thing a good clean often does is it reduces the hiding places for pest insects and places for their eggs.

A large caterpillar that was living under the moss growing on the trunk.

After a general clean I pruned the long growth and then sprayed with lime sulphur.

After the work.

All the tree needs now is a wiring and a re-pot sometime prior to spring. I am toying with the idea of lengthening the canopy on the left side and possibly growing a low branch from the left side of the hollow. I guess I will grow one and see how it goes next season, i can always cut it off if it doesnt work out.

I am pretty happy with the pot it is in at the moment. I was never really 100% on the last oval pot and feel this one suits it a lot better.

The pot is a production Reiho. Reiho is one of my favorite production potters from Tokoname. Although the photos don’t really capture it, the pot really changes moods depending on the sun. Sometimes in low light it looks almost black, and then in full sun it turns to an almost ultra marine blue. you can kind of see it by comparing the colour in the first pic with that of the soil surface photos.  Hopefully next season I will get some good colour on the tree so I can see the yellow leaves set off against the dark blue fo the pot.

The tree below is another that was heavily infested with pests. It was infested with Whitefly which in turn had led to sooty mould. Again, in the last garden it was growing in it was almost impossible to control the fly as every time I would spray the tree it would be re-infested a couple of days later.

As a result of the infestation each leaf that was on the tree had a hundred or more eggs laid underneath it. Because of this I wanted to defoliate just before leaf drop so I was able to collect all the leaves and destroy them.

The Quince before defoliation. You can see how damaged the leaves are from the whitefly.

This is my only quince and since I have owned it I have fallen in love with the species. It grows strongly, approach grafts easily, and buds back well. It also shows great colour in autumn (should you not defoliate it too early such as I did this year) and also gives a display of flowers followed by fruit. The bark is also very attractive. When you add up all these positives you get a species that makes a great bonsai candidate.

After removing the infested leaves.

As you can see from the above image, the tree is still very much in the developement stages. I am in the process of approach grafting a number of branches onto the trunk and am also trying to develop a new first branch. The second branch is where most of the whips for the approach grafts are taken from, which explains the looped twigs. This last summer I was able to graft 4 new branches but 3 still need a little more growth before they can be cut from their parent branch. This coming season I hope to graft a couple more.

For those of you wondering what pot the quince is in, it is a pot by Yamafusa. Yamafusa although not really high-end, is one of my favorite tokoname potters. Their green glazes are very beautiful and suit a wode range of deciduous trees and although at the cheaper end of the price scale their pots are great quality.

After I defoliated this Quince I also sprayed with lime sulphur in the same way i did with my trident maple. Hopefully this will kill any remaining insects and leave it pest free come spring. Fingers crossed.

This year has seen some dramatic changes to my bonsai. The most major of these was moving house and gaining some backyard space. My trees previously were kept in amongst a lush garden. On one hand this was good in that my bonsai were quite sheltered and there was a good micro climate in which to grow amongst. The down side was that I could never really rid my trees of pests as once the garden was infected everything was. As a result my trees ended up with a number of pest problems. Now I have moved I hope to rid them of these problems, which brings me to the subject of this post, my Trident Maple.

Earlier this spring I defoliated the maple and posted the results HERE. I repeated this defoliation process twice more during the season and was rewarded with much increased ramification.

As it began to change into its Autumn colours I set about doing the final defoliation. Usually I would leave the leaves on a little longer in order to see the full range of colours they would turn but I wanted to remove them before they dropped so I could dispose of them along with any insect eggs that may have been laid on them.

The trident at the beginning of autumn just beginning to show signs of it changing colour.

Starting to turn

I removed all the leaves which revealed the structure of the branches and all the new ramification. All the leaves that were removed were put into the household garbage to ensure that any eggs on them would not end up anywhere near my bonsai.

Defoliated.

Once the tree was naked I was able to carefully look over the tree to assess the amount of pruning that would be required. I wanted to spray the tree with lime sulphur to kill any remaining pests so I did not prune at this stage. I don’t like the idea of lime sulphur getting into fresh cuts. I am not sure if it is actually a problem or not but I choose to avoid it where I can.

What I did prune off was some insect eggs. I found what I first thought were fungal blooms on dead twigs.

If you look closely you can see the small white tufts of damage.

A close up of a damaged twig

Upon further investigation I realised that the tufts lead to a hollow channel within the twig which was filled with eggs around 0.5mm in size. I did a quick search on the net and realised they were the eggs of Passion Hoppers which lay their eggs in channels they make within small twigs. The twigs die soon after the eggs are laid so cutting the twig off and destroying it is a good way to tackle them.

I then went over the tree with a pair of scissors and removed every twig I could find that exhibited signs of damage.

A pile of some of the damaged twigs.

After removing what I can only guess was hundreds of insect eggs I sprayed the tree with a diluted solution of lime sulphur to prepare the bonsai for winter.

It was a satisfying days work. I hope that the work will pay off next season with a dramatic reduction of insects in my collection. Fingers crossed.

During my recent trip to Japan i managed to visit Fuyo-en. Fuyo-en is a garden that always has a high number of quality bonsai. I was a little pine-ed out by this part of my trip so it was nice to spend some time with their amazing deciduous trees. I took a number of photos which can be found HERE.

What was also nice was to see some of the recent work that was going on around the garden.

The frist bonsai i noticed of interest was what I am guessing was a flowering apricot. It had recently been grafted in a number of places. I have read that these trees often need to have young wood grafted into areas of older wood to maintain vigour and keep the bonsai compact.

The grafted bonsai.

Although the grafts looked to not have completely healed nearly all of them were  producing flowers as can be seen below.

The grafting in detail.

One of the other trees that caught my eye was a maple with an enormous nebari. The bonsai was being worked on by one of the apprentices who was wiring all the branches to the tips.

An impressive nebari

I always enjoy seeing techniques done by Japanese professionals. Even seemingly simple tasks can reveal tip and tricks when performed by someone who works at these high levels.

A freshly wired branch.

One such trick that can be learnt from the above image is the use of the little wire bracket. It has been used to gently spread two sub branches. Had this not been used, the two branches would have had to been wired with quite a large diameter wire to achieve the same spreading effect. Having avoided using a heavy gauge wire, the wire that is on the branch appears far less obtrusive than it could have. A small trick with large results.

I always look out for these little tricks when ever I am around other people’s bonsai, as I find there is always something to learn.

This last weekend I went down to Footscray and had a look at the Bonsai Northwest Inc.’s annual show. This year there had been a change in venue to the Footscray community arts centre which turned out to be a great success. The exhibition space was skirted in black curtains which provided a great backdrop for the trees.

Having been involved in the Victorian scene for a while now it is good to see that every year the quality of both trees and displays are on the rise.

All those who exhibited and worked on setting up the venue should be proud of their work, the exhibition looked fantastic. Hopefully this year is a sign of things to come in the future and also a hint of the quality we might expect at next years AABC convention which is being hosted by this club.

I did manage to get some photos but unfortunately my camera struggled with the lighting as it is a small point and shoot. Some of those pictures are below:

Even though my last trip to Japan’s purpose  was to get married, i still managed to find some to visit some bonsai nurseries.  The nursery below was a little out of the ordinary from your normal Japanese nursery.

For those familiar with the nurseries of Omiya and other well-known growers would be used to the high level of immaculately maintained and presented bonsai. I am sure many of you who have been to japan and experienced this for them selves would be aware of the overwhelming feeling you get when you are exposed to so many high quality trees in one place. These places are obviously the top end of the business. Their trees grace the many shows around Japan that exhibit these high level trees and in my opinion cement the Japanese at the top of the bonsai pile. But surely not all of Japan’s bonsai are show ready and of the best quality. Which brings me to this post.

The Kanuma garden centre (Click the image for a larger view)

My last trip I was taken to a place where there was no doubt, a huge range of bonsai. There were magnificent trees on display but, they were the minority. For the most part the bonsai for sale were project trees. Trees with problems in one way or another. Trees that would benefit from an air layer, a branch or two removed or a restyle. I spent a good amount of time here looking over the many benches, admiring potential. It was nice to be able to see trees that were waiting for the hobby grower with some vision to come along and place their mark upon them. I would love to live near a nursery such as this. On the surface it is not as impressive as the higher end nurseries but it is budding with potential for someone who likes to work on their own trees.

A small selection of photos are below.

Some of the more developed pines.

One side of the benches. There is an equal number of benches to the left.

This seasons Satsuki dug and ready for sale.

A Satsuki on the benches

A pine in need of some refinement.

A maple with a nice base. Great beginnings for someone willing to do the branch work.

A trindent with a whole lot of problems i would love to inherit.

A modest maple that would have plenty of potential.

Kanuma garden centre is not going to be first on the list when it comes to a Japanese bonsai pilgrimage, and may not even make second, third or fourth place, but for someone who has seen all the big sights and wants a bit more insight into what is out there in Japan it is worth a look.

Enter your email address to subscribe to this blog and receive notifications of new posts by email.

Join 688 other subscribers

Contact me

nichigobonsai***gmail.com

Note: to use email address, substitute *** with @