I have slowly been trying to get all my trees into good quality pots. By good quality I mean Japanese, old chinese and or hand-made western potters pots.
When I started bonsai I couldn’t see the point of spending money on good pots. Australia is flooded with cheap pots that are made out of China and I couldn’t see why you would bother spending 3, 4, 5 or more times what a cheap chinese pot cost on a Japanese or other container. I would much rather have spent the money on trees or tools. After all pot is a pot right? Not really, not all pots are created equal.
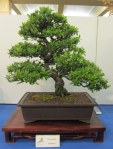
Take the two pots below. The first is a cheap Chinese pot i picked up a month or so ago. I needed a pot for a pine i was re-potting and didn’t have time to get anything of better quality. So I went to a local nursery that had a good range of cheap pots. Below is the pot I used. As you can see, after only a months use it is already weeping white ‘stuff’ from the clay.

A Cheap Chinese pot
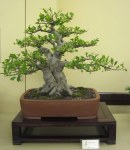
If you compare it to a Japanese production pot such as the one below you will see that there is no issues with white ‘stuff’ on the Japanese one. These two pots are beside one another on the bench and both have Japanese black pines in them. If the white deposit was from the water I use it would be on all my pots but this cheap chinese pot is the only one showing these signs. What is most worrying is that this white stuff began weeping out of the pot during the first week of use. If it is on the outside of the pot I am sure it is also weeping through on the inside as well.

A production Japanese pot.
I talked to an importer at a local show about this issue. His family run pottery kilns in China and he imports their pots. He said there was a range of quality coming out of China at the moment. The best stuff goes to Japan and the rest goes to Europe, America and here. He said that to make the pots cheaper things are added to the clays to make them go further and reduce costs. Now im not a chemist, but……. I believe it’s these additives or impurities that you can see weeping out of the pot surface above. The white deposit is definitely not something I want to see on my pots that is for sure.
But when it comes to pots, materials are only the beginning of the differences. There are many differences that in my mind make using better quality pots well worth while. Now I am not saying that every cheap or Chinese pot will give you issues. I have a few cheaper Chinese pots that I like a lot but there are definitely a lot of bad, poorly made pots out amongst the few good cheap ones.
Hopefully in the next couple of posts I can begin to show some of the other differences that make quality win out over a cheap price. It has taken me a while to appreciate good pots and hopefully I can share some of the things I have learnt along the way.