
You are currently browsing the category archive for the ‘Bonsai Maintenence’ category.
Been busy as per usual but I have managed time to fit in a couple of customer trees.
Below is a quick before and after of a black pine that needed teasing out of a sea of needles. A fun tree to style.
Before
The after shot is a little lacking in quality but I am sure you get the idea.

After a day or so work.
As the days get cooler we slowly approach the time of year where I like to style conifers. This year is gearing up to be a big one for bonsai work as I have taken on a number of customers trees to be styled. Following on from the last Black Pine I worked on, I had the opportunity to work on a similar tree.

Before starting the work.
At least it looked similar before the work begun, but soon after the old needles were removed a new set of structural challenged presented themselves to be solved.

Old needles removed and ready for pruning and styling. (slightly rotated)
I decided to rotate the front slightly which brought up the issue of the first branch. That is it was now heading towards the rear of the tree so with the help of a screw in the trunk I was able to bend it forwards. This then set the base of the tree and the rest of the canopy could be built around it. The head was finally lowered and rounded out to create the final image.

After the work.
Again this tree now needs a couple of years to grow into its new shape but even after the couple of weeks that passed between starting the job and finishing, new buds are beginning to form which should see this tree become show-able in the not too distant future.
While in Japan I worked on a number of trees which might make it to future posts.
One such tree was a bunjin style white pine that had been bought by the nursery as part of a larger collection. It had been styled by the previous owner but with far too thin wire so it was up to me to re-wire and find a new style for the tree. Oyakata gave me free rein on the tree and so I set about working.

As the tree began, styled by its previous owner.
So I stripped the old wire, pruned some branches and wired what was left. I then started to place branches and reached a stage where i wanted to cut off some branches that would take the tree past a point of no-return. So I called Oyakata from the garden to make sure he was going to be happy with my decisions.

My styling of the tree.
It turns out what I had done was not to his liking and he proceeded to remake the branches and form a more upright tree.

The tree after Oyakata re-re-styled it.
And so that is how the tree stayed. After all it was not my tree and I certainly did the right thing by asking when I did.
That being said, did I like the end product? No, not really but I wasnt really happy with my version either. I can see why Oyakata styled it the way he did.
It is a little more regular and perhaps in that form is more easily sold (which is the name of the nursery game) and being of fairly low quality comparatively with the rest of the nursery Oyakata was probably hoping to get it sold quickly to make room for something more interesting.
Having said all that what was interesting about the exercise was to see a piece of material transformed into three totally different stylings by three different pairs of hands over the course of the day. Each person who styled it, from the previous owner, to me, finally to Oyakata saw something different in the material and I think it is that difference in how each of us treats our trees that keeps this art interesting and keeps me turning up to demonstrations, shows and events.
Perhaps this material much like all others has no one perfect way to be styled but instead many different forms that play to different tastes.
Things have been pretty busy since I got back from Japan. A new job, a pregnant wife and Autumn’s bonsai work just beginning haven’t left a lot of time for the blog.
On top of this, I have also been doing a fair amount of work on customer’s bonsai and their collections. Some of this work is routine seasonal maintenance, some of it teaching and then some of it is re-styling.

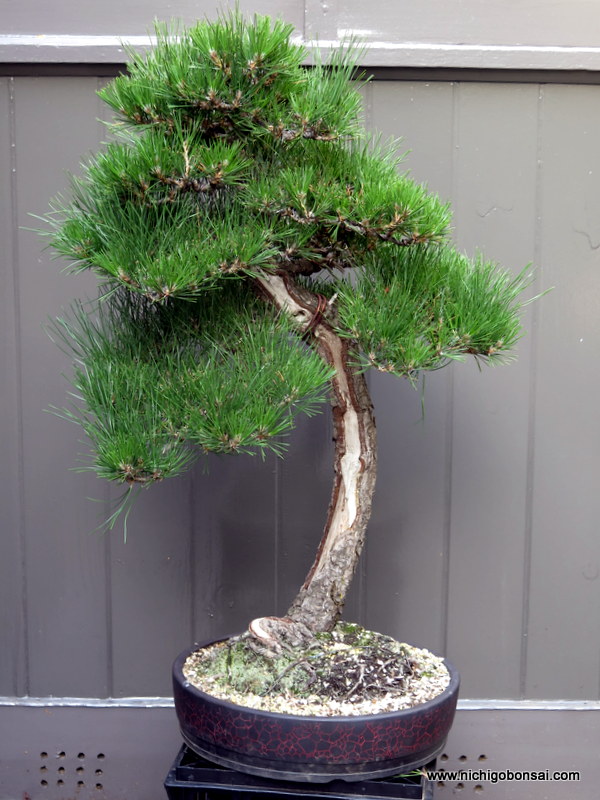
Before any work
One such re-styling I completed recently was the black pine pictured above. For Australia, the black pine had some good age to it and was starting to develop nice bark textures, but it’s canopy had grown into a solid blob over the years. My job was to find the tree within the blob. I had to prune a large number of branches out and define a better branch structure to set the tree up for it’s future. As a result a fair amount was cut off the tree but now the bones have been formed to grow a better structure upon.

After pruning and wiring.
One of the main changes, apart from separating the foliage into layers was to enhance the movement of the tree. This involved shortening the right side and lowering the head to accentuate the left movement of the main branch which made a huge difference to the appearance of the tree.
I think a re-pot into something more suitable and a year or two of candle pruning should see this tree fill into a very nice tree.
I have been busy re-potting in the last few weeks and finally managed to get around to doing a project tree that I have been growing for a couple of years. When I first acquired the tree I placed 6 or so root grafts onto the trunk. 3 took and 3 failed. Since then I have been meaning to replace the failed grafts but for what ever reason, every time I have had this tree out of its pot I havent been able to do the grafts.

The Arbortech and the faulty nebari in the back ground. You can see the two vertical scars from last attempt.
The first failures were all down to the fact that the channels that accepted the new shoots were too shallow. As the approach grafted seedlings thickened, they simple pushed away from the trunk instead of fusing. I originally cut the channels with a knife and was only able to cut so deep.
This years remedy was the Arbortech! I do very little machine carving but this tool does get a bit of work this time of year as it is excellent for cutting graft channels.
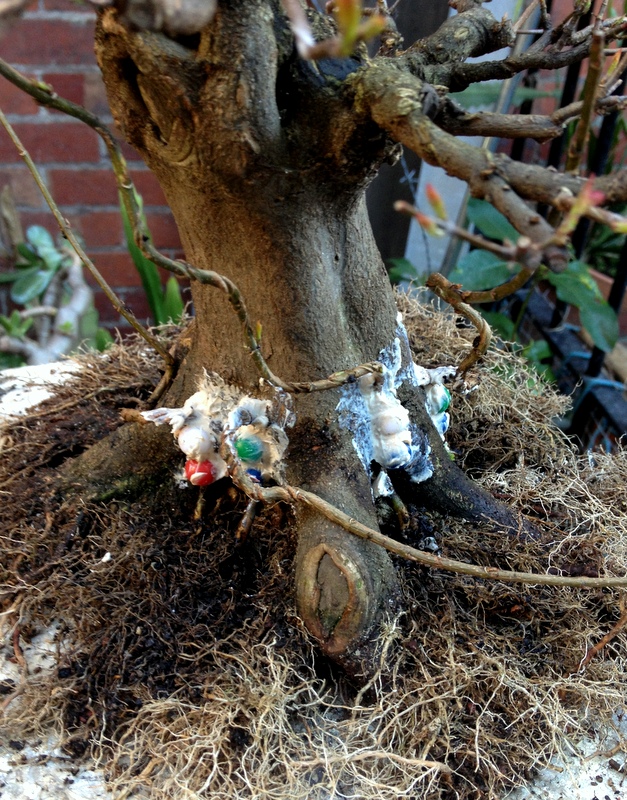
The four new grafts.
The process is dead simple. It is much the same as any other approach graft except instead of using a branch from the same tree you use seedlings as your grafting material.
The basic idea is that you cut a vertical channel in the trunk where you would like some new roots. You then insert a seedling into the channel and adjust it until the seedling’s roots are at the same level as the existing nebari. Then you fix the seedling into the channel (I used big map pins), seal it all up with cut paste and let it grow. Soon enough the seedling will thicken and fuse with the trunk. Cut off the top of the newly grafted seedling and you have new roots where there were previously none. For a better breakdown of the general theory see these two posts. Post 1, Post 2.
This year, the seedlings look a little strange as they are all from the batch of seedlings I bent the year before. Having said that, the bendy little trunks were very useful as I was able to use the first bend to create a good angle for the new roots to leave the trunk from.
The bendy seedlings are care of a project I started last year.
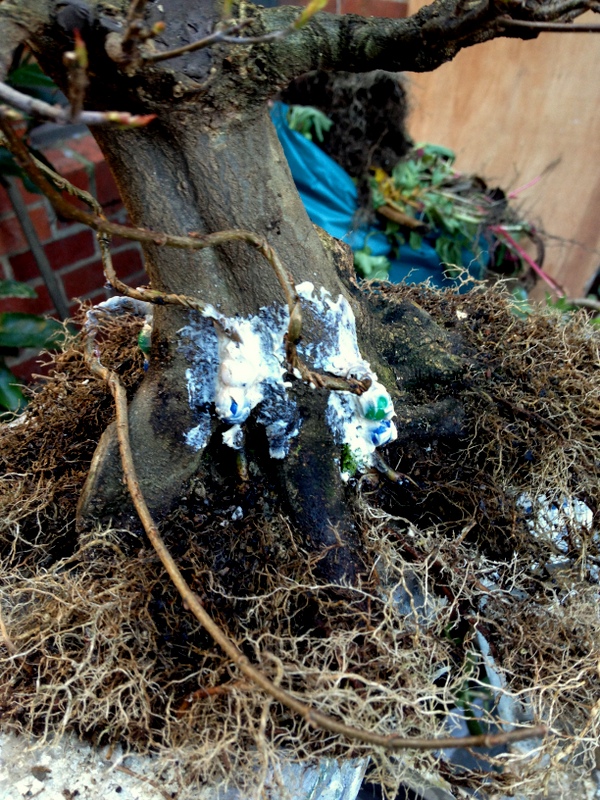
The new grafts were generously coated in cut paste and then the whole lot was potted back into its training pot.
I imagine that by the end of this rapidly approaching summer the grafts should have taken and I will be able to shorten them back before then some time the following year cutting them flush with the trunk.
Hopefully I remember to take a few pictures along the way.
I have been trying to keep my collection from growing any larger with mixed success over the last few months. What makes it especially hard is when you help friends dig stock out of their growing rows at their nursery.
This years visit to Shibui Bonsai was much like last years in that a lot of nice stock was dug (which I am sure a lot will be featured in the coming seasons catalogue). Although a lot caught my eye, I was well-behaved and none of the ground grown stock came home. That is not to say I didn’t bring anything back to the benches…….
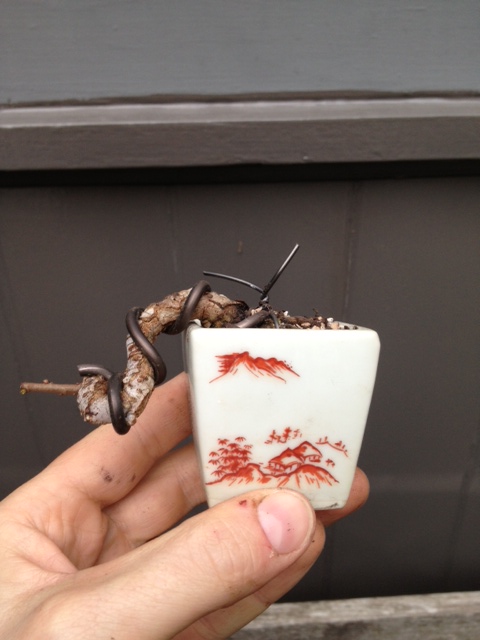
For a while now I have been meaning to grow some small twisted mini’s to use as accents in 3 point displays. On the benches at Shibui, Neil had a range of interesting little chinese elm root cuttings that I thought would be perfect for the project so I brought one home.

The cutting out of its original pot
Today I wired the cutting to enhance some existing curves and then re-potted into a much smaller container in which I plan to start to grow a small crown from.
Often working out how to secure a small tree into a small pot which only has one drainage hole can be difficult but I have found the method shown below works well.

tie-in wire secured to a larger wire.
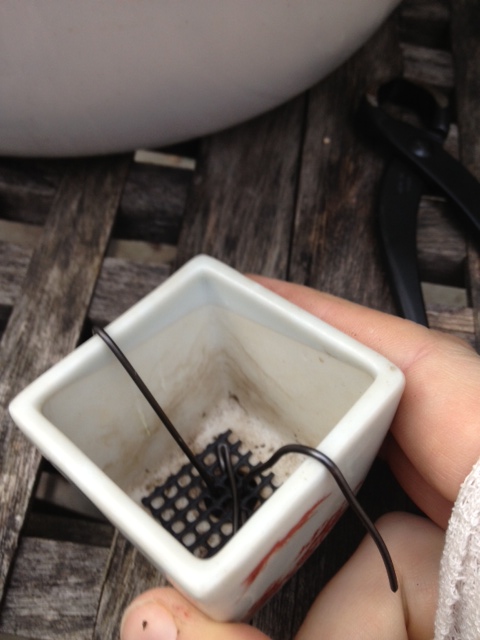
Mesh installed and tie in wires ready to accept the tree.
The pot itself is by no means a museum piece but it is a well made Marufuji production pot. Being a little on the large side will serve it well to help the tree establish some new ramification. Once I am happy with how the ramification is progressing I will look for a more suitable pot anywhere up to half the size of the current container.

The roots were reduced accordingly.
For such a small cutting the tree had grown a number of large roots all of which I removed and or shortened to fit into its new home.
Potted up but before I trimmed the tie in wires.
After half an hours work the tree had found its new planting angle and its new pot. It is by no means a masterpiece but I think once I can develop some ramification it could make an interesting companion to a larger tree.
I think this little tree will make a nice addition to the collection in the coming years and being so small it shouldnt effect the space I have too much. In fact I probably have a whole lot of room for trees of this size.
As the season rolls on I am slowly getting to the end of my needle work which in turn will mark the time to begin preparing the deciduous trees for winter.
The tree below is another that has been slowly developing over the years and with another wiring and another years candle pruning I think it will be close to exhibit-able.
The tree has appeared on the blog before HERE where you can see the progress it has made and the ramification it has gained. It also makes obvious just how much it needs a re-wire.

Before the work

After a the needle plucking.
Yet another of my trees that desperately needs a re-wire, it will have to get into line behind all the others that I plan on doing this winter.
This weekend gone by I got some time to do some needle work on a few more trees. One of which has featured on this blog before. It’s a bit of a strange tree and people either like it, or want to cut off the first branch. I like the first branch and as a result i haven’t cut it off just yet and actually now the tree is filling in a little bit more I am beginning to like it more than I did at first.
Looking a little shaggy
Probably the part of blogging I am enjoying the most is how it has forced me to catalogue my trees as they progress. If you look at this tree 2 years ago HERE you can see that the tree has really improved over that short time. Looking at it day to day on the benches it is easy to lose perspective and feel like the tree is not progressing. It is only when you see a picture from a year or two ago that you realise just how much it has changed.

Needles removed revealing nice, new, short growth.
I am very happy with the progress I have achieved with it over the last couple of years and hopefully if I can keep this momentum up for a few more the tree will be well on the way to being exhibit-able.
I doubt if this tree is ever going to be everyone’s cup of tea but I think that it is now on a path where it will grow into a convincing image.
Its been a good year for growth in my garden which is always a bit of a double edged sword. A good seasons growth means that all your trees will have progressed and built further to their structure, ramification etc. but with lots of growth comes lots of maintenance.
With my pines this work takes longer and longer times. As the trees ramify the number of shoots double each year in turn doubling the time it takes to maintain them. As trees become more dense fingers can no longer reach areas of the branching so tweezers are employed which again can slow things down a little.
Here in Australia we are beginning to slip into autumn and it is time to shoot prune the second flush of growth and do needle work on the pine’s remaining growth.
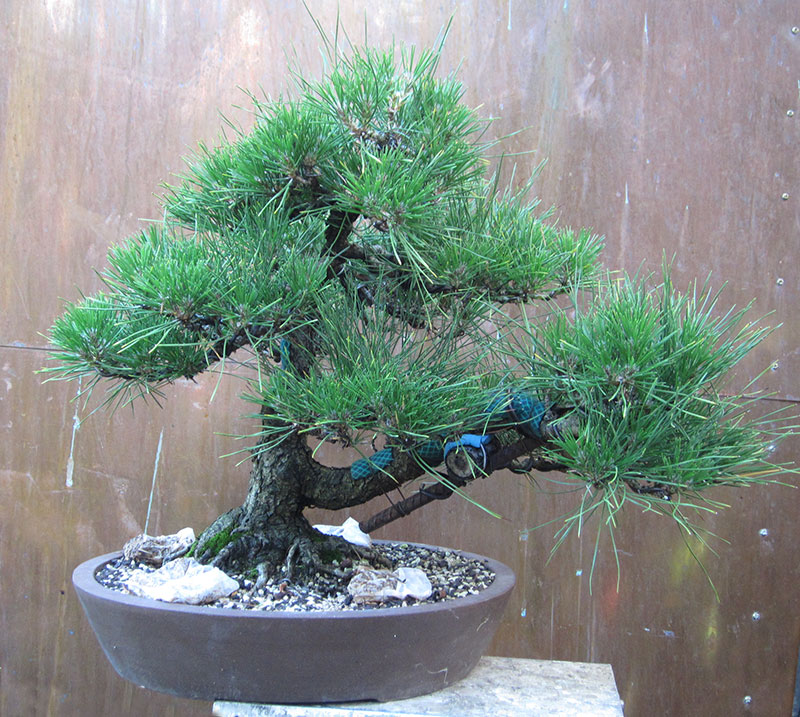
The first tree off the bench was THIS little black pine.

Before the work.
Finally it is beginning to look like it belongs in a bonsai pot. you can see in the before picture how nicely the needle length has come down compared to the long needles attached to candles that were not pruned in spring due to them being weak. These weak candles now have strong buds at their tips getting ready for next springs flush.

After removing old needles.
After a few hours work things begin to look a whole lot neater. The new length of the needles is much more suited to the trees size and over all the tree is beginning to look more in proportion. Next step is a re-wire which I hope to complete some time this winter and then a re-pot into something a bit nicer.
I have had a number of old deciduous trees go through my collection over the years. Often they arrive in various states of neglect or dis-repair due to ageing owners, lack of interest or lack of knowledge. What has been interesting is the results of this lack of technique and or application.
I think most people are aware of what they should be doing. Most beginner books say something along the lines of “cut all downward growing roots off to form a flat root-base”. In essence that is correct. But why?
- Is it to get the roots to fit in shallow containers? Partly yes.
- Is it to encourage a flaring nebari? Partly yes.
There is one more reason that is rarely discussed or talked about when talking about root work.
What we want roots to do in a bonsai container is counter intuitive to the plant we are growing. We want a shallow root system close to the soil surface. This area of the soil profile is horticulturally the worst place in the pot to grow roots, and here in lies the problem.
The top few centimetres of soil are those most likely to experience temperature changes and drying out, both of which are no good for roots. Yet this is the area of soil we need them to occupy to form a good shallow root-base.
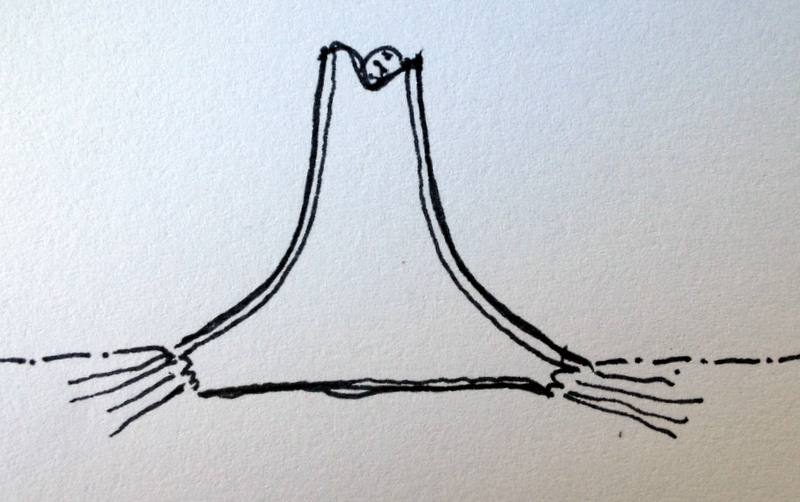
Correctly pruned root base
The above image is a vertical slice through the center of a well-formed nebari.The hairs on either side are roots and the triangluar shape is the nebari and lower trunk.
Idealy you want roots on the outside radius of the root base so that as the tree grows the nebari slowly gets larger. These roots however are occupying a zone that is not ideal for them. In order to keep them active in this zone you must force them to stay there.
To do that you remove all downward growing roots. These roots are more protected under the trunk and head straight for the cooler more temperature and moisture stable soils lower down in the pot. If you leave them on year after year the bonsai will preference these downward growing roots which are in better horticultural locations and the roots you actually want to keep around the edge of the nebari will slowly start to die back.
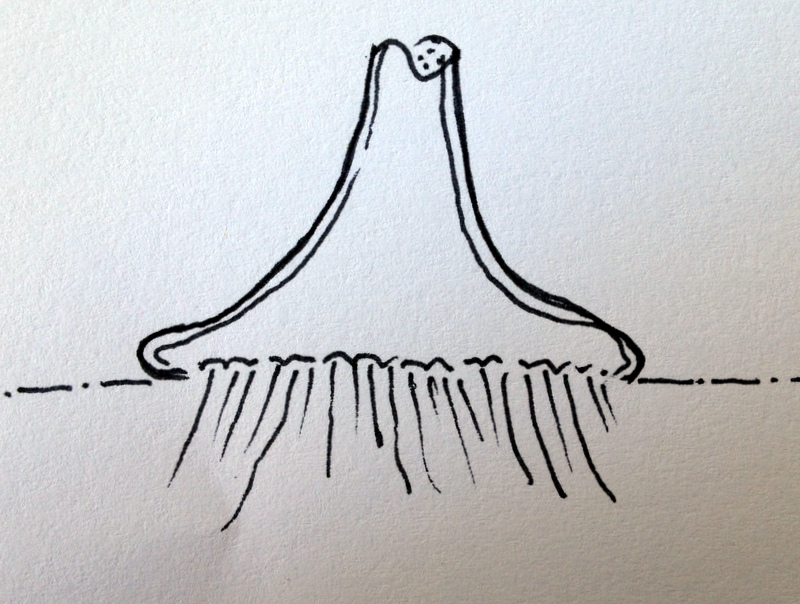
Incorrectly pruned root base result.
What you end up with is something like the above drawing (this shows a tree which had a well-developed nebari and was then incorrectly maintained). All the roots on the edge have died back and only roots underneath the trunk are growing. Now the nebari will not grow in size around the edges but instead grow underneath the trunk and slowly make the root base less and less shallow requiring deeper and deeper pots to house it.
These downward growing roots often push the trunk up and show the edges of the nebari so that it appears somewhat like a blob of melted candle wax. Not ideal. Not natural.
If left in this state for a long time the edges of the nebari can begin to develop areas of dieback that will often spread from the edge of the nebari up toward the trunk. All in all a bad result.
So if you have deciduous trees that are beginning to form nice root bases be sure to ALWAYS take off the downward growing roots. It is not just to fit the tree into the pot but it is mainly to ensure your roots grow where you need them to and this will keep your nebari developing correctly well into the future.
