You are currently browsing the category archive for the ‘Bonsai Maintenence’ category.
What to do with boring stock? Good stock is out there but often hard to find or expensive. On the flip side, straight, untrained whips are available not only at bonsai nurseries but at almost every general nursery as well not to mention you probably have a number of neglected cuttings that you took years ago struggling along in the ‘ill get to it later’ area of your backyard.
Which gets me to today’s post. After going through the recent batch of stock that came into my garden these 3 plants were by far the least inspiring. Long, leggy, dead foliage and a general lack of interest in the trunks. Essentially material i would usually ignore if i was in the market for bonsai stock.

But material like this can be a good opportunity to begin something that ends up being interesting and potentially great, all at the work of your own hands.
The stock above is getting to the point where most people would give up on the idea of getting a tree with good movement out of the fairly stiff and straight trunk lines. But for certain species, and especially shimpaku juniper material like this can pose a good opportunity if found for the right price.
First you need to clean up the material.

I tend to remove dead shoots, competing trunk lines and thin the branching aiming for a general spread of branches at good intervals along the trunk. In the case of the trees above i also removed strong branches as well i want these to end up more on the Bunjin side of the style spectrum and therefore I only want short compact branches.
I then applied raffia to the trunks. I don’t often use rafia but due to the thickness of these whips and the tight bends i intended, applying the raffia was a worthwhile addition.
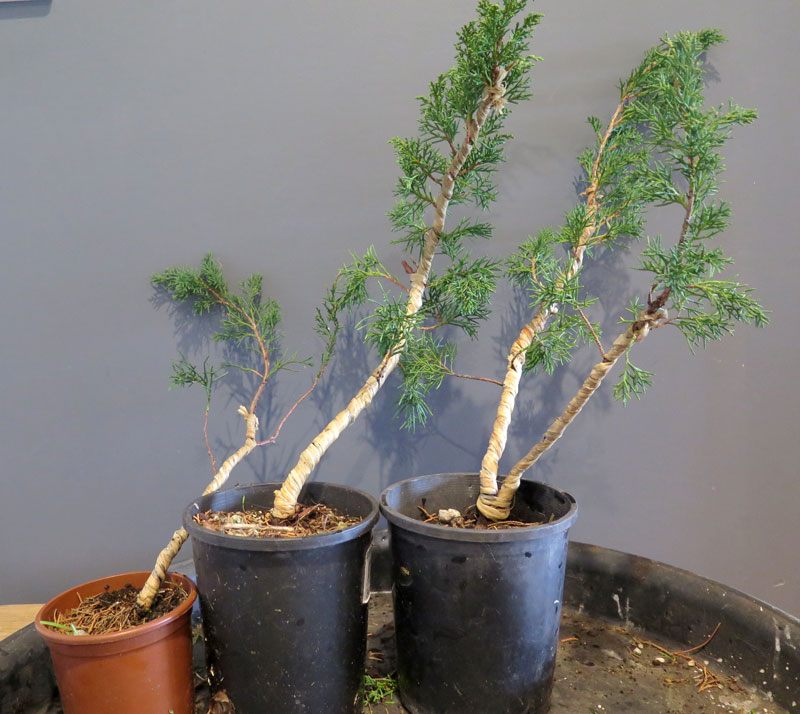
Wire goes on next, I ensure that the wire is coiled on in the same direction as the raffia beneath. This is done so that as i bend, i can also twist the wire in the same direction the rafia was applied in. Having the raffia and wire both tighten to the trunk hopefully provides support to the inner fibers, rather than these wrappings loosening off and allowing room for breakage.

I applied two wires up each trunk and spaced the wraps apart rather than doubled them up together. This provides more points of contact along the trunk and more support along the bends, hopefully further reducing the chances of breakage.
Now comes the fun part. The bending.

The trees were bent making sure to twist the trunks in the same direction that the wire and raffia had been applied, essentially tightening it all down against the trunk.

I also wanted to introduce this twisting for the next phase of the process that will happen after the bends have set, Shari.

As the bark on the tree also twists as the trunk and raffia and wire are twisted through the bends, the sap lines will twist and spiral around the trunkline. This means that removing bark along these sap lines will create sharis that also spiral around the trunk as it moves along its length. While you can on young stock force a twist in the live vein via cutting a spiral, the effect you get from twisting the trunk originally is far easier and i think a superior end result. A tree that has been twisted like this will also have the heart wood fibers twist and follow the twist of the shari making any carving via fiber pulling automatically follow the shari lines.

All in all a productive morning, turning some trees with no potential into material i am pretty excited to continue to develop into the future.
All the trees were bent pretty hard with some cracking and complaining heard from each one. I am not worried too much about their survival as they can tolerate this fairly easily and as this is the first time i have worked them i am not loosing much of a time investment if they fail. Nothing risked, nothing gained, and if you are going to do a high risk process on a bonsai it might as well be before it becomes valuable.
I hope the above inspires a few of you. The starting material for this technique can be found in most peoples backyards, most bonsai nurseries and every club sale day. You can grow these whips from cutting fairly quickly and easily also if you are struggling to find it in the wilds.
I would recommend everyone give it a go, its a very easy way to create good material at a very low cost. Why not make a heap and sell some on! People are always after twisty junipers and you will be helping to lift the average of quality stock in this country!
This post will likely be the first of many documenting this tree’s progress from stock through to ‘bonsai’ over the next few years.
I haven’t had a post like this for a long time because I have been actively reducing my collection to a more manageable size, which hasn’t seen much rough stock make it onto my benches. At the same time, the trees i have kept continue to develop and become refined which hasn’t really seen much rough development type work, until………..
Recently myself and a friend came across a large amount of stock which you will likely start to see show up on the blog as we develop it and progress it towards a higher level of refinement.
It’s actually a bit of a funny story really how we ended up with all this material.
A good mate Dave, (well his name is not Dave, i am using Dave to give him some anonymity, his name is actually Jeff) did a drastic cut back of his collection at the recent Bonsai Northwest show. He sold somewhere in the vicinity of 25 trees leaving his collection compact and manageable. Now Jeff didn’t want to expand his collection much beyond this level but he did want to add a single Juniper to the mix, something a little less refined than what he had previously sold so he had a project to work on and develop.
I respect Jeff’s general approach to bonsai. He has had previously a huge collection and has cut it back savagely on several occasions. I have asked him about this and he essentially came to realise that what he really enjoyed about the bonsai process was taking stock and refining it, styling it and making it into what would be accepted as a bonsai. From this point forward however, he got little enjoyment from the often mundane ongoing refinement and maintenance, so he now builds a collection, then sells of components of it and starts the process a fresh with new owners enjoying taking his creations deeper into the refinement phase. It takes a fair amount of self reflection and self honesty i think to come to such a realisation and then decide that its ok to select a component of the bonsai process that you enjoy and are good at to focus on, essentially being somewhat unique in your bonsai practice compared to the general community.
Anyway, i digress.
So Jeff had told me he wanted just one new juniper, and as fate would have it i had just visited another good friend Kris’s new garden where he had just put aside a bunch of junipers and pines he wanted to get rid of.
Kris is another grower I really respect. He is pretty humble and wouldn’t admit the following but he produces some really great stock and trees, all of which he has produced by reverse engineering Japanese photos of shohin bonsai and rough material. The stock he passed on to us was in the throw out pile so don’t use the below as examples of his work, but just know he has produced some amazingly good material over the years.
So to cut a long story short, after taking Jeff to get a single tree, we ended up leaving with 30 pieces of material and left a pile of pines to be picked up at a later stage.
Essentially that is how Jeff set out to get one tree and came back with 30.
Needless to say, you will be seeing a lot of this stock on the blog being worked and developed over the coming years.
Below is is one of the first I have worked, and have named ‘The Octopus’.
Like most of the stock, this is its first real styling since being wired for movement during its early creation. The material need to develop its foliage and trunk further so it will be grown as styled stock in development rather than go into a bonsai pot. As a result the ‘final’ image below looks scrappy and messy. This is somewhat intentional as all I want to achieve this styling is to establish some branch positioning and trunk lines. As they are setting in place, i will also work to tighten up and get back budding on the areas that will become future branch pads. During this process it can look unruly as health, vigor and growth are what i am targeting over neatness.
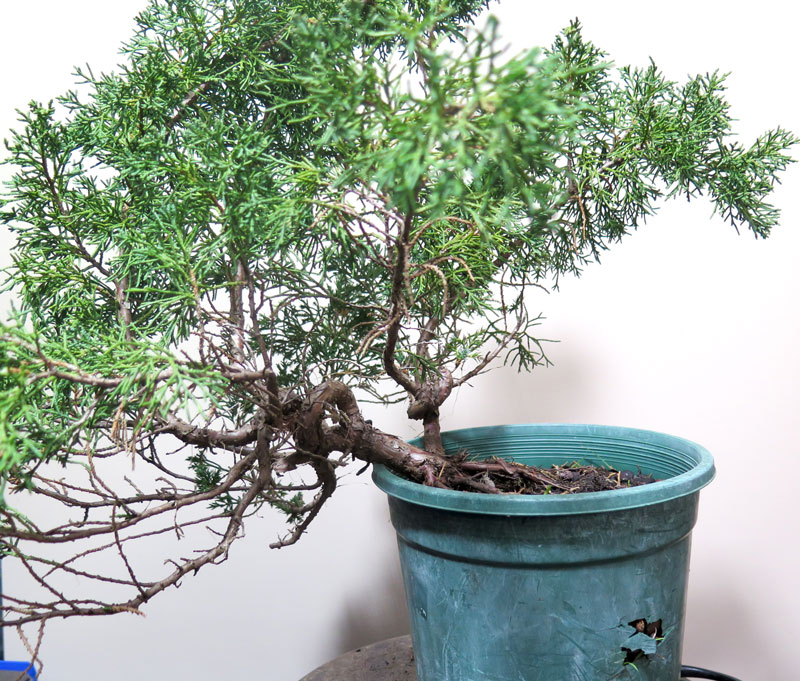
Typical of most stock that has been grown uninterrupted for a number of years, this tree was full of dead shoots, old pruning stubs and leggy foliage. Cleaning up that was the first priority which gave me a better understanding of the branches and trunk movement. For anyone overwhelmed or stuck on a piece of material i cannot recommend doing a basic foliage and trunk clean up enough. Doing this clean is how you get to know the material and you often discover features within the tree and get ideas for the styling moving forward.
Post cleanup, i began to introduce some shari into the two main trunk lines.
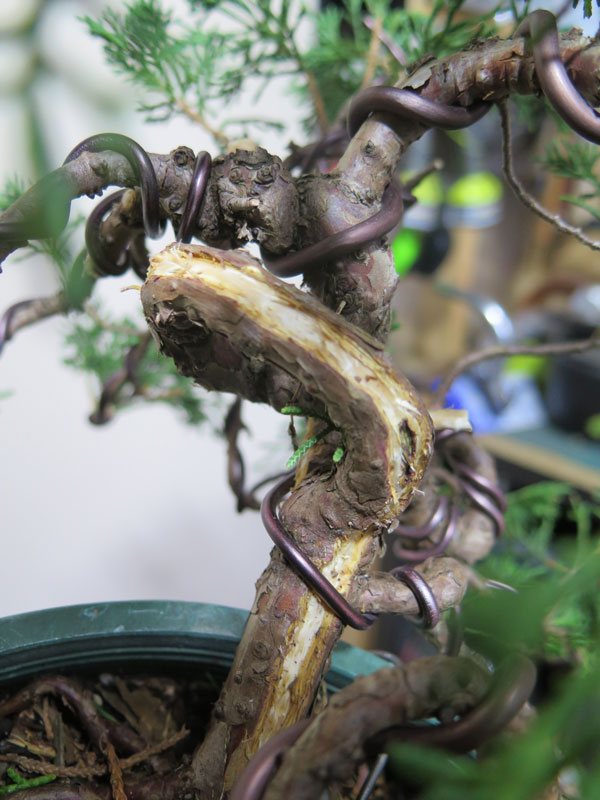

Above: The beginning of shari’s trying to follow the trunk movement.
The incorporation of shari into juniper bonsai are beneficial on a few levels.
Firstly from a design sense, the shari adds a great white contrast to the green foliage and orange trunk line acting almost as a highlight to draw your eye into the movement.
Secondly, by reducing the area of live trunk but maintaining a similar amount of foliage above forces the trunk to thicken the existing live areas at a rate faster than if the whole trunk was growing. You see this in live vein creating where the vein ‘muscles up’ and bulges as a large amount of sap and resources is channeled through a reduced area. This can be manipulated further by leaving the live areas of bark in spots you want to thicken, ie. a live vein either side of a trunk will only see the trunk expand in those directions, creating more side to side thickening than if a similar amount of growth was to occur on a fully live trunk. But i digress again……
At this point i hadn’t really thought about angles, fronts or trunk-lines so after some pondering and some wiring i shaped the tree into a strange composition that i quite liked. I aimed to continue the movement that Kris had formed early on and also establish some flow within the composition which in turn directed branching and the likes. As i said above i was really just looking to set main lines so the end result is a bit messy. Neatness and refinement will come in future years.
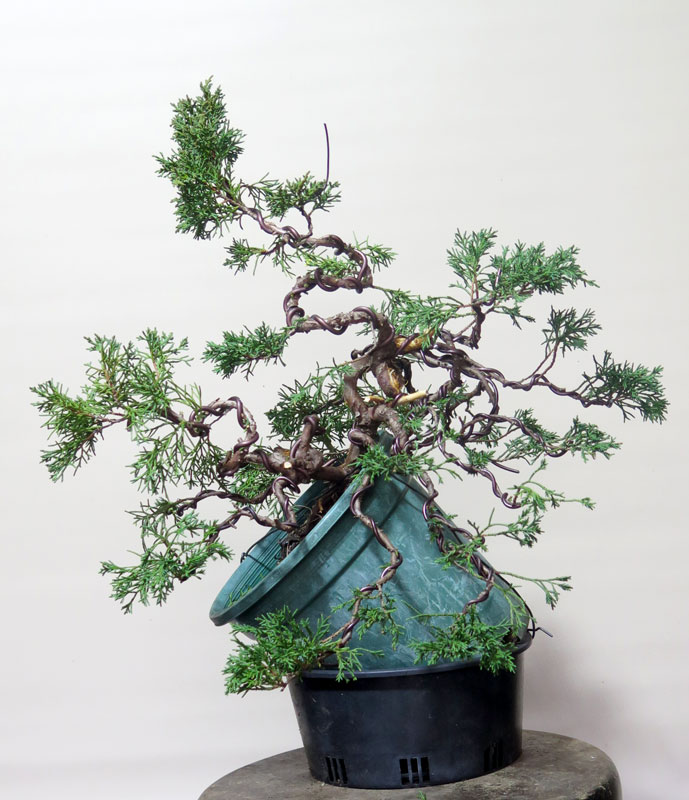
It’s certainly going to be an unusual one. you can see why i have decided to call it ‘The Octupus’ with its twisted limbs going out in all directions.

I think i have set a good base building on the early movement in the lower trunks. I have also done a bit of a bad rough sketch which is below to mostly remind me of the direction it is heading.

From here a lot of growing needs to happen which will likely see this tree staying in larger grow containers for at least a few more years. I really want to thicken the trunk lines while also developing shari’s and the live veins. This is something that simply takes time but i think i will be able to simultaneously work on the foliage pad as i go, hopefully minimising the overall development timeline.
Anyway, that’s all for today, keep an eye out for the other trees from this batch which i will post as i get them worked on.
It’s been a while since i have grown Radiata pine. Early on in my collection i had a number but as i moved houses and the collection was scaled back each time the Radiata’s found alternative accommodation in other people’s gardens.
A couple of years ago i found myself in a pine forest, shovel in hand and figured it was time to get a few back into my own garden. I dug a couple of saplings with the intention of testing grafting white pine onto them (so far with no success. If you have had any success yourself grafting red, black, white or other pine species onto them let me know in the comments) but also freed from the shackles of the wild forest this tree that had a funny first bend and the beginnings of some nice bark.
Since digging it it has taken a couple of seasons to get it out of the terrible site soil and into a good mix. I also gave it a first styling last year sometime which for some reason i cant find any pictures of.
Recently, as i have been working through my other trees this radiata found it’s way back onto the bench to be de-wired and the secondary branching re-wired.

As you can see from the above it is still very early days but i do enjoy the unusual branch setting of this tree combined with the strange lazy first bend.
I am still experimenting with how i go about managing the foliage which i might post about when i work things out a little more.
As far as the future of this tree i think i could get it looking pretty close to the below sketch in a few more growing seasons.

Not sure if it will every be a truly excellent tree but for now i enjoy playing around with it and i do find it interesting to look at which will likely see it stay on my benches.
Radiata make great bonsai and as they are an invasive weed in our native forests they are an excellent candidate to dig up, gaining good material for yourself and ridding some native forest of a weed. Everybody wins!
They grow fast and strongly, take a lot of bending and other abuse, have great bark that develops fairly quickly, bud back and make good bonsai, get out there and grab yourself one!
Today’s post is a quick update on a tree that has been in the works for a number of years. I am not sure when I dug this originally but it was certainly a while ago, five years ago perhaps?
The juniper was originally a Sabina Juniper that came from a local school that was removing the garden bed in which it was planted. A good friend put me onto it and we both dug this and a couple of other similar trunks.

Once I had brought it back to some health from the original dig I set about grafting the foliage over to Itoigawa. While Sabina foliage is fine, after many years persevering and working on trees with sub par foliage i now look to grown trees with the best characteristics. With the amount of time you put into your bonsai i don’t want to be investing that time into a foliage characteristic that will always have down sides. Hence the grafting.
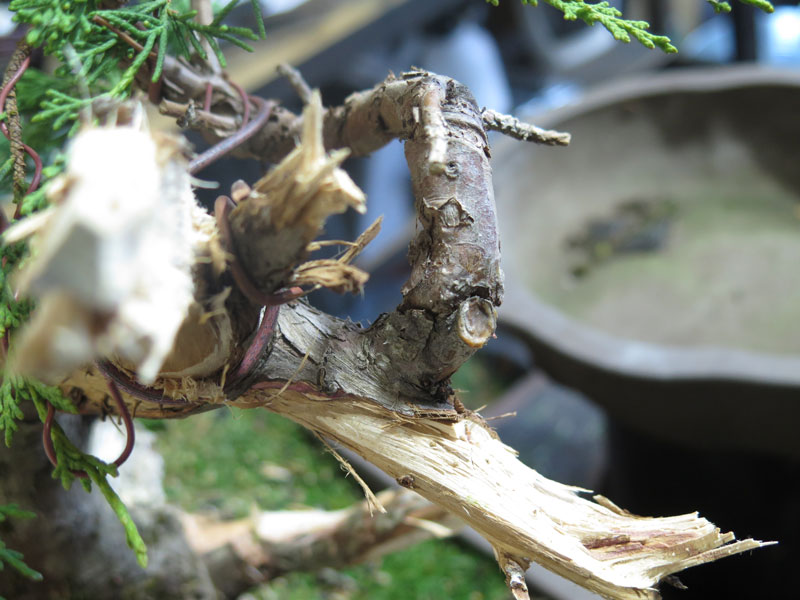
I ended up with two grafts that took and have been growing them out and strengthening them over the last couple of seasons prior to thinking about styling.
I finally got around to doing a rough first styling last night.

Obviously the tree has a long way to go, judging by the timelines with THIS tree, it will be another 2-3 years before this bonsai starts to properly take shape.
That said, it was good to get into this styling and set some structure that the future of the tree will grow upon.
As I worked my way through the basic pruning of the tree i decided to move the direction of the tree back towards the right hand side. As part of this re-directing of the movement of the trunk over to the right, i also began modifying the deadwood to reinforce this movement. I will also need to grow the top of the tree further over toward the right as the tree progresses.
The dead wood still needs a lot of work, i need to spend a bit more time going over the bark and finding the live veins and cleaning dead bark from the deadwood sections as well as continuing to carve the shari and jins.
For carving I very much prefer hand tools for this carving. Chisels, large slip-joint pliers, branch splitters and various other tools all get a good work out. It’s a much slower way of carving but I think it creates a much more natural end result.
The one electric tool I do use is a wire brush on either an angle grinder or drill to strip hard to remove bark and smooth out the fibers from the hand carving………. But carving techniques are probably a topic for another post.
I am looking forward to finishing stripping the old bark so I can get some lime sulphur onto the wood and begin to get the contrast between all the colours to develop. This winter i plan on spending some more time on the dead wood so will post an update when it is further refined.
I also need to start thinking about what pot to put it in. I have a trip to Japan later this year to visit family and will keep an eye out while I am there but I’m still not entirely sure what style to use. If you have any ideas or good examples I’d love to hear about it in the comments below.
With a new year upon us it marks a good time to change things up a little.
At the start of spring, Evan Marsh put me onto a cheap dosing attachment available from our friendly, faceless multinational hardware chain.

It has been a good addition to the garden so far as it’s ease of use has really upped the regularity of my feeding and all my trees are showing excellent health and growth as a result.
I always liked to think that i fed regularly but when i though back to when my last weekly feed was it was often months ago……. This new dosing attachment makes the process so simple and convenient i have been able to feed as i water and it has kept me to my intended schedules much more easily.
For those interested, THIS is the product in question, the Holman ‘Quickmix’ spray gun.
After the Quickmix discovery, then came the task of deciding what fertiliser to use. I tried some of my usual go to liquid feeds but their paste like consistency clogged some of the jets and just generally didn’t feed out very well in the Quickmix.
So after very little experimentation I have landed on the below system:
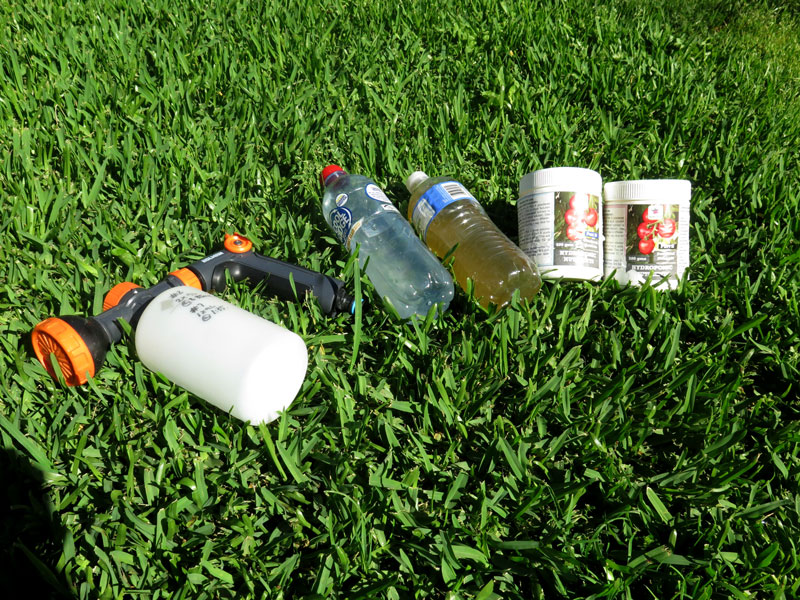
The fertiliser itself is intended for Hydroponics so has a good spectrum of nutrients and minerals but requires some preparation prior to use. It is a 2 part system where you need to mix a ratio of the crystals and water into 2 parts prior to combining the two into the Qickmix before you feed. It is my understanding that some of the minerals will re-crystalise if you leave the 2 parts mixed for any period of time so best to mix the two prior to feeding.
To use the Quick mix i add about 5mm of each 2 part solution tot he Quickmix and top up the bottle with water. Then i simply water using the gun. The gun has some adjustment for the dosing rate but as i have lower pressure from my water tank’s pump i just use the maximum rate. (more details about the dosing rates on the Holman website)
I have made my pre-mixed solutions in 2x 500mm bottles. I have been feeding each week and have so far used less than a 1/4 from each bottle. This stuff goes a long way! For $25 i think i will get several years worth of feeding done so i cant complain on the value side of things. All in all i am very happy with the system thus far. This combined with a slow release seems to be covering all the feed needs i have for now.

Just a quick update on how this tree is developing. It was in the workshop recently for a cleanup (mainly as an excuse to play with THIS).
It is proving to be both a really useful and fun tool to use around the collection. It’s an amazingly quick way to clean up deadwood, remove built up muck, staining and compact dirt from trunks and roots and even stones. Ive had trident maples with dark staining on their lower trunks for years, this is the first season they are clean!! Its a tool that is well worth the investment if you have similar tasks in your own trees.

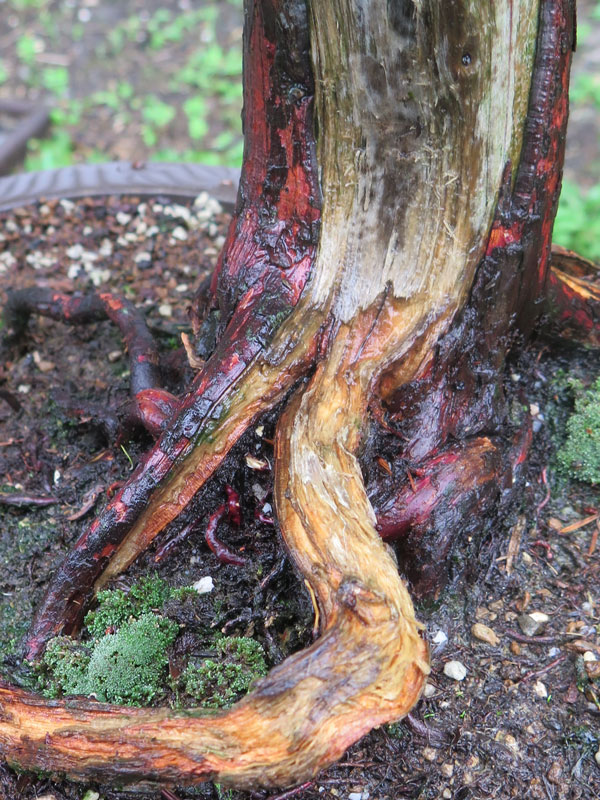
The above comparison shows what 2 minutes can do with one of these tools. You can probably also see that it has removed a lot of the rotten, punky deadwood in the process leaving behind the harder heartwood which has saved another task. All i will need to do is a final hand clean and we are ready for a new coat of lime sulphur.
I am going to also give this ‘Alchohol & Resin’ wood hardener a go this year and see how that works in some of the more prone to rot areas.
As for the tree itself, it is building momentum and developing quickly now and i am contemplating on displaying it at a local show mid next year if it continues to go from strength to strength and i can get all the foliage as developed as the lower first branches pads are.
Its an interesting tree to look at over time as per the images below:
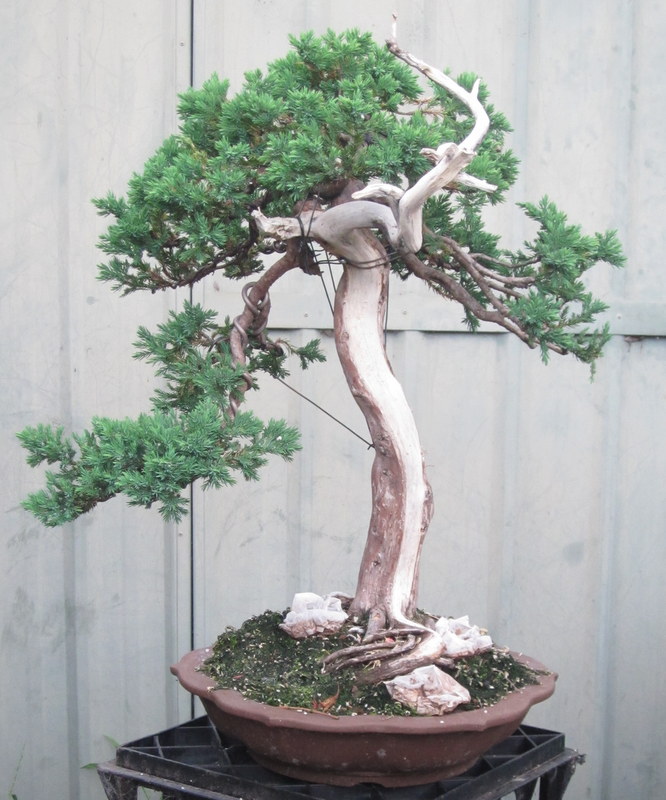


So back to the work, after a good cleaning the shari and deadwood was re-limesulphured and the bark somewhat cleaned up. Its growing into a nice tree.

While I had the tree on the bench i also thinned and shaped the live veins a little on the rear of the tree to further define them and ideally encourage them to ‘plump up’. Afterwards I gave the shari areas and jins a good fresh coat of lime sulphur and added some moss while I waited for things to dry. As I was applying the moss i also pulled and tied down the root on the left side that was hovering above the soil surface which I think was an easy improvement to make.

Next time this tree is on the bench I need to remove and likely re-wire the foliage and branching, but I am going to wait for things to fill in a little more before I do that, maybe next month’s task.
This year i finally feel like my pines are thriving after a long period of mediocre growth. This bad growth was due to a number of factors including:
- water pH Issues – Solved by moving to rain water.
- soil mix – I have recently moved to Akadama, Pumice and Scoria and believe this is a good improvement.
- fertiliser regime – This year i am using a two part hydroponic fertiliser and am applying weekly, and;
- strange seasonal variation – We have been in an ‘El-nina’ phase which resulted in cool wet years which even threw my tomato crops off kilter amongst other things
Most of the pines have been grown out last year and skipped de-candling to build their strength and from the below pics you can see they are responding well this year.

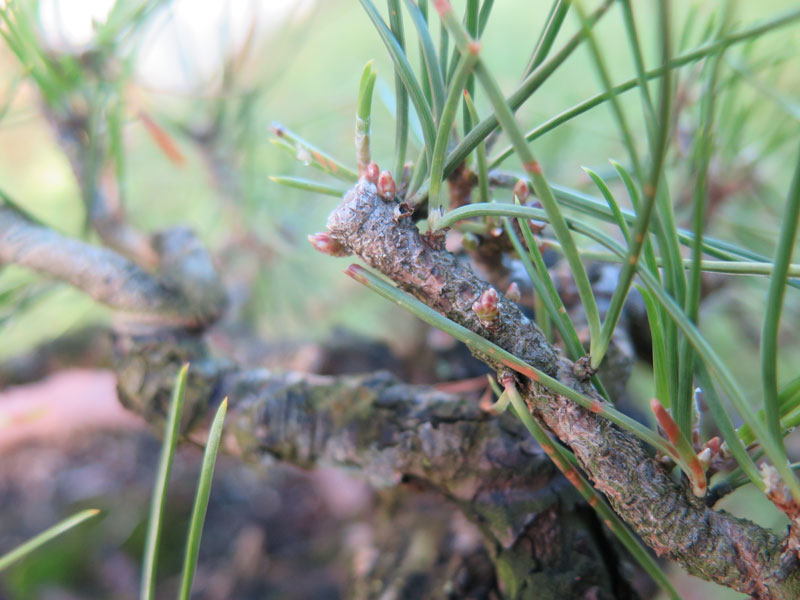
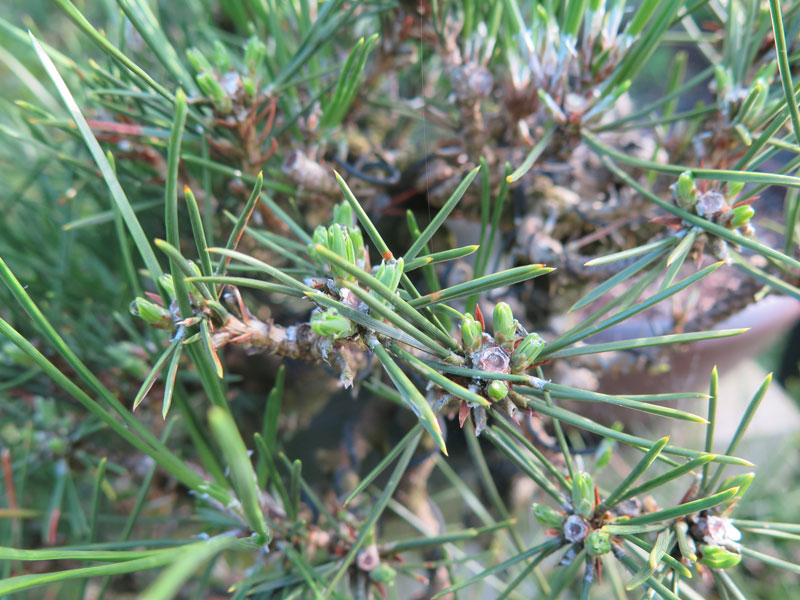
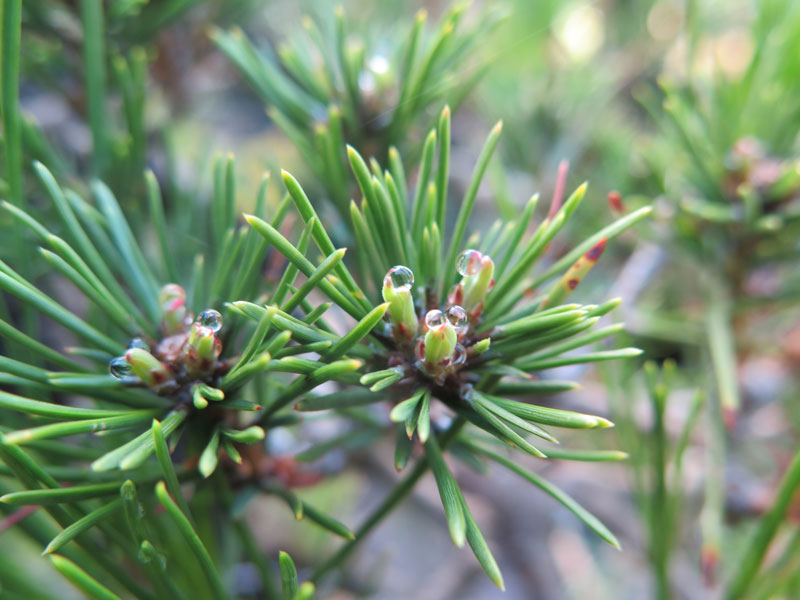

The Radiata is a fairly new addition to my garden after not having one for a while. I am treating it more like a Japanese White pine in regards to foliage management and so far am seeing good results. The process is essentially:
- Grow out the spring flush.
- once it stops extending, prune back leaving some of the new candle’s growth.
- New shoots form and grow out
- Thin needles
- Prune back new shoots to two and reduce length as per Step 2.
- Repeat.
I am guessing i will get 2 or 3 flushes per year using this method. So far needles have not come down in size much but as i build more canopy i assume this will slowly reduce the length.
I probably also need to play around with feeding timing but at the moment i am focused on building branching so am feeding heavily. A post for another day.
With some down time over the Christmas holidays, I finally got around to re-styling THIS TREE. It had been growing mostly untouched for a couple of years and had well and truly outgrown its former style.

As it had been left to grow a lot of the growth had become leggy and a lack of routine thinning had left fewer amounts of interior growth than i would have liked.
To get started, I began by pruning. I thinned and removed heavy and unneeded branching, upward and downward growing sub branches, thinned the foliage and generally cleaned up the structure.

As I worked I also started to play around with new front angles and didn’t mind it from a slightly counter clockwise rotated position.

I began to wire as I pruned so i could get a better sense of what branches I needed and what could be cut off. All was going well until i made an error. I wasn’t paying enough attention and when I cut off one of the branches in the top of the tree it was difficult to see from my angle that there were two branches in the branch cutters jaws…….. and as a result, i cut the key branch on the right side off.


Well, what was done was done so I continued wiring and worked a front that was much closer to the original. I was pretty annoyed with myself but there wasn’t a whole lot I could do. All in all everything was not lost but i was kicking myself for making such an avoidable mistake.

The ‘finished’ result is a good place to be for now. The styling is pretty sparse due to how much foliage and branching i removed but the trunk and deadwood are now very much more prominent.

You can probably see that the wiring I applied is only on major branches and sub branches. As this is a restyling, I will need to develop the foliage over the next 12 months or so to fill in and tighten up to this new style, so I didn’t bother fine wiring and hence the slightly scrappy appearance.

As the canopy fills in i think i will further fine tune the front. As you can see from the above image that original front is not bad but i still think i prefer the one i ended up with that is slightly rotated anticlockwise. We will see if this changes as i grow some of the branches and get some more width to things (something that i wouldn’t have to wait for if i hadn’t cut off that key branch!)
It is interesting comparing this and my other small Kishu to the itoigawa i have. It is certainly more difficult keeping these kishu small and compact compared to the itoigawa. That said, the branching stays much finer on these so i guess you have to take the good with the bad.
Next post might be an update on one of my itoigawa trees…. we will see.
Just a quick post today tracking a task I do on the semi regular to develop the junipers that have deadwood and shari features.

Above is yet another of my trees in desperate need of a wire. While I didn’t wire it today, iI did do a little thinning of the foliage in preparation for summer growth and a future styling. The main task i completed however, was the widening of the shari’s on the tree.
If you’re interested in seeing the tree 10 years ago, HERE’S it’s first post.
I do this task every couple of years to slowly reduce the sizes of the live veins which speeds up trunk thickening (or more like widening) and develops the shari’s texture.
The technique it’s self is fairly straight forward and involves removing a couple of mm of bark along the edges of the shari. It is a fairly safe process as you have to be pretty unlucky for the branches above to be reliant on the narrow strip of bark but it does pay to make sure that you are not removing all of the bark from directly below branches.

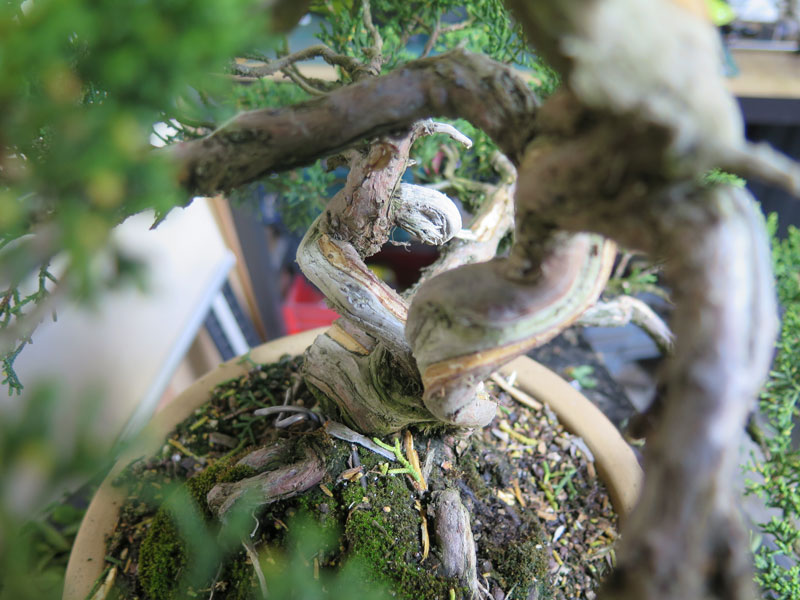

You can see the freshly exposed shari in the images above.
By reducing the size of the live vein you direct the same amount of sap (to supply the foliage above) through a thinner section of bark and as a result it tends to thicken in this area much more quickly compared to a larger area of bark supporting a similar amount of foliage. If you then have live veins on each side of the trunk they will grow outwards and appear to thicken the trunk much more quickly (if only in one side to side dimension.)
The other benefit of doing this technique over time is that you get a great texture on the shari areas. As you expose these new areas of shari, you are exposing younger heart wood and as a result you get lines appearing between the younger and older area of shari. You can see this quite clearly in the images above where there is a year or two age difference between each line. You can end up with an almost finger print like pattern on the shari with no need for carving and its a fairly effortless way to achieve a nice texture.
This is a maple I have been working on for some years and you might have seen on the blog before (2021 update, and 2013 update).
It came into the workshop recently (where i forgot to take before pics) and I gave it a structural prune. It really needs a full re-wire but overall I am pretty happy with the branch structure and development.

If you compare the tree now to some of the previous posts you can see quite a bit of development but then again i think I first started working this tree in 2013 so 10 years have passed so i would expect some change (and perhaps more development).
It had been somewhat neglected the last little while and particularly last year where it was overdue for re-potting and i ran out of time to do it.

As a result in the heat of summer I had some root issues and the tree suffered some die-back on the nebari. It was not a good result and entirely my fault. Well, lesson learnt and now i will have to spend the next few years healing the scar and will consider wrapping the roots in a towel or cloth to give some sun protection on our hottest parts of the year.
The tree still has a way to go but each time i work on it i can see the improvements. I am looking forward to giving it a full re-wire this Autumn.

