
You are currently browsing the tag archive for the ‘Australia Bonsai’ tag.
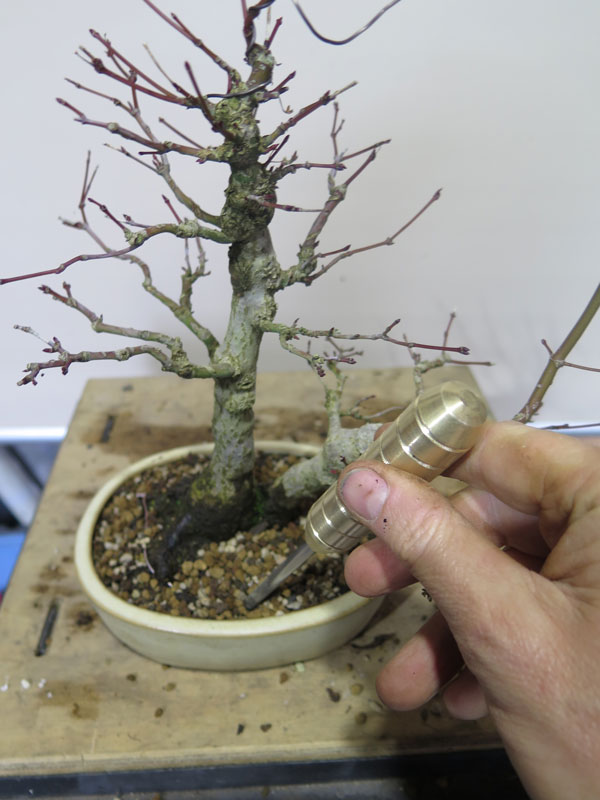
Today’s update is a fun little English Elm that was styled last season. Post on that styling below:
Today’s work was a fairly simple repotting into a lovely Koyo pot. I really love these pots and am always happy to use them with my trees.

The tree is probably ready for a re-wire but as English elms are one of the later trees to leaf out I will try to squeeze that in between repotting my remaining trees and bud burst.
I really like this lumpy little tree. its a bit ugly and has some strange bumps but I think that they all add to its character. I recently sold its brother to a friend so i will likely be hanging onto this tree for a long time.
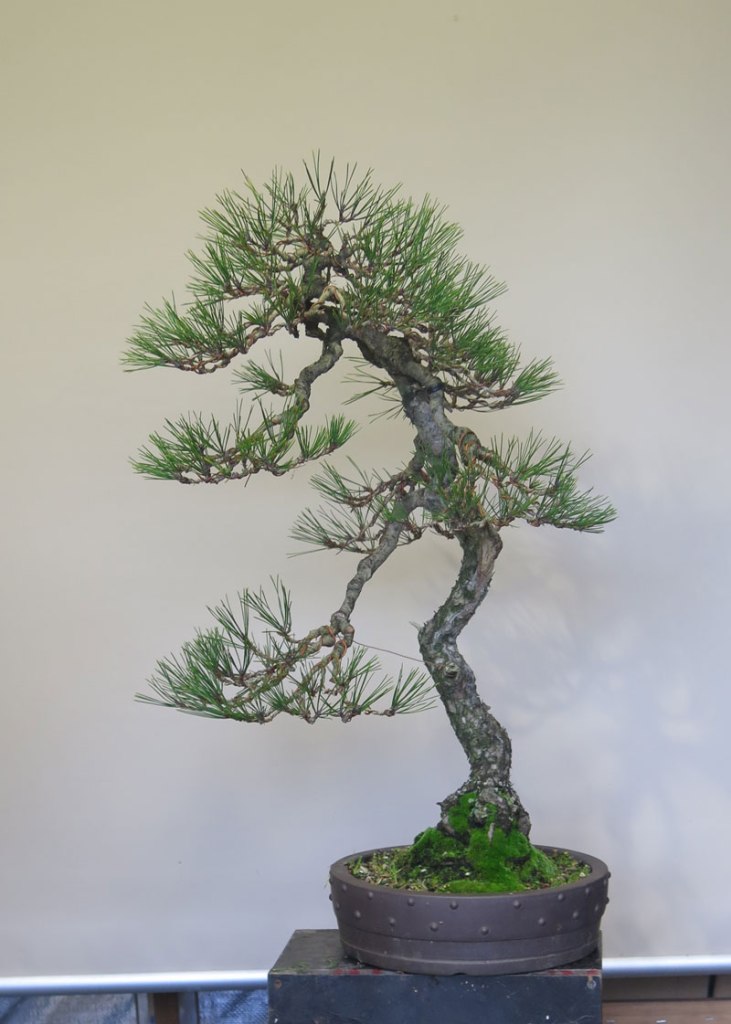
Another quick update on a tree I recently styled. The below pine has really started to shape up post styling and I figured it was time to get it out of the terracotta grow pot and into a bonsai container.
I potted it up in the pot from the tree in the last post which was the only spare pot I had that roughly came close to fitting the tree. Its not a bad match but I will see if I can locate a better pot for it in the next couple of years (square perhaps??).

Interesting to note the foliage colour seems much darker since the restyling photos, hopefully an effect of the water change and health returning to my trees. This tree has a long way to go but it seems that its future is back on track.
Just a quick post as part of the on-going repotting series. I repotted this pine which i recently worked and featured in this previous post:
Pretty simple work all in all just a change in pot. It’s not a perfect fit but I don’t mind it all the same. before and after below:


It will be interesting to see how this tree goes after the re-pot. It is in a fresh mix and this year I am potting most of my collection in Akadama, pumice and scoria in fairly equal proportions. I haven’t used this mix before but have heard good things so I am looking forward to seeing how it performs. Should be an interesting 12 months.
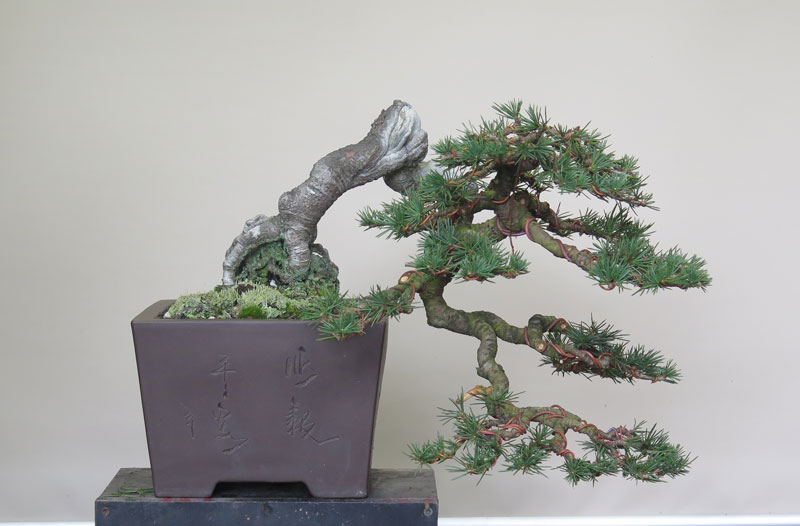
I am trying to repot a handful of trees each weekend in the lead up to spring to get ahead of the growth that seems to be quickly approaching. One of the trees I potted last weekend was the below, tall Japanese white pine.
The little pine didn’t start it’s life as a white pine and in fact was collected (liberated) from a local pine plantation’s roadside where it had self sown. I collected it really only to test as grafting stock.
It had some nice bark and a strange curve atop an otherwise straight trunk. It was also very thin which meant it had a small root ball and was easy to collect.
Turns out that it took the graft really well and the white pine foliage I grafted on has thrived.

After the graft being successful I think I let it grow out for a couple of years before I cut all the original foliage off. Essentially I was able to replace the long (20cm-ish) and shaggy original pine foliage with neat and compact white pine.
After the experiment was confirmed a success, I decided I should probably do something with it so I styled the tree and finally got it into a pot.

I really like how this one has turned out for what was just an experiment. It has a lot of development and growing to do before it is any more than styled stock but I think its off to an interesting start. I am really liking the tall-ness of this tree and it has made me want to go and dig a handful more so I could graft them and assemble a group. I did have to remove the tap root this re-potting but it had few feeder roots growing from it so fingers crossed it is a quick recovery.
So it looks like spring is on it’s way early this year with Trident Maples and Chinese Elms in my garden already swelling their buds. This might not seem all that strange depending on when you are reading this post from but ‘down under’ we are still in July (at time of writing) and I don’t normally even consider repotting until mid to late August and often run into September and beyond.
NOTE: (for those in the northern hemisphere, the months of June, July and August are our winter. For the Americans who don’t have metric winters; a short summary of the above might be that we are 64 ⁄ 79 ths of the way through winter and trees are budding out.)
I was lucky this year that I had a YouTube celebrity come over and help me out.
For those interested, his YouTube channel “Jeff’s Bonsai” can be found HERE.

Jeff is a great guy and we had a great day together and it only cost me a bowl of reheated left overs for his lunch!
I had forgotten how nice it was to have company when doing bonsai. So much of my work is done on my own down the back of the garden in my little shed. I suppose that social isolation generally has only increased with Covid so it was a really nice change to have someone else around lending a hand.
I think together we repotted 12 or 13 trees in half a day or so. I don’t think I could have done half as many in that timeframe, so thankyou Jeff.
The other thing you might notice from the above image is the black mesh screen on top of my green waste bin. This was another idea I got from Jeff (noticed in one of his videos). The night before he arrived I welded up the screen to easily and cleanly get all the old soil into the compost bin without risking the tree or tools falling in. It worked a treat!
As for the trees we re-potted, eventually many of them may make it to the blog but in the mean time a couple you might recognise from older posts are below.


Thanks again to Jeff. With his help we have broken the back of what can often be an overwhelming and desperate race against swelling buds. Hopefully I can trick him into helping again!
During one of the now countless lockdowns our state has been through, I enrolled myself into a Tafe Engineering (Machining) class as a point of difference in what at the time was a fairly monotonous pattern of “covid normalcy”.
It’s been a great change of pace and learning to run Metal lathes, mills and other machines (that seem to always be plotting to kill you or remove you digits) has been very enjoyable.
As re-potting season is gearing up, it was about time to steal another of my wife’s chopsticks to aid with soil settling. This year however, I decided that with 100’s of thousands of dollars worth of machines at my disposal that I should make a tool to do the job rather than raiding the cutlery draw.
So I fired up the lathe and started turning down some steel and brass.

I turned a handle out of some brass stock and made the shank from some 6mm mild steel bar. The two pieces are fitted together in a low tolerance fit and are held together with thread lock. That way should I ever want to change the shank (or switch to a stainless one), I can heat it up, break the bond and swap it out relatively easily.
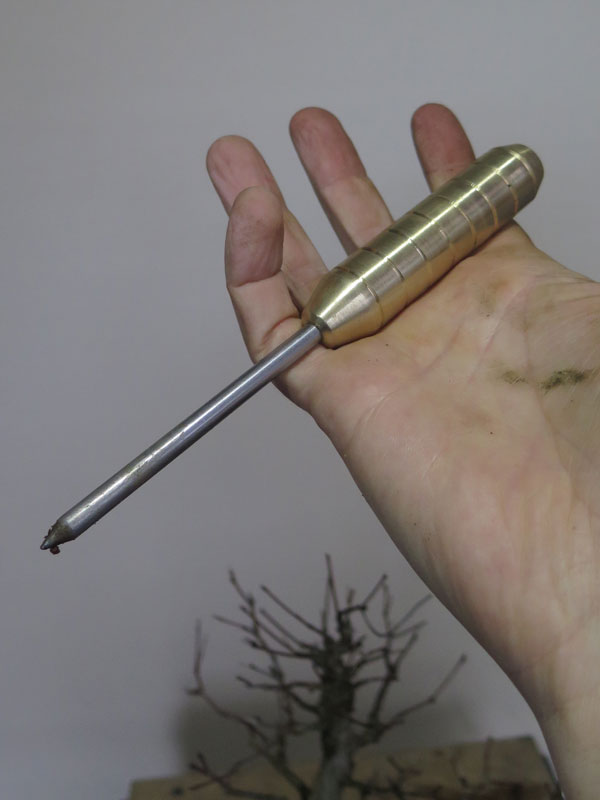
I’ve repotted a number of trees with it already and it seems to work well. It’s certainly heavy in the hand and feels solid.
I enjoyed making it and there is something really nice about doing work with tools you have made yourself. Which brings me to a question back to who ever is reading this:
Does any one have any good idea for bonsai tools I could try to make in the future? If you have a good idea, please comment below. If it is something I could see myself using I will more than likely have a go at making it.
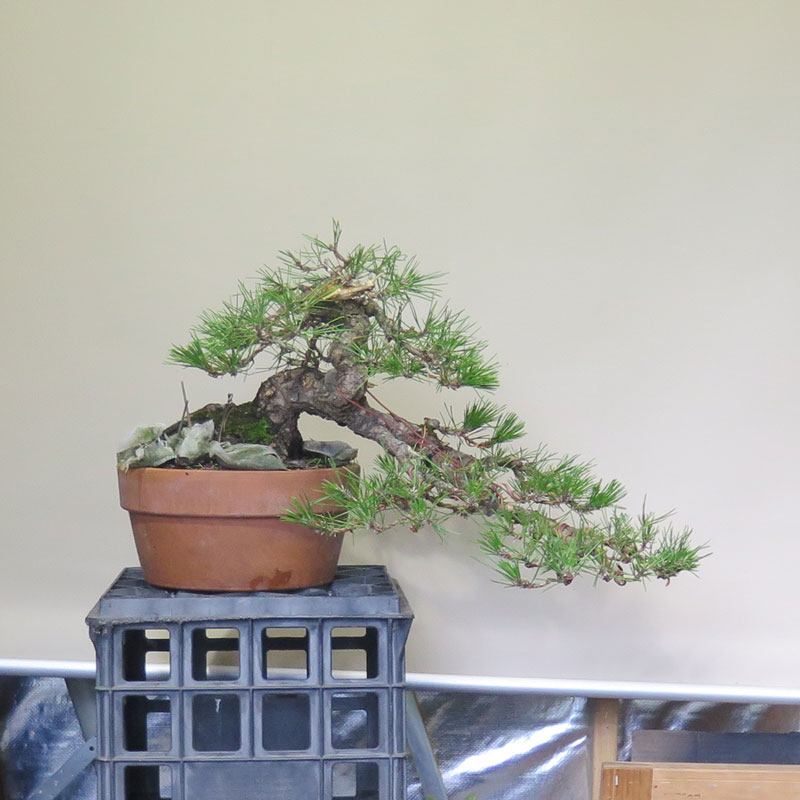
Another tree that has been worked recently was this Japanese Red Pine.
It was a tree that I styled for a friend that later found it way onto my benches. I really love this little tree and enjoy working it and getting lost looking at it.
The tree had a fairly dramatic first styling back around 2016. The before after shots of that work are in the bloc post below:
It was also displayed at the 2018 AABC national convention where it was in great health and form. It’s the last tree you see in the 6 trees I displayed in the below video:
The work this time around was more of a maintenance styling and of course I forgot to take a before image as i got carried away in the work. The tree like many others had suffered with my poor water issues and has lost a few branches and shoots so I had to be a bit creative to fill the gaps once more. That said, I am pretty happy with how it all turned out and I am looking forward to the next couple of years as the tree develops further.
As per my pervious post, this tree is also a little thin in the canopy. That said I am fairly confident that this will fill in nicely this next growing season. It may be due for a repot also this year so I might see what containers I have on hand to mix up the image a little. Pretty sure I have a nanban style pot hidden away somewhere…. I just need to find it.
I don’t grow cedars myself but I have worked a number of nice ones over the years. The tree below is no exception.
It is owned by a good friend of mine who had just got it back after it spent a number of years with someone else. It was a little weak when he got it so he had spent some time letting it gain strength once more…….. which gets us to the below (terrible quality phone pic) image.

I’d love to take all the credit for this tree but really all I did was follow the bones that were there. I compressed the apex a little and moved some things about, all in all I was just bringing out the qualities that already existed.
The tree still has a ways to go but it is covered in buds in all the areas you would want to fill out (like the bottom branch) so I’m pretty confident that even after one year the tree will look full and much more developed.
On a side note, the roots remind me of a hand grabbing at the soil. Try to un-see it.
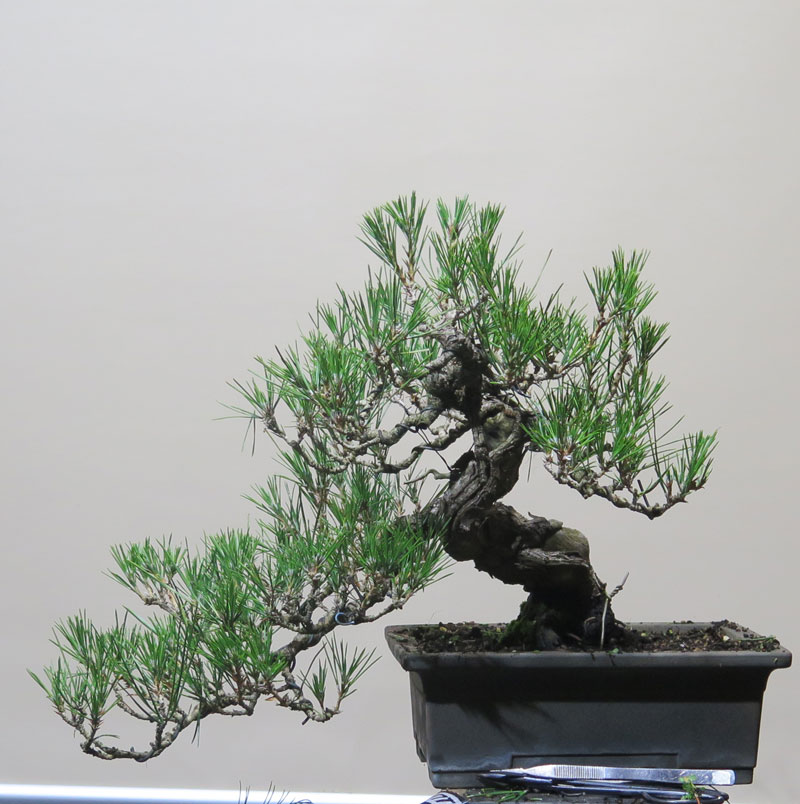
I’ve been working through some of my trees. Two of which are these black pines that were featured in the below blog post earlier this year:
Those two trees had their yearly needle work done and I now finally got around to wiring them.
Due to my water issues I had let many of my trees grow out (without doing the usual candle work etc) to gain some strength, and as a result their styling looks a little more sparse than it might otherwise. That said, I am happy with the strength they are now displaying and this styling will set them up for the next few years where I will work towards some more back budding and ramification.
Before after’s below:

After needle plucking 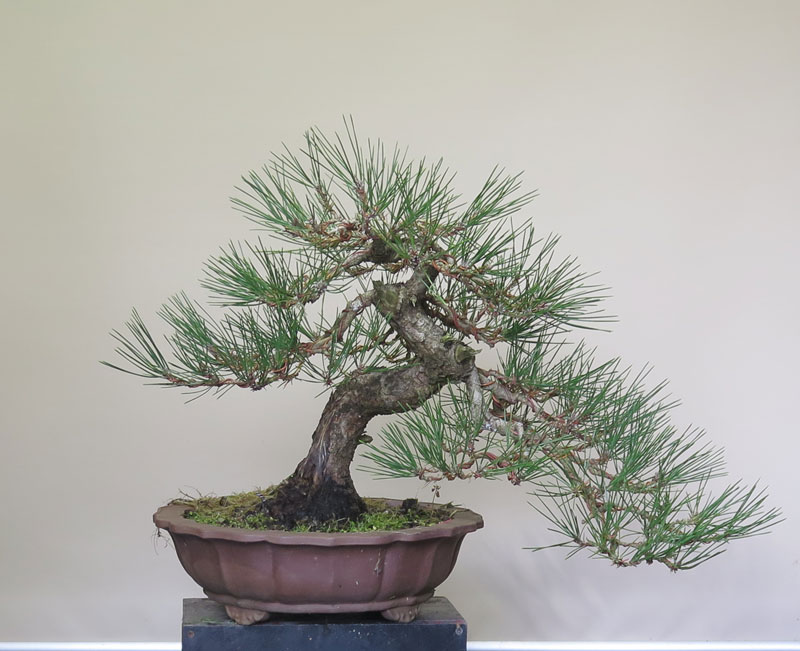
After some wire…..
I discovered on the tree above some significant rot had formed on the left side of the trunk. I dug out what I could but I will have to further investigate / treat it during repotting in the next few months.
Post needle plucking 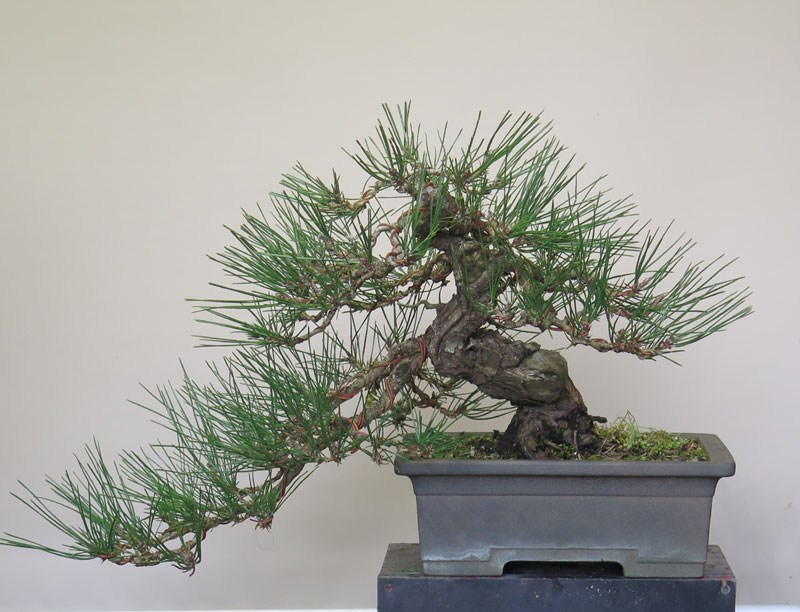
Some wiring later…
This next tree was fairly straight forward, it was wired out and it’s branching spread to allow for the in-fill budding and ramification that I will hopefully build over the next couple of years. With any luck, this tree will fill in fairly quickly and present a dense canopy.
There is something to be said about the different ways in which you might approach styling depending on what stage the material is that you are working on. Trees like the two above, I tend to try to spread things out much more than if I was to style something that was more “finished”. You need to make a guess as to how many future buds and branches you need to make room for. If you style developing material as if it were a display tree (tight, dense branches) you end up having to re-wire almost yearly to re-distribute the branch ramification to make room for the new shoots.
All in all nothing ground breaking with the above two trees but I suppose it tracks the often mundane nature of the slow improvements over the years. Not every styling is a dramatic transformation and in fact the real skill lies in the fine tuning, not the dramatic, which is something I am still trying to perfect……….
I’ve had a spur of motivation lately. In my private life i have changed jobs and am now working a 4 day week. It’s given me the hint of a day a week i can spend on myself and thus far i’ve been dedicating it to Bonsai.
One of the trees that has benefited from this work is a Japanese Maple that i begun work on several years ago. You can read a blog post about it below:
Its been a slow road, mainly due to my lack of attention but I have been slowly removing course growth and re-growing better branching.
It has a long way to go but finally I am beginning to see it growing into its final form.
The upper areas of the tree have a lot of length to add to the branching and there is the start of another trunk (which will be the fourth, shock horror) on the bottom right of the trunk.
That said I am pretty happy with where it is at and with a little more time up my sleeve I hope to get some more mileage out of it this year.

This post will hopefully be the first in a run that i have been preparing and working on. I have a couple of pines left to un-wire before repotting season hits us so i will try to cover off some of that as it happens.
I am thinking that when I repot this tree it will likely get a change of pot to mix things up a little.
Until the next one………
