Below is a pictorial post explaining the steps i went through when styling this tree. I had previously adjusted the planting angle in the last post and now had to adjust the foliage mass in reaction to this. I’ve done my best to explain the thinking process for each of the steps for each of the below images to give some insight into my thoughts and process. I hope it’s interesting.
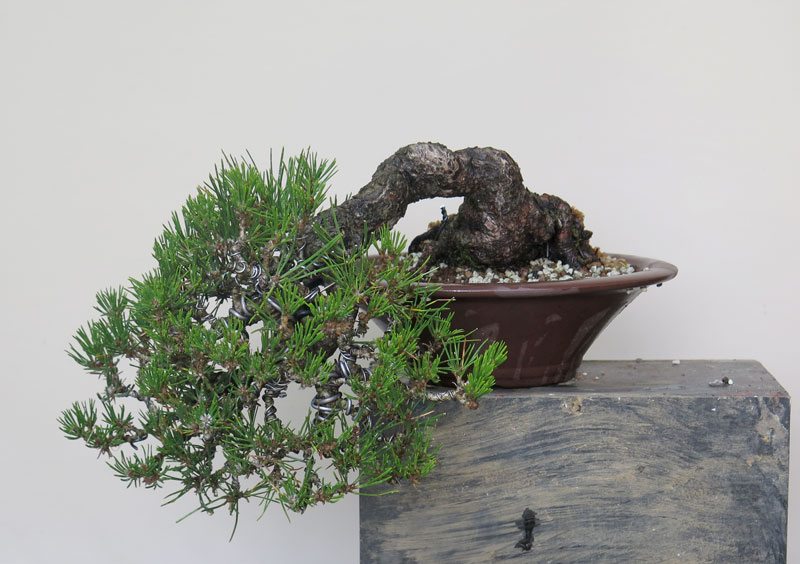
Above: Where we got to in the last post. The trunk was tilted to the left but the foliage wasn’t pruned or adjusted to the new angle. From a balance perspective, i feel that there is too heavy a visual weight in proportion to the trunk.
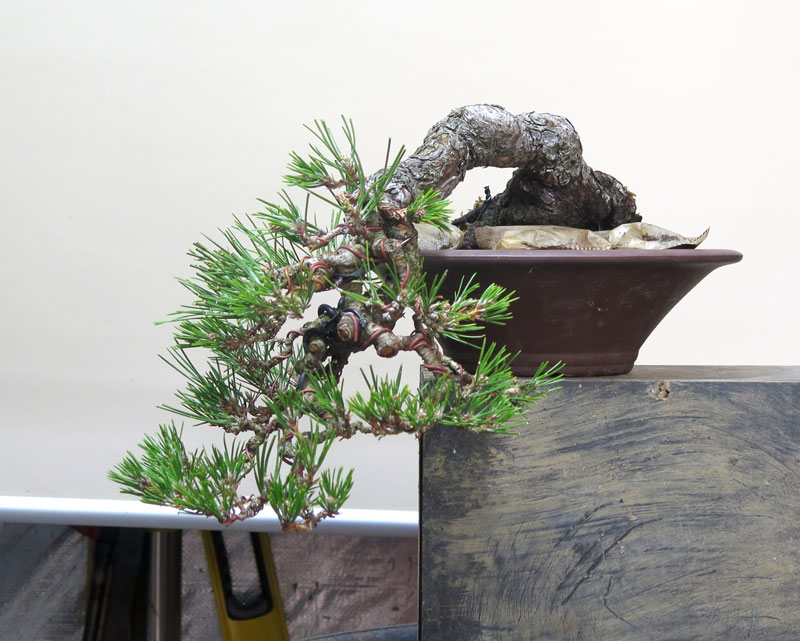
Above: the tree’s branching was pruned a little and thinned with a major branch on the lower right removed to begin lightening the canopy. I fully wired the remaining branches and began to think about the styling. I felt that the foliage was too large and removed the focus from the trunk. Its mass dominated and reinforced a feeling that the trunk was thin.
I also didn’t like the direction the tree lead the eye and felt that combined with the trunk movement it drew the eye away from the tree. I decided that i wanted the tree to move back toward the base of the trunk creating kind of a circular composition. This decision kicked off the below responses.
Above: to facilitate the lower branch moving rightwards, i had to remove a couple of branches to create space for this key branch to occupy. I also began to compact the apex region slightly with the overall aim of creating a smaller and more compact foliage mass.
Above: As i moved the lower branch across i removed another branch to ease the congestion the shifting branch created. Having began to move this key low branch, I felt that the foliage was feeling a little stretched out again taking the eye away from the trunk-line.
Above: I pulled the lower branch across further and brought it upward to further compact the foliage mass and bring it all in closer to the trunk. This also helped fill in the gaps left by the removed branches from the previous image. This is essentially where i will leave this round of work. I will let it fill in this season and perhaps revisit the wiring in autumn.
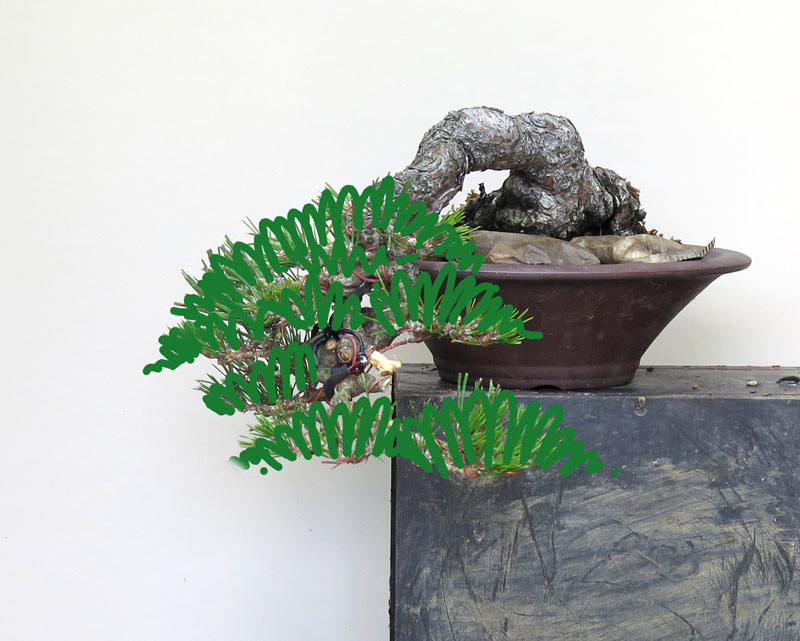
Above: a quick scribble to give a sense of what a more fully filled in canopy might look like.
Above: A quick couple of images to give comparison of where the tree was when i started working on it and where it is now. I am very happy with where the tree is at now and look forward to continuing to develop it over the next few years.
It’s been a funny start to spring with some trees leafing out early and with gusto while others are only just budding out. I put it down to a warm start and a later cold snap which has set a number of trees behind their bench mates.
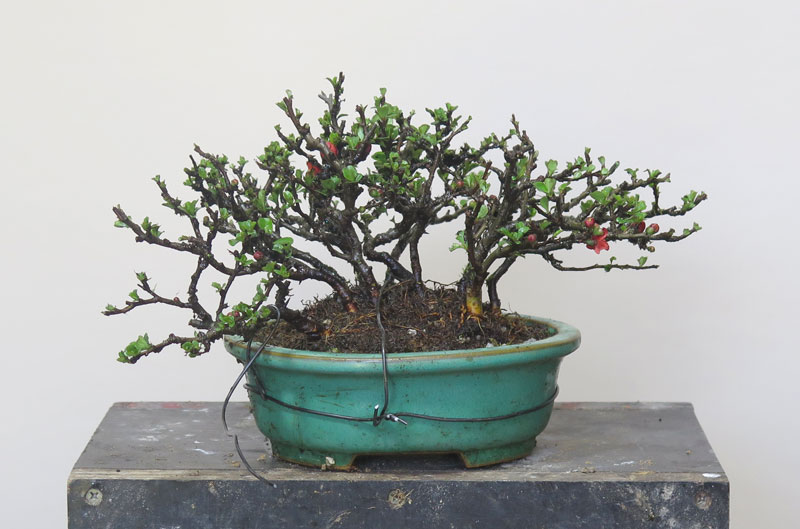
The below Crabapple is new to my benches and was re-potted a month or so ago and falls firmly into the early leafing category
Since re-potting, It had continued to grow strongly and had leafed out to a point where the inner growth was already being shaded out and the inner buds looked sluggish.
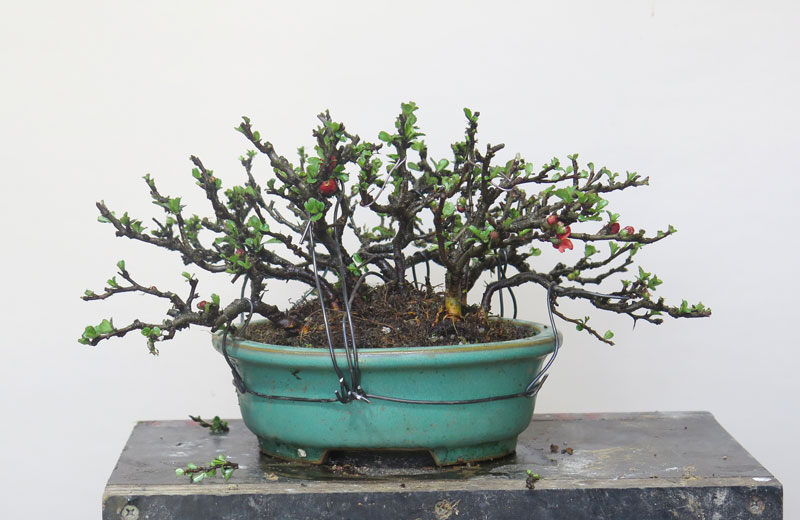
So i brought it into the workshop and cut back extending shoots and also leaf pruned or partially defoliated the canopy.
Above: Before and after.
I have left the tree with two leaves per shoot, having also removed the small inner leaves at the base of shoots that tend not to form buds at their base. I find this goes a long way to increasing the sunlight that reaches the interior without really effecting the budding / ramification. I will see what happens from here but if the leaves keep growing in size and shade the interior too much i may cut them in half to further encourage light to the interior.
There was a lot of growth in the upper regions of the tree so by carrying out this first leave prune i hope that the energy of each branch is much more evenly balanced and has a more even access to light. We will have to see what happens with the second flush to test that thought.
This is a bit of a different post covering a tree that has found its way back into my collection lately.
I originally grew this as stock from a cutting and put some early bends into the trunk line. Soon after the wiring of the cutting i gave it to a friend who did the bulk of the work in forming it into a tree and growing it on.
As luck would have it, the tree recently found its way back into my collection.
Stupidly, i didn’t take any before pics, but when i received the tree i re-potted it, changing the angle a bit and fully wired the tree removing a branch or two in the process. All in all, building on my friends work, its forming into an interesting little tree!
Above: The tree post re-pot and styling.
But…….. it still has a while to go.
Normally a shimpaku of this thickness i would keep as stock and grow hard and fast to thicken the trunk and develop the shari’s and live veins. Luckily we cut shari’s into the trunk last year but i still need to focus on developing trunk thickness and continue to develop the sharis as things thicken.
This is somewhat difficult in a tree that i don’t really want to grow out of shape or get too much larger. What i want is to thicken the trunks and keep the tree’s foliage well managed.
The solution is………. Sacrifice branches.
Above: The two main trunk/branch lines.
The tree is built off two main trunk lines as per the diagram above and ideally i would like to thicken both of these lines. To do this i will likely grow two sacrifice branches.
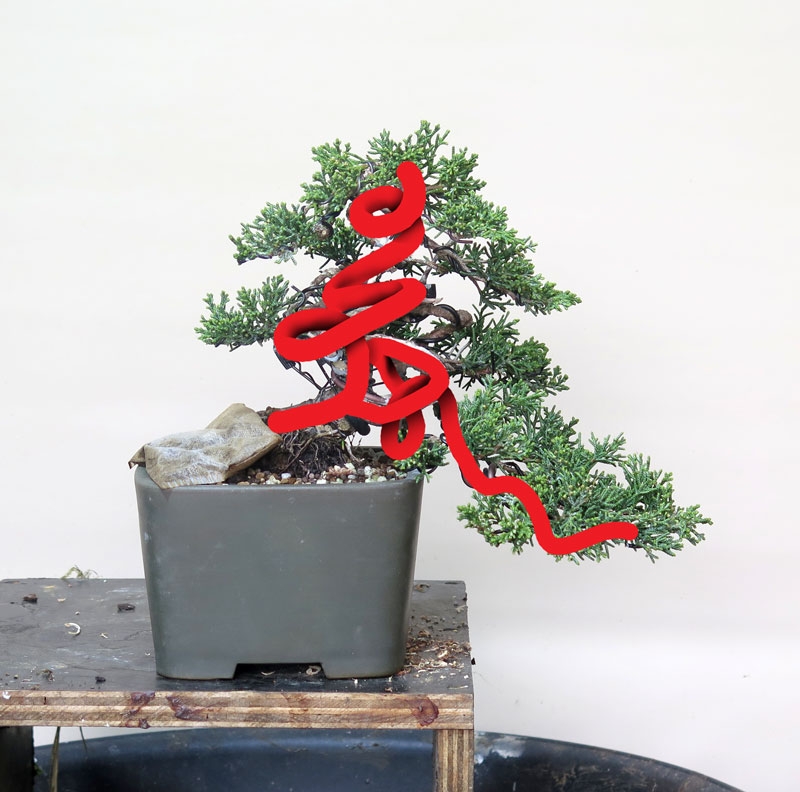
Above: likely locations of sacrifice branching (shown in pink).
I will locate two sacrifice branches (one per trunk line) but in slightly different locations. The sacrifice branch in the apex will be toward the top of the trunk line as i want the entire upright trunk to thicken.
The second sacrifice will be on the first branches trunk line, It will be located back from the first branch tip though, to avoid the branch holding the foliage from thickening too much, keeping it in scale with the other branches.
Above: the image in my head i am aiming for.
I will likely also wire the sacrifice branches into interesting shapes reinforcing the tree’s movement so i can use them as future jins.
To further facilitate this thickening i will be making a shari on the opposite side of the trunk to the shari’s we have already made. I’ve covered this a bit more in THIS post. I am hoping this speeds up the whole process quite a bit. Also keeping the majority of the foliage trimmed and compact should direct a lot of energy into the sacrifice branches which will be left un-pruned. Hopefully allowing them to grow quickly and do their work.
That said however, i do expect this process to take a number of years to get to the thickness level i am after.
This is one of my trees that was partly neglected over the last couple of years. It’s pruning only really focused on cutting back to the silhouette (due to lack of time), so while the canopy out of leaf looked twiggy and dense, the structure was not great and the beginnings of lumps and bumps were forming where too many shoots emerged from one place.
The time came recently to do some work on this tree and it was pruned back and re-potted.
Above: Pre-work. The tree looks dense and ramified but the beginnings of lumps were forming within the canopy. It was time to cut out some problems.
Above: After a cut back. I think about 50% of the fine twigs were removed. While this is a bit of a set back, with a year of strong growth i think i can probably get 3 or 4 flushes out of it and mostly replace what has been lost, but this time upon better structure.
Above: ….. and a re-pot. Not a dramatic change as its the exact same size, style and make of pot, just in a different colour.
This little tree stands 12cm from the rim of the pot which doesn’t really come across in the pics but it is a tree that really fits in the palm of your hand.
During this growing season i will be working towards rounding out the top of the canopy and increasing the ramification. I will do this via:
Heavy feeding
Outer canopy defoliation and cut back
Selective pruning of twig structure to avoid growing more issues into the tree and;
From where we last left off, the pine had been un-wired during the previous season and had grown out quite a bit, hence needing a little tidy up. Recently toward the end of this last winter, it made it into the work shop for a quick wiring before the candles got too fragile.
Above: de-wired and grown out of shape.
Above: The first step was bending the lower branch down further to try and separate the foliage masses a little more into individual zones.
Above: Post wiring.
I only wired what was needed which essentially meant only the main branches and sub branches were wired. I am pretty happy with the way it turned out and think it is evolving nicely.
For comparisons sake, below is how it was in 2021 vs. after the styling today.
20212024
the combination of a narrower apex area and a more separated lower branch all work together towards a solid slow improvement over the years.
I recently was gifted a number of very nice small trees from a close friend. They were all trees we had been working on together and that had got to a pretty nice point in their development.
One of the trees was this black pine.
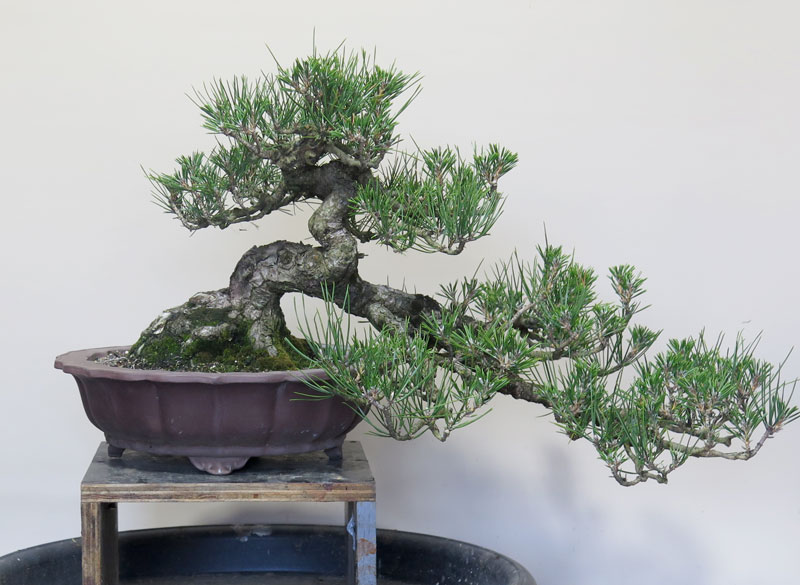
Above: the tree as i received it.
We had previously worked this tree and during its last re-potting we have moved it into this semi-cascade position from a more upright posture.
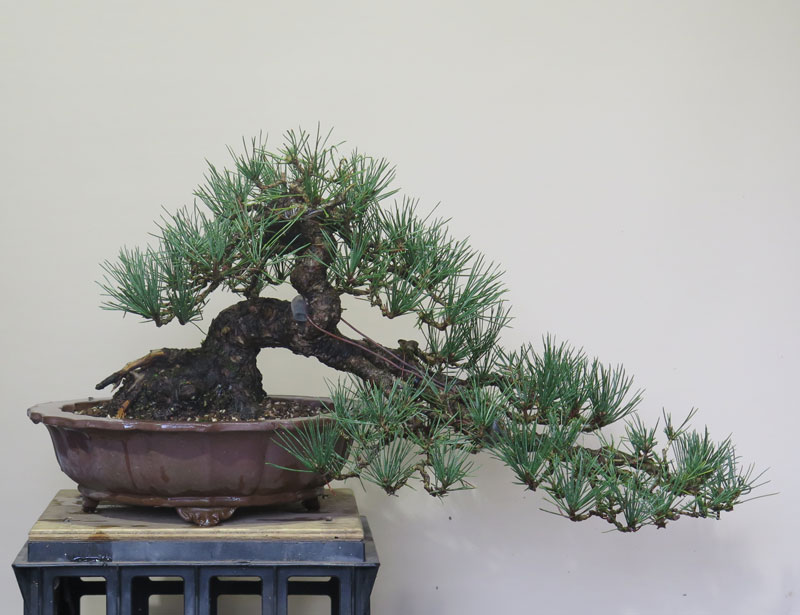
After staring at it for a while i started to wonder if i could get some more out of it, so out came the plastic pot and I tested a few new potential angles.
Option 01: Use the rear as the front and tilt the tree. I felt this kind of straightened out the trunk (even if a little lumpy) and elongated it a little so I wasn’t completely convinced.
Option 02: the original front but a slight rotation and a decent tilt to the left. I liked this option as it shortened the trunk a little and added what looked like another bend in the trunk’s length.
Above: I only had a couple of pots available for the re-pot. A flared sided round pot and the original banded round one.
I ended up using the flared pot. I liked the flared side as it helped lighten the visual weight of the pot. It also will give some extra clearance for branches which i may want to place close in to the container.
Above: the tree all potted up. I couldn’t quite get the full rotation and as a result the top section of trunk is a little parallel to the pot edge. While it doesn’t bother me too much at this stage, I will likely try to get this further down in the next re-pot.
Of course with an angle change like this there will always be foliage that needs re-styling.
Above: you can see from the angle of the shoots just how much the angle of the tree has changed.
Surprisingly the roots were fairly easy to adjust to get to suit the new angle, with only a couple of finer ones ending up above the new surface level. For those i dressed them with a layer of sphagnum moss to keep things moist while the slowly adjust to their new position.
Above: Sphagnum moss covering a couple of exposed roots.
All in All a successful re-pot and angle change. Once the tree recovers and grows out, i will start to think about part 2 of this process and restyle and re-shape the foliage mass to suit the new angle.
This year i have gone a little Chojubai crazy with a lot of them on the go. The below tree hasn’t helped bench space matters at all as it has multiplied!
Above: the clump in it’s larger form.
I had originally been growing it as a larger clump but after seeing how it had developed since last re-potting i decided that there were actually two nicer smaller clumps within the mass of trunks.
So i set about breaking it up and finding pots for the two settings.
Above: The two smaller clumps that i split out of the larger planting.
I think both smaller plantings have some great characteristics in their own right and they should continue to develop into interesting trees.
I really love Chojubai and would recommend everyone gets a few into their collections!
I have re-potted most of my chojubai this year but this tree, i decided could go another season. That’s not to say it escaped the work bench…….
After another year of development it was again looking a bit ‘all over the place’ so i began by busting out the mini-pressure washer and removing the moss from the trunks and soil surface and pondered what to do next.
Above: Post clean up.
For anyone who grows small clumps, you will know just how difficult it can be to wire the individual trunk lines so in this case i Jerry-rigged a wire around the pot rim which i used to attach tie down wires to to lower and adjust the the various trunks and branches into positions i was more happy with.
Above: Post adjustments
The aim was to spread the clump out a little more and even out the density of branching more evenly across the canopy. I started with the outer most shoots and worked my way into the center of the group as i went. I think it’s shaping up well.
Chojubai are a great species to grow. They are fast to develop, grow easily from cutting and as the above tree shows, you can go from a handful of cuttings to a little clump setting in a fairly short period of time.
A few weeks ago i was incredibly lucky to be the Artist in Residence at the NBPCA.
The NBPCA is part of the larger National Arboretum (https://www.nationalarboretum.act.gov.au/) located in the heart of Canberra. The larger Arboretum is a great day out for any tree lover with 100 forests planted across the site amongst a scattering of lookouts, walks, a killer playground and a restaurant / cafe with view that’s hard to beat!
Terrible photography on my behalf: Part of the view the collection looks out across with a constant stream of people enjoying the collection and larger Arboretum site. The view is much more panoramic but the above gives you a taste. Get up there and experience it for yourself!
Within the Arboretum, the Bonsai and Penjing collection itself commands impressive views over the city, with the views of the bonsai inside it’s walls also pretty impressive.
With a mix of permanent collection bonsai and loan trees there is always something interesting on display to see with the trees changing with the swap over of loan trees on a regular enough basis to make re-visiting the facility each time fresh and enjoyable. In fact, at the moment I have 3 trees on loan and on display adding some fresh faces (fresh trunks perhaps) to the smaller trees in the collection. If you haven’t been, and you’re into bonsai or trees more broadly, i would thoroughly recommend a visit!
It had been a number of years since i had been to the collection proper, and it was great that i got to catch up and Spend time with both curator Leigh Taafe and assistant curator Sam Thompson. Leigh i have know for many years but it was really good to get an opportunity to hang out together, reacquaint ourselves and talk all things bonsai. It had been a long time between chats!
Sam on the other hand, i had met on some previous occasions but it had only been in very small, passing hello’s at conventions and the like, so it was really nice to spend some time together and get to know him better.
Sam and I spent the first day of my stay working together and discussing a whole range of things from pottery obsessions to the day to day challenges and methods of running a collection such as the NBPCA.
As for what my role there was, the Artist in Residence program is predominantly a knowledge sharing exercise with a range of different bonsai practitioners from around the country being given the opportunity to share ideas, techniques and skills with the collection and it’s volunteers. On the flip side it provides a great experience for those outside of Canberra to have some involvement in what is a the jewel in the crown of the Australian bonsai community and be exposed to trees from around the country and the inner workings of a high end public collection.
Another part of my time at the collection was working on some trees. The trees were provided with the aim that they will likely be used as part of the annual fundraising for the collection, with raised monies going back into the collection, it’s trees and it’s ongoing operations. A nice thing to be able to contribute back to.
The first tree I worked was a large Trident Maple that I was able to slowly style over the course of the first day, all while chatting to a few of the Volunteers and Sam.
As a bit of a side note, I didn’t take many pics but luckily Sam and Mike (from the Friends of the Arboretum group) took and kindly sent me a few which are below.
Above: Before
Above: After, (with me for scale.)
I was pretty happy with how this one turned out. Being a trident, there is only so much bending you can get out of thick branches, so the existing structure dictated many of the styling decisions. Via slowly editing the branching and wiring what was left I think you will agree that we were left with what looks like wild and mature deciduous tree. I think this one will have a bright future as further ramification is built upon the branches we set.
As part of the knowledge sharing side of things i also prepared a presentation on refining, or more so maintaining refined trees. The Arboretum is a little unusual in that all the trees it has or likely will receive for their display are already in a refined state and so maintaining that refinement is an important skill-set over those skills used to take a tree from say a developed structure into that state of refinement. I think it was well received.
I also conducted a demonstration on styling and how i go about taking stock through its first styling into a bonsai.
I was really happy with the material i was presented with as i have been playing with a lot of similar trees in my own collection lately.
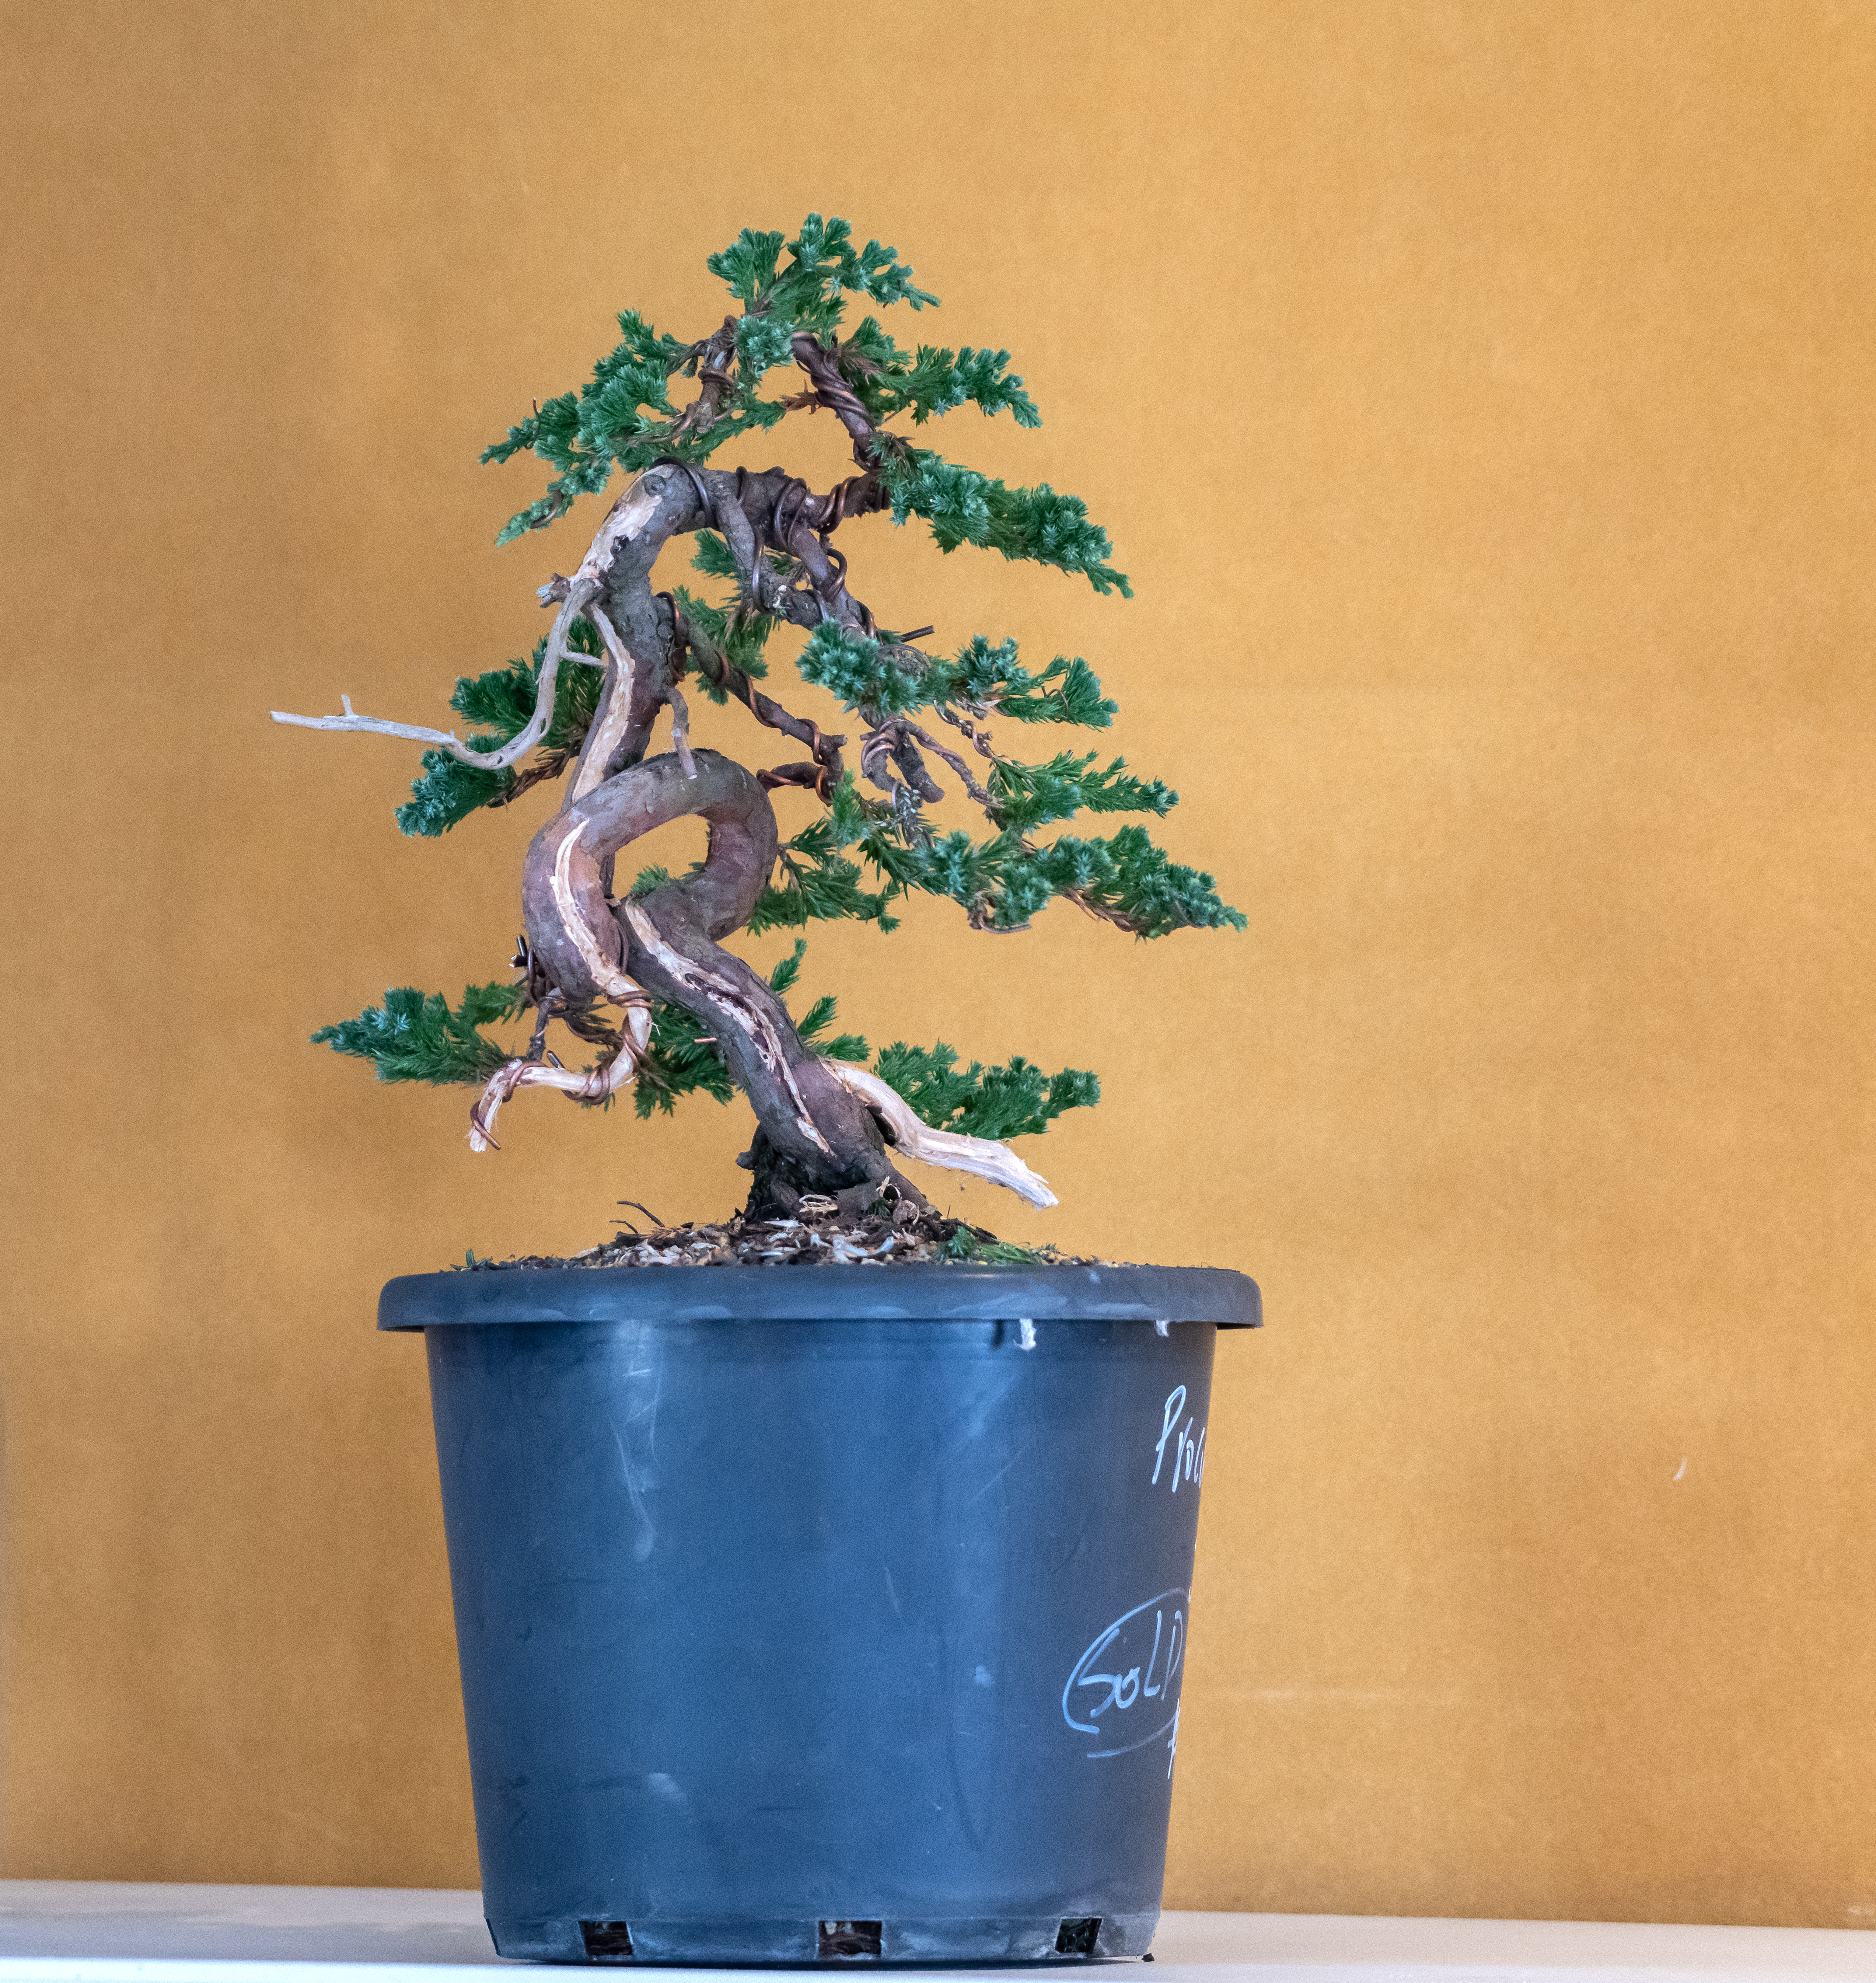
The tree itself was a procumbens Juniper and had some wild and unusual movement, including a loop the loop feature. I began by removing unnecessary branching and making shari that highlighted the movement of the trunk-line.
The aim was to compact the foliage around the movement in the trunk to really play this up as the hero of the composition.
With the completion of the demonstration the structure or the future bonsai was set. I was really happy with how the tree turned out and think that it has a bright future ahead of it once the foliage fills out a little (which will happen quickly on a procumbens) and it gets a suitable pot.
And with that my time was done and i was back on my way home.
All in all i really enjoyed my time as Artist in residence. It was really nice to have some involvement in a collection that is essentially owned by the wider Australian bonsai community.
I cannot recommend enough getting up there for a visit and if you would like to be involved in some way I am sure Leigh would be more than happy to talk about Volunteering, Donating, Loaning trees or being otherwise involved.
As a final though, I’d like to extend a thank you to Leigh and Sam for so graciously hosting me and to all the Volunteers i met who were also very welcoming and accommodating. I hope i can get back up there at some stage soon for another visit.
I’ve just about finished my re-potting for the next season’s growth. It has gone fairly easily this time around for some reason despite the collection growing in size a little. While I wont be posting every tree, this will be one of a few posts capturing the most interesting re-pots of the year.
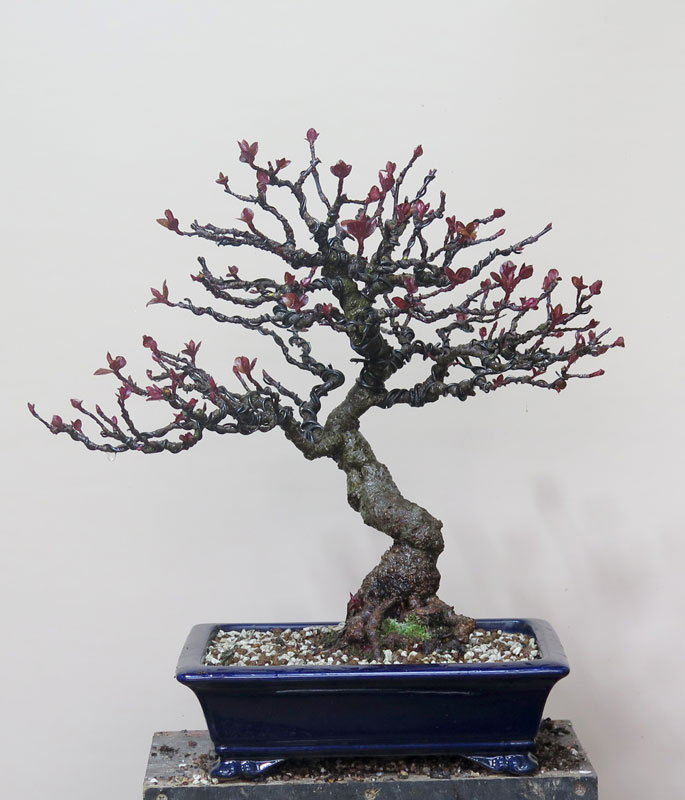
The first tree is a new tree to the collection. It’s what we think is a Crabapple. It arrived to me in a very shallow pot, which while it suited the tree, i wasn’t sure it was the best choice in my garden with the often hot summers.
So as a starting point i got it into my mix and a deeper pot. By doing that I now know what baseline i am starting with and if any issues do come up over the growing season i will not be questioning the roots or a soil mix i do not usually use.
Above: The tree sans pot. The hook root on the right of the trunk annoyed me so i took it off. i planted the cut root in another pot to see if if will shoot from a root cutting or not.
Above: Post re-pot. I ended up going with this navy blue Reiho pot which i liked. It goes well with the fresh red growth but time will tell how it looks when the foliage matures (and maybe turns green?)
As far as i know, the tree has never flowered so i will be doing my best this year to feed it up with some high phosphorus and potassium fertiliser with the hope it sets flower buds next year.