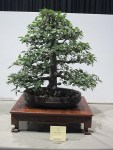
I am still slowly working through my collection and preparing for winter. This weekend this Chinese elm was cleaned up along with a couple of other trees.

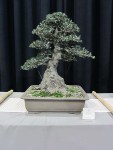
Before the work.
The tree I worked on had recently undergone a re-style. Upon re-potting last year I also decided to change front slightly. This required a bit of pruning. As I began to prune I realised that the initial branch structure had been grown too quickly and lazily on my part. Many branches were too thick, had little taper and had messy structure. I decided that the change in front would also be a good time to re-structure the ramification so I pruned hard.

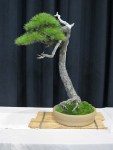
The same tree a year or two ago prior to re-styling.
Re-styling an established tree can be a hard step to take but ultimately having this tree go backwards for a couple of years will mean that in the future it will be a much better tree. Luckily chinese elms are strong growers and rebuilding the ramification should be a fairly quick process.
The work I did this time around was mainly removing leaves that had not yet fallen off and cleaning the trunk of moss and also cleaning up the soil surface.

The soil and trunk need a clean up.
Keeping your bonsai clean of moss and fallen leaves and other debris achieves a few things. First, it makes the tree look better which I always find makes me take better care of it. I also find that doing work that makes you look closely at your trees you become more familiar with them and it often reveals what future work will need to be done in coming seasons. The last thing a good clean often does is it reduces the hiding places for pest insects and places for their eggs.

A large caterpillar that was living under the moss growing on the trunk.
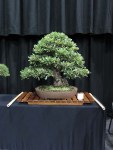
After a general clean I pruned the long growth and then sprayed with lime sulphur.

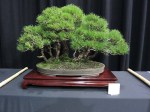
After the work.
All the tree needs now is a wiring and a re-pot sometime prior to spring. I am toying with the idea of lengthening the canopy on the left side and possibly growing a low branch from the left side of the hollow. I guess I will grow one and see how it goes next season, i can always cut it off if it doesnt work out.
I am pretty happy with the pot it is in at the moment. I was never really 100% on the last oval pot and feel this one suits it a lot better.
The pot is a production Reiho. Reiho is one of my favorite production potters from Tokoname. Although the photos don’t really capture it, the pot really changes moods depending on the sun. Sometimes in low light it looks almost black, and then in full sun it turns to an almost ultra marine blue. you can kind of see it by comparing the colour in the first pic with that of the soil surface photos. Hopefully next season I will get some good colour on the tree so I can see the yellow leaves set off against the dark blue fo the pot.