For the next 4 or 5 weeks I will be in Japan so will most probably not have the opportunity to post on the blog as much as I would like during that time. My trees are going off to be baby sat this weekend as we make our final plans. Although the trip is family based I am going to make sure I squeeze a few bonsai stops in along the way and hopefully also make it to the Gafu-ten show in Kyoto as well as a handful of nurseries.

In the mean time, I will leave you with a display I made with the talented Mario Komsta when I was studying at Taisho-en. We were talking about display and quickly grabbed some small items that were at hand that were in scale with this tiny black pine. We played around with various arrangements and stands to test a few different ideas.

This was the final arrangement. We jokingly called it ‘3 points of our lives’ as most of the days we spent working together on bonsai, we talked about girls, cars and Mario’s favorite topic, motorbikes.

3 points of interest? convenience store toy car, hand-made news paper pop star girl scroll and beautiful mini black pine.

When I get back from Japan I should have a whole heap of photos to share.

Until then…….

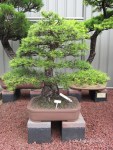
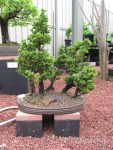
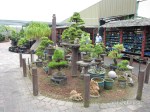
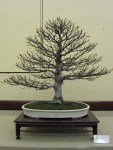
Amongst the display trees that I saw at collectors corner (which can be seen HERE and HERE) I noticed that a large percentage of the display trees were Pinus Radiata. In fact the first tree that greets you once you enter the nursery is a big old Radiata.
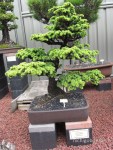
The welcome tree

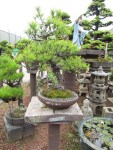
This tree has been in possession of the nursery for a number of years and has always been an impressive bonsai. So impressive it seems it needs to be chained down!

Old bark

The old bark that the tree exhibits is beautiful and the crackled plates of bark seem in a good scale with the rest of the bonsai.

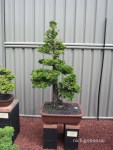
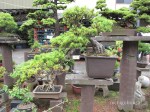
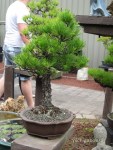
Now why does this tree have a post of its own? Well I thought that this bonsai was a good example of some of the problems that these old radiatas face.  From a distance the tree seems to be full of foliage but upon closer inspection a different story is told.

A main branch

As you can see from the above image the foliage is only on the tips of long leggy branches. This is a problem. The tree has no inner buds and no fine inner branches to cut back to. What this means is that the outline of the tree can never be reduced without the aid of grafting as at least from what i have found and the experiences of other local growers with the species, Radiata’s dont bud onto old wood well.

What does this mean for this tree? Well I think it needs a major re-working. It is always nice to project the future onto trees so I will have a quick go at making a list of the things I think needs doing short of feeding aggressively, watering etc.

  1. The branches have all grown upward. The first port of call would be to correct this by doing some heavy bending on each of the main branches, bending them down to just below horizontal.
  2. Wire all the sub branches and prune growth back where possible. This would have a two-fold effect. Bringing the foliage down would allow for light to get into the inner areas of the tree as well as taking the dominance out of the tips. A tip that is pointed upwards will always grow strongly from the tip. If it is horizontal it is more likely to bud along its length.
  3. Feed feed feed. If you are to hope of getting budding on old wood you will need a healthy, strongly growing bonsai.
  4. I would then look at grafting opportunities to start re-introducing growth into inner areas of the branch structure.

I think with a work routine something like the above the tree could be vastly improved. A nice tree as it is (Age tends to excuse many faults) but I think it could be better. If it were ever to come up for sale I am sure I could find room for it at my place.

After seeing this tree I began to think if these problems are some that  I might be facing with my Radiatas in the future. Hopefully through regular styling I can avoid the upward branch problems but I am a little concerned about the lack of back budding. Hopefully one day I will unlock the key to this dilemma. Perhaps in this case it is a result of a thick canopy shading out inner growth?I think the above tree had just been heavily thinned as my memory of it in previous visits was of a much denser canopy.

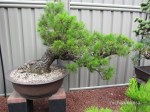
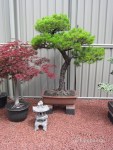
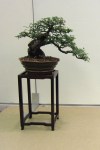
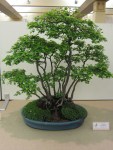
Either way, in the mean time I will keep on experimenting with my trees and keep dreaming about other people’s trees that I would love to own. One such tree that caught my eye at the nursery was the pine below. Again another Radiata.

Interesting?

Interesting or ugly?

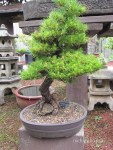
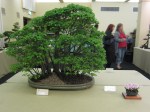
I keep finding myself being drawn to trees with problems. I think I enjoy both looking at these bonsai that challenge the rigid frameworks some people use and also love to work on them to try to use those awkward features to form a design that works in a classical sense.

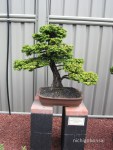
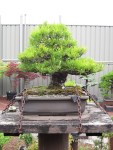
The heart of the problem or the heart of the opportunity?

Again I think the age displayed by this tree excuses a lot of the faults and in a way the faults in branch placement almost add to the ancient feeling the tree exhibits. Would I change things? Most probably yes, but I would like to live with the tree for a long while first to get to know each of its quirks.

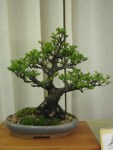
Again I think with some creative styling and a total wiring this could become a very interesting tree. Another I could easily make room for at home.

It is interesting to note that this tree also seems full of foliage from a far but on closer inspection it is actually quite leggy and bare on the interior. Now I am not sure if this is a result of age or whether this is due to too thick a canopy being kept that has shaded the interior, killing the inner shoots. Hopefully it was a lack of light and not just the result of the species growth habits. If it is just a lack of light I can rectify this on my own trees.

Well i hope you have enjoyed these trees as much as I did. I always like to see old radiatas. I like to look into them and see if they will give away any hints that may lead to a future technique or method for getting them to back bud on old wood. Perhaps I will never find it, but I will definitely enjoy looking for it.

On that note, does any one out there have old radiata or Monterey pines? How do you grow them? have they ended up leggy? I would love to hear from you. Please comment below or email me at the address on the left of my website.

Following on from part 1, I thought I would share a few more bonsai from Collectors Corner. If you happen to find your self in the area it is well worth a visit. Their website is found HERE.

Recently I visited the newly renovated Melbourne nursery Collectors Corner. Collectors Corner maintains a moderately large collection of old display trees of a quality that are hard to find on public display else where in Melbourne. Many of the bonsai had been recently re-potted and were showing the results of this work with flushes of healthy spring growth.

I would love to get my hands on some of the display trees as i think with a couple of years refinement they could be very good bonsai.

The renovations are a great improvement on the old setup even though the overall size of the display seems to be a little smaller the bonsai are much easier to see and appreciate. Well worth a visit if you are in the area.

Some photos are below. I will upload a second lot in my next post.

The following trident maple was ground grown by a friend. Since digging it up I have slowly been preparing it for its future life as bonsai.

One of the things I wanted to do this year was to set a first branch in an area where there was no branching.  I used a rough version of approach grafting which I hope to explain below.

Now the method I am using is not as exacting as it could be. The reason for this is the species I am using (Trident Maple). Tridents are very fast growing and forgiving. They also fuse very quickly which is the trait I am hoping to take advantage of in this instance.

Making the cut.

Approach grafting is a fairly straight forward technique. I wrote about it in regards to conifers in two parts HERE and HERE. To approach graft conifers you have to be fairly exact when lining up the cambium layers. Using the below variation you can be a bit less exact if using thin barked deciduous trees.

The finished cut.

Firstly you cut a channel roughly the width and depth of the whip you wish to graft.

The pinned whip.

You then insert the whip and secure it in place so that as it grows it is forced to grow into the cut channel, during which time it grows together with the trunk, fuses and makes the graft.

Hammer time.

In this example I used map pins to secure the graft. I find that the round surface of the pins heads does less damage to the growing and thickening whip than using square-headed pins or those with sharper edges.

The second pin secured.

In this case two pins were used to secure the whip. As Trident maples grow quickly and have relatively thin bark the whip and cut channel should graft together in a relatively short time as they heal and thicken. What is good about this technique is you can use very young whips as you do not need to expose the cambium layer. By not having to expose the cambium layer you avoid having to expose a large percentage of the cambium in the form of a wound and therefore increase the chance of the whip surviving and growing strongly.

Sealed, wired and ready to grow.

After setting the graft I like to lightly wire the whip and direct the tip upwards to ensure it will grow both strongly and leave the graft site at a desired angle.

This graft will be left to grow for the season so it can thicken, fuse and graft itself onto the trunk. I will cut it off the parent whip once I can see a difference in thickness between either side of the graft site. As the graft begins to take it should start to draw sap from the trunk and become noticeably thicker from the graft site onwards.

After I finished placing the graft on the trident maple I decided it was also a good time to clean up a graft on a Chinese Quince from last season. If you look closely you can see the difference in thickness between the grafted branch and the stub that use to be connected to the parent whip.

A successful graft

You can just see the stub below the branch junction where the whip was cut once it had taken.

Stub removed.

I like to leave the stub on for a while until I see the graft growing strongly. I think keeping wounds away from the graft site at least until you are sure the graft is successful is a good idea.

Sealed and finished.

To complete the process it is as simple as cleaning up the stub from where the whip was once attached and sealing the wound. Once the wounds heal and the graft grows for a season or two it will become increasingly difficult to tell that it was a grafted branch.

It is a very simple process all in all and one I use quite often. It can be used with a range of thin barked deciduous trees that show signs of fusing easily. It is an easy technique to do and most of the time returns great results. Some example species to try might be, Trident Maple, Japanese Maple, Chinese Quince, ficus species and other species with similar bark traits.

While at a local show one tree caught my eye. It was a Maritime Pine or Pinus pinaster. It had great movement and some really interesting features that made it great bonsai material.

We don’t see a whole lot of maritime pines in Australia but after spending my time looking over this tree I think I would like to find one for my own collection.

The bark was fantastic and old and had deep cracks through the red/orange coloured plates which was very similar to the bark on some collected trees I had seen in Japan. This really gave it the appearance of a very old tree.

The fissured bark

The tree also had very interesting movement in the upper sections of the bonsai.

The twisting trunk

You can start to see the red colour in the bark.

What was really interesting about this tree was around the back of the trunk where there was an old shari. Around the edge of the shari some strange blobs had formed which almost looked like fingers or melting candle wax.

A thumb with finger nail perhaps?

The thumb above with some more fingers growing further down the trunk.

The one factor letting down this species would probably be the needles. They are very course and quite long. These long course needles had me thinking of images of what a tree like this could look like after a few years grafting either Japanese black, or Japanese Red Pine foliage onto the fantastic trunk and base.

The whole tree complete with difficult to photograph background.

A nice tree I would love to have on my bench. It is an interesting species I will be keeping an eye out for one in the future.

Is anyone growing this species? I would love to hear about it and or any species specific techniques you use.

Just thought I would share a couple of pictures from a recent show. The show was put on by the Bonsai Society of Victoria and much like other years it was well worth attending. What I found interesting this year was that there were a number of groups on display. It seems that recently, groups have fallen a little out of favor so it was good to see some nice old examples represented.

Pictures of a couple of trees below.

Sold. Japanese black pine shohin.

Last night I sold the above pine. I had been torn as to whether or not to sell this tree for about a year. Small black pines are hard to come by in Australia.

This morning when I went out to water and it was confirmed that it was a good decision. I moved my trees a little to fill in the space it had left and I didn’t miss it at all. In fact of all the trees I have sold I have never missed one. Now this is not because they were not good trees. Each one had been grown because it had good qualities or good potential, but for what ever reason they had stopped speaking to me. In this case it was a casuality of trying to cut down my collection a little so I can dedicate more time to refining each of my remaining trees.

I have also sold trees that I had sentimental attachment to aswell. I sold the first tree I grew a number of years ago. It was not a particularly good tree but for what ever reason I felt attached to it as it had been my first bonsai. It was a difficult decision to sell it but once it had sold I didn’t ever regret it or really even think of it again.

Which I guess brings me to my point, sometimes one of the best ways to improve your collection is to sell those trees that either have lesser promise in your collection or those that you are no longer enthusiastic about working up to a higher level. Once sold i am sure you will not regret it or even think twice about the decision. Not only will you be left with a better average level of bonsai in your collection but you may also be able to spend the sales proceeds on better bonsai or stock.

I have a pretty busy week ahead so I though I would just post a quick picture of a tree a came across a few weekends ago growing in a national park. Its form reminded me of many of the collected Junipers you see from overseas. Enjoy.


Luckily collecting is banned in national parks so people will be able to enjoy this trees form in its natural location.

I had some time this weekend to work on one of my pines. This time i chose to re-wire a small Japanese black pine (Pinus thunbergii).

The tree in question had belonged to a member of one of the clubs I belong to. When i received the tree it was estimated to be around 30 years old. It had been a nice little tree, but the last few years before I received the tree it had become leggy and some wire had also been left in the apex which had caused some large swelling and scarring. As a result, I had to prune most of the branches back quite hard and also remove the damaged section of the apex and upper trunk which essentially shortened the tree by a third.

The first wiring happened in March 2009.

One of the first wirings. Before and after, March 2009.

The little pine responded well to heavy feeding and was re-potted into a better mix. It budded back quite well and was ready for another light wiring by April of 2010.

After wiring the tips out. April, 2010.

As you can see the apex still needs a lot of developement. After cutting the damaged upper trunk off in 2009, I had then had to re-build the apex from a single branch. It is a slow process to rebuild a crown but this little pine responded well and produced a number of buds where i needed them.

The tree slowly coming to shape. Pre-wire, first branch and then secondary branches wired.

Every year the ramification increases and I am able to remove problem branches and replace them with better growth. The apex has now taken shape and now needs to increase its ramification to fill out its silhouette.

After the latest wiring.

Looking at the above picture the shape of the tree becomes clearer, but i think it still has a way to go. I like the long first branch, but am still toying up whether or not to break the foliage mass up into a couple of pads or keep it as a single mass. This years wiring was not the final wiring the tree will see and was done to achieve two things. The first was to start to set the form of the branches a little closer to how I imagine their final positions and also to let more light into the interiors of the structure. By letting more light into the interior I should be able to strengthen weak inner buds and also encourage further back budding.

I hope that in a couple more seasons I should be able to even out the foliage density and have the tree ready for show.

Enter your email address to subscribe to this blog and receive notifications of new posts by email.

Join 678 other subscribers

Contact me

nichigobonsai***gmail.com

Note: to use email address, substitute *** with @