
You are currently browsing the tag archive for the ‘Japanese Black Pine’ tag.
Below is a pictorial post explaining the steps i went through when styling this tree. I had previously adjusted the planting angle in the last post and now had to adjust the foliage mass in reaction to this. I’ve done my best to explain the thinking process for each of the steps for each of the below images to give some insight into my thoughts and process. I hope it’s interesting.
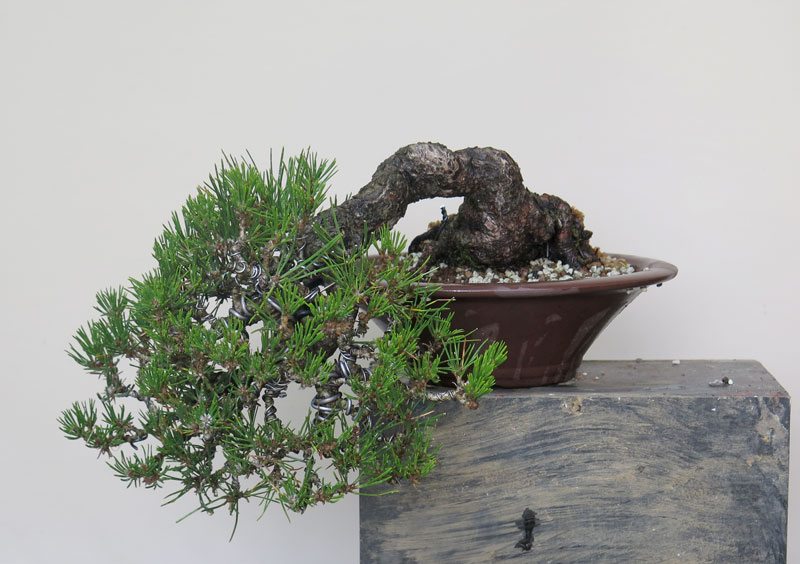
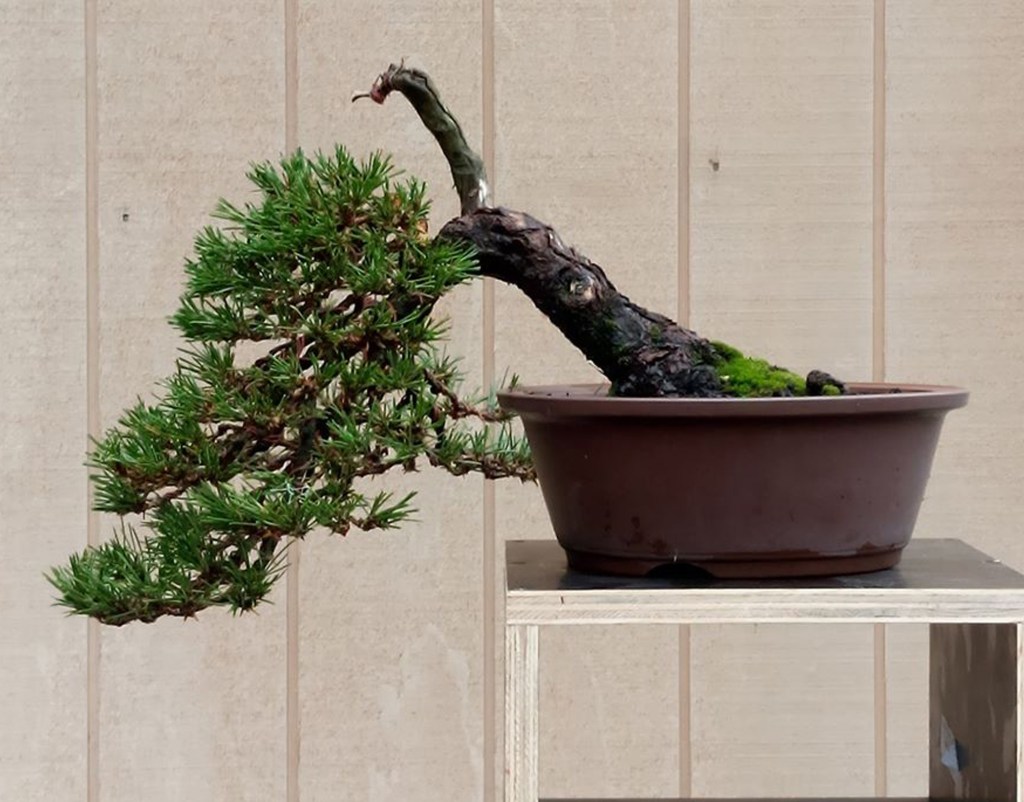
Above: Where we got to in the last post. The trunk was tilted to the left but the foliage wasn’t pruned or adjusted to the new angle. From a balance perspective, i feel that there is too heavy a visual weight in proportion to the trunk.
Above: the tree’s branching was pruned a little and thinned with a major branch on the lower right removed to begin lightening the canopy. I fully wired the remaining branches and began to think about the styling. I felt that the foliage was too large and removed the focus from the trunk. Its mass dominated and reinforced a feeling that the trunk was thin.
I also didn’t like the direction the tree lead the eye and felt that combined with the trunk movement it drew the eye away from the tree. I decided that i wanted the tree to move back toward the base of the trunk creating kind of a circular composition. This decision kicked off the below responses.

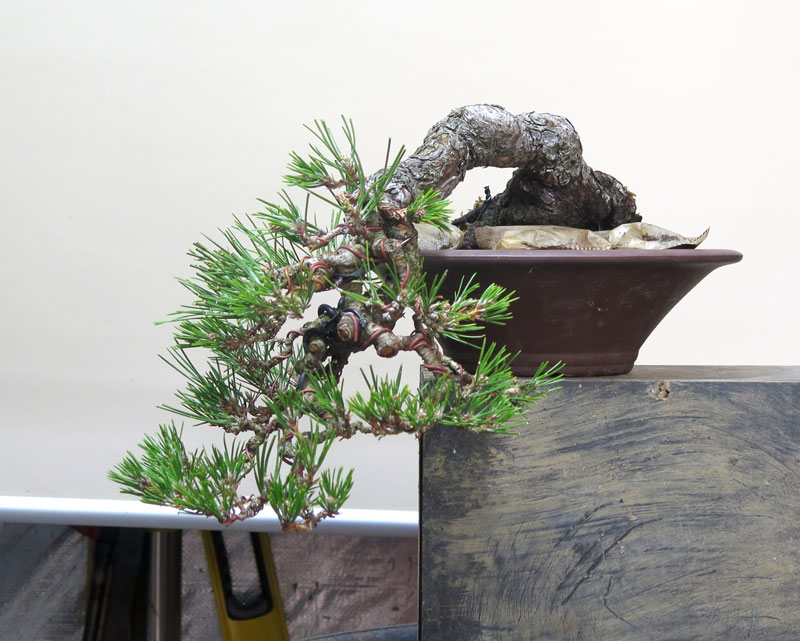
Above: to facilitate the lower branch moving rightwards, i had to remove a couple of branches to create space for this key branch to occupy. I also began to compact the apex region slightly with the overall aim of creating a smaller and more compact foliage mass.

Above: As i moved the lower branch across i removed another branch to ease the congestion the shifting branch created. Having began to move this key low branch, I felt that the foliage was feeling a little stretched out again taking the eye away from the trunk-line.

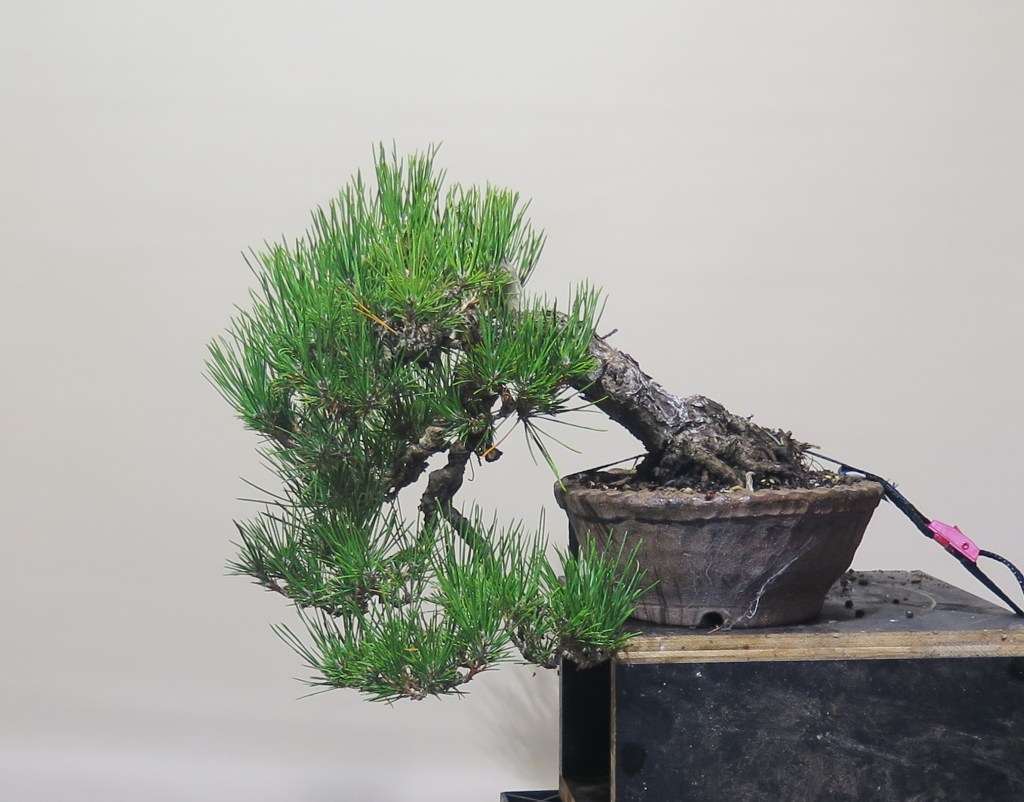
Above: I pulled the lower branch across further and brought it upward to further compact the foliage mass and bring it all in closer to the trunk. This also helped fill in the gaps left by the removed branches from the previous image. This is essentially where i will leave this round of work. I will let it fill in this season and perhaps revisit the wiring in autumn.
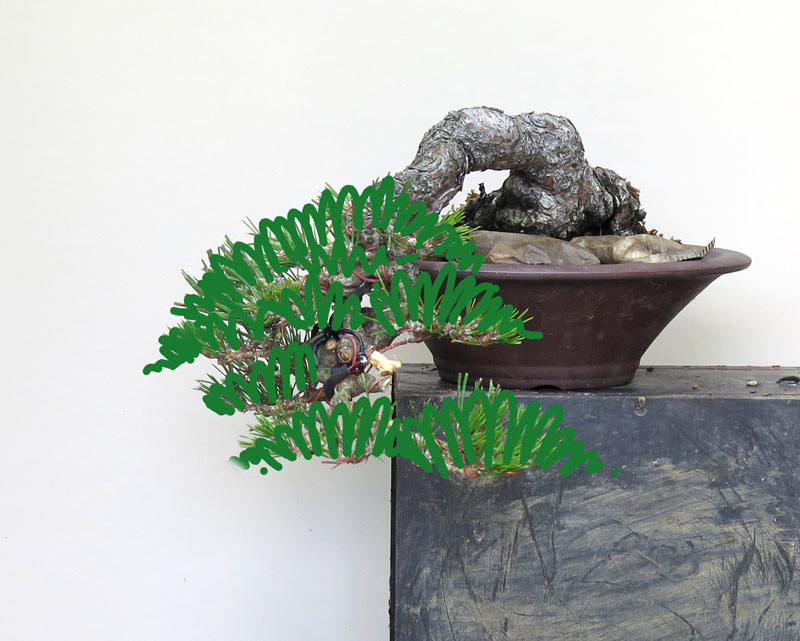
Above: a quick scribble to give a sense of what a more fully filled in canopy might look like.

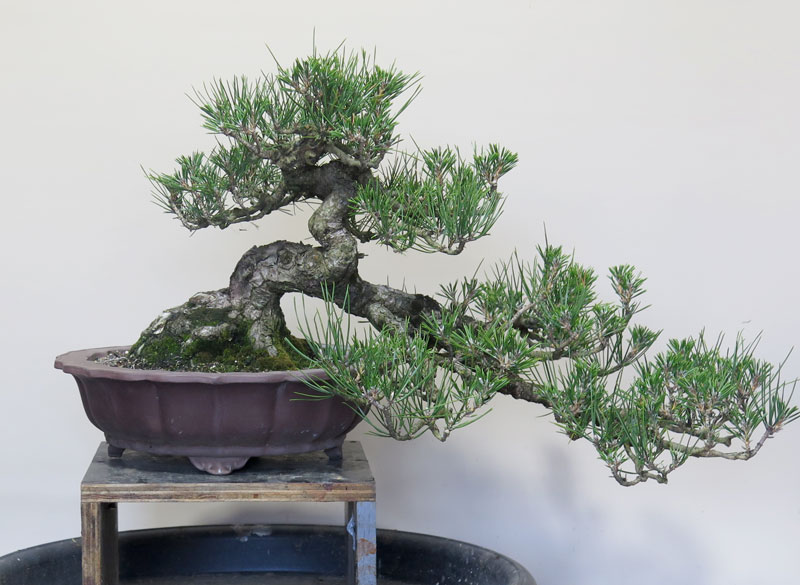
Above: A quick couple of images to give comparison of where the tree was when i started working on it and where it is now. I am very happy with where the tree is at now and look forward to continuing to develop it over the next few years.
A very quick update post of THIS pine.
From where we last left off, the pine had been un-wired during the previous season and had grown out quite a bit, hence needing a little tidy up. Recently toward the end of this last winter, it made it into the work shop for a quick wiring before the candles got too fragile.
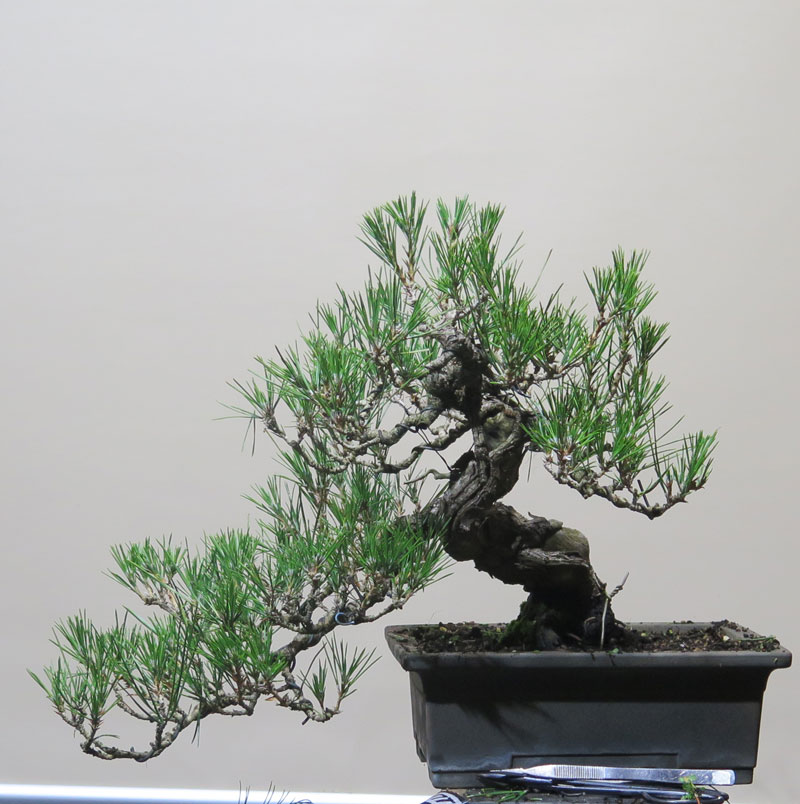
Above: de-wired and grown out of shape.

Above: The first step was bending the lower branch down further to try and separate the foliage masses a little more into individual zones.

Above: Post wiring.
I only wired what was needed which essentially meant only the main branches and sub branches were wired. I am pretty happy with the way it turned out and think it is evolving nicely.
For comparisons sake, below is how it was in 2021 vs. after the styling today.
the combination of a narrower apex area and a more separated lower branch all work together towards a solid slow improvement over the years.
I recently was gifted a number of very nice small trees from a close friend. They were all trees we had been working on together and that had got to a pretty nice point in their development.
One of the trees was this black pine.
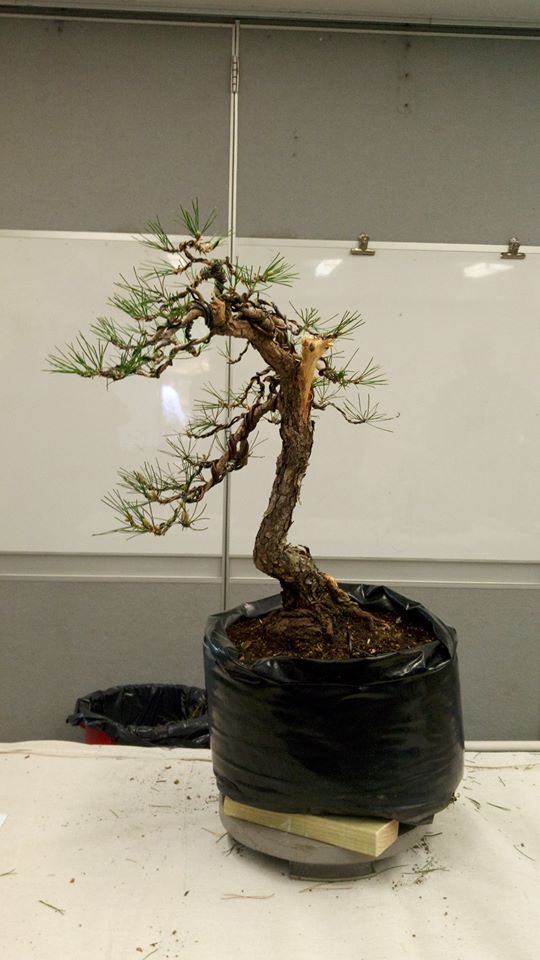
Above: the tree as i received it.
We had previously worked this tree and during its last re-potting we have moved it into this semi-cascade position from a more upright posture.
After staring at it for a while i started to wonder if i could get some more out of it, so out came the plastic pot and I tested a few new potential angles.

Option 01: Use the rear as the front and tilt the tree. I felt this kind of straightened out the trunk (even if a little lumpy) and elongated it a little so I wasn’t completely convinced.

Option 02: the original front but a slight rotation and a decent tilt to the left. I liked this option as it shortened the trunk a little and added what looked like another bend in the trunk’s length.

Above: I only had a couple of pots available for the re-pot. A flared sided round pot and the original banded round one.
I ended up using the flared pot. I liked the flared side as it helped lighten the visual weight of the pot. It also will give some extra clearance for branches which i may want to place close in to the container.
Above: the tree all potted up. I couldn’t quite get the full rotation and as a result the top section of trunk is a little parallel to the pot edge. While it doesn’t bother me too much at this stage, I will likely try to get this further down in the next re-pot.
Of course with an angle change like this there will always be foliage that needs re-styling.

Above: you can see from the angle of the shoots just how much the angle of the tree has changed.
Surprisingly the roots were fairly easy to adjust to get to suit the new angle, with only a couple of finer ones ending up above the new surface level. For those i dressed them with a layer of sphagnum moss to keep things moist while the slowly adjust to their new position.

Above: Sphagnum moss covering a couple of exposed roots.
All in All a successful re-pot and angle change. Once the tree recovers and grows out, i will start to think about part 2 of this process and restyle and re-shape the foliage mass to suit the new angle.
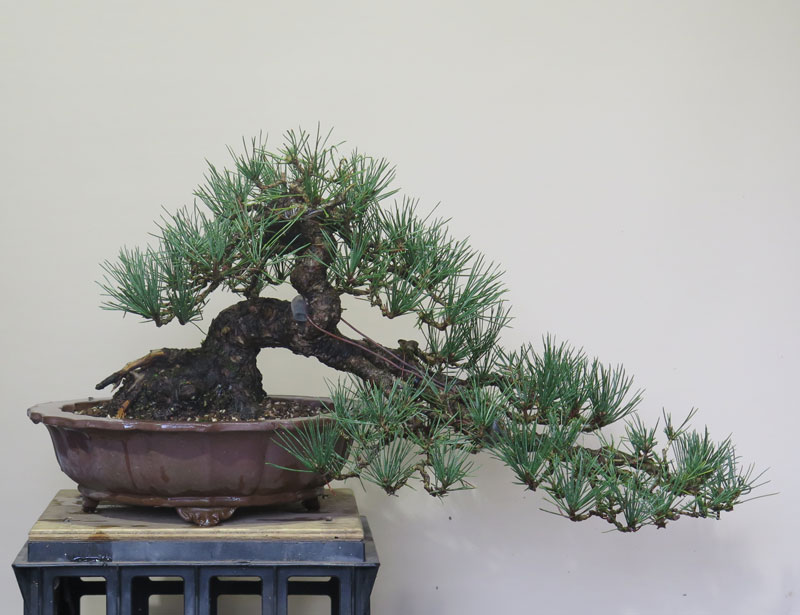
A number of years ago we visited Onomichi in southern Japan as a bit of a side trip during a family visit to Japan. I fell in love with the town for some reason. While i cant really put my finger on it, something just ‘clicked’. Its ocean setting, industrial history, creative new industries side by side with their traditional counterparts and of course the amazing shimanami kaido (well worth riding the bike trail if you are so inclined), the hilly landscape, querky old buildings, yellow trains etc all played their part I suppose.
While staying there, we walked to the peak of one of the small hills in the area and managed to stumble across this red pine.
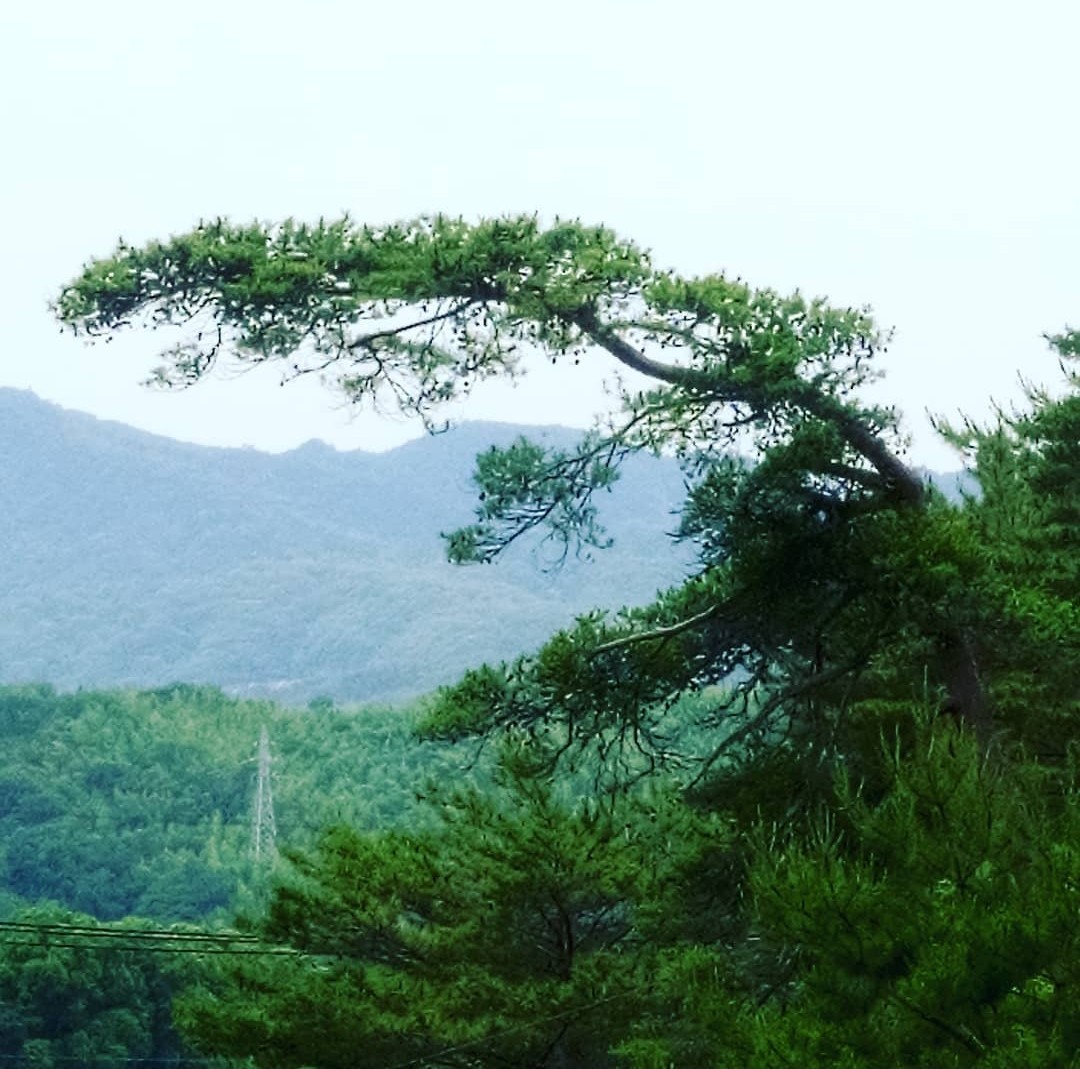
I really liked it, and again, while i cant really put a finger on why i liked it, it again ‘clicked’.
…….Cut to this week, I am looking through some travel pic and stumble upon the above red pine again. As fate would have it I was also trying to think of what to do with one of my black pines.
I had another tree that was styled very similarly and I was never quite sure that my collection was large enough to have two very similarly (and kinda of poorly) styled trees, so I would often catch myself staring at this black pine trying to figure out what i could do with it.
When I came across the Onomichi pine picture I had a light-bulb moment and wondered if i could capture the ‘vibe’ of this pine in the (now desperately needing styling) black pine on the benches.
…….. Now vibe is an interesting concept. Bonsai is a whole lot of different things to a whole lot of different people and that’s OK. In fact i think the myriad of different ideas and approaches is what makes it interesting.
For me, i am not really about making miniaturised, scale models of trees. I think what i like to do is try to capture the feeling of trees and or what my sub-conscious is drawn to in trees. It might be an element of a tree (canopy shape, branch movement, strange feature) a feeling that you get (hugeness, ancient-ness, calmness etc) or just somehow trying to reinterpret the spirit of a tree that i am drawn to. I amso am drawn to graphic shapes in the trees i style which is probably from my Landscape Architecture background. I think in summary I’d call it capturing the ‘Vibe’.
So One night I set myself up in my workshop and set about working towards imparting some of the spirit of the Onomichi pine into my black pine.

I’d anticipated a restyling at some point and had pruned and thinned back the foliage last autumn. The tree had been let grow freely the previous season and i think the above image reflects how desperately it needed work!
Now it’s probably on the late side of timing regarding styling black pines. We are entering an El’nino weather phase and the growing season has arrived much earlier than usual so i was caught a little off guard. Candles are extending so i had to be super careful when wiring so as not to break any but think I got away with it.
The process was fairly simple, I chucked on some tunes and switched between looking at the original Onomichi pine image and trying to impart some of it’s ‘vibe’ into the black pine. It was a fun exercise although I’m not sure how successful it was. You are always limited by the material in front of you so of course the end result is not a mirror image but it certainly has turned out being styled in a way i wouldn’t normally have approached the tree.

I quite like the end result but something still bothers me about it.
I think I am going to put it in a spot i can look at it each day and try to work out whats not quite right about it and tweak it over a period of the next few weeks (or leave it as is potentially).
It was a good exercise to go through and I’d recommend it for those with favorite trees and bonsai that share the basic structure. I had to actively go against my baseline styling urges in a number of instances and I learned a lot by doing that that will likely be part of my future work.
As far as the tree’s merit as a bonsai…………. the jury is still out…….. It’s certainly a more interesting tree compared to what I started with and the fact it will now trigger memories of a great family holiday and a favorite place I think will cement it place on my benches for many years to come.
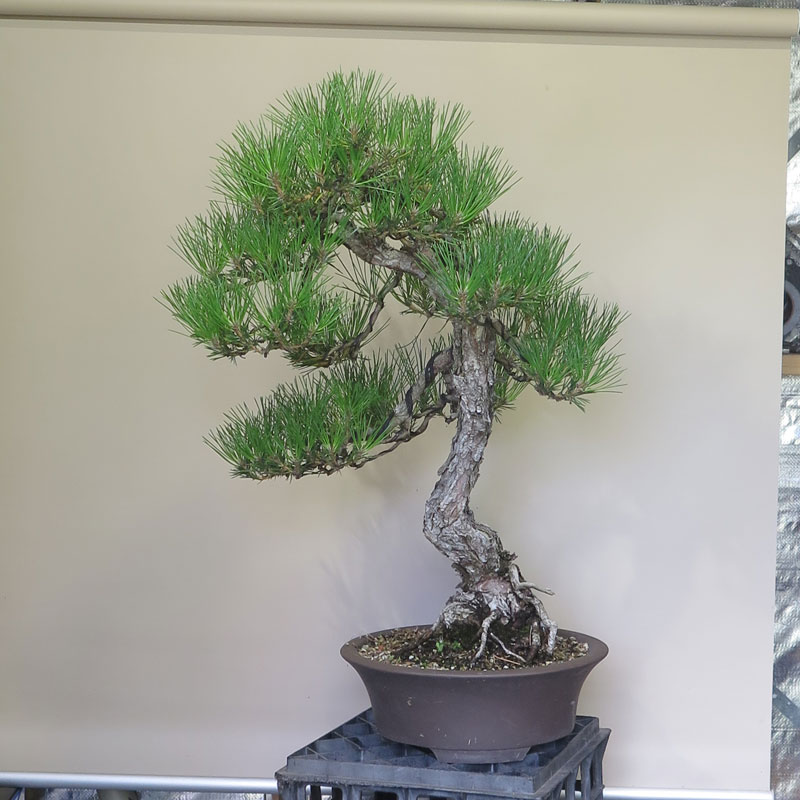
Another quick update on a tree I recently styled. The below pine has really started to shape up post styling and I figured it was time to get it out of the terracotta grow pot and into a bonsai container.
I potted it up in the pot from the tree in the last post which was the only spare pot I had that roughly came close to fitting the tree. Its not a bad match but I will see if I can locate a better pot for it in the next couple of years (square perhaps??).

Interesting to note the foliage colour seems much darker since the restyling photos, hopefully an effect of the water change and health returning to my trees. This tree has a long way to go but it seems that its future is back on track.
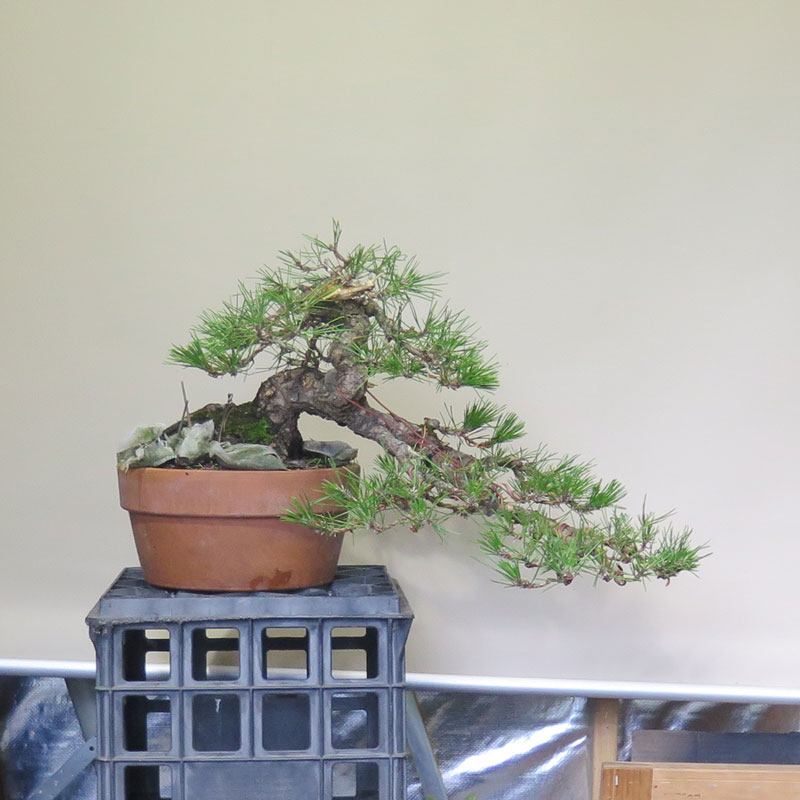
Just a quick post as part of the on-going repotting series. I repotted this pine which i recently worked and featured in this previous post:
Pretty simple work all in all just a change in pot. It’s not a perfect fit but I don’t mind it all the same. before and after below:


It will be interesting to see how this tree goes after the re-pot. It is in a fresh mix and this year I am potting most of my collection in Akadama, pumice and scoria in fairly equal proportions. I haven’t used this mix before but have heard good things so I am looking forward to seeing how it performs. Should be an interesting 12 months.
I’ve been working through some of my trees. Two of which are these black pines that were featured in the below blog post earlier this year:
Those two trees had their yearly needle work done and I now finally got around to wiring them.
Due to my water issues I had let many of my trees grow out (without doing the usual candle work etc) to gain some strength, and as a result their styling looks a little more sparse than it might otherwise. That said, I am happy with the strength they are now displaying and this styling will set them up for the next few years where I will work towards some more back budding and ramification.
Before after’s below:

After needle plucking 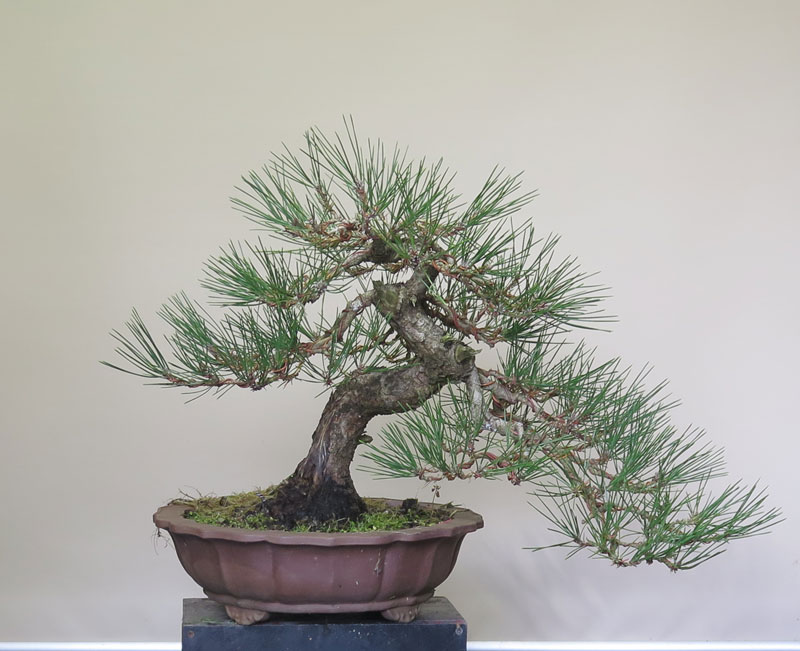
After some wire…..
I discovered on the tree above some significant rot had formed on the left side of the trunk. I dug out what I could but I will have to further investigate / treat it during repotting in the next few months.
Post needle plucking 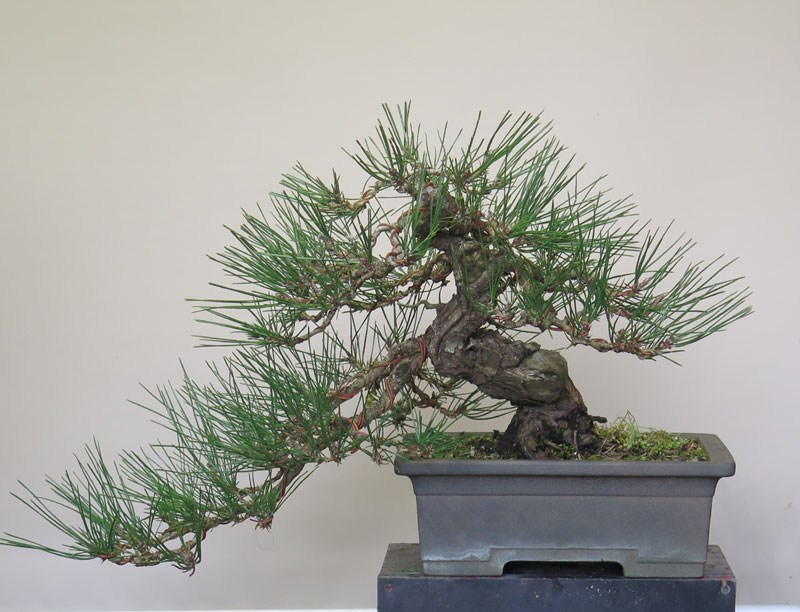
Some wiring later…
This next tree was fairly straight forward, it was wired out and it’s branching spread to allow for the in-fill budding and ramification that I will hopefully build over the next couple of years. With any luck, this tree will fill in fairly quickly and present a dense canopy.
There is something to be said about the different ways in which you might approach styling depending on what stage the material is that you are working on. Trees like the two above, I tend to try to spread things out much more than if I was to style something that was more “finished”. You need to make a guess as to how many future buds and branches you need to make room for. If you style developing material as if it were a display tree (tight, dense branches) you end up having to re-wire almost yearly to re-distribute the branch ramification to make room for the new shoots.
All in all nothing ground breaking with the above two trees but I suppose it tracks the often mundane nature of the slow improvements over the years. Not every styling is a dramatic transformation and in fact the real skill lies in the fine tuning, not the dramatic, which is something I am still trying to perfect……….
The below tree is bonsai i have had on my benches for a number of years. For some reason i hadn’t really worked it much over that time and was putting it off so it could be used as demonstration stock. With covid hitting and my calendar being cleared i thought it made no sense to put it’s styling off any more. I think this tree was last worked in 2012 so it was certainly due for a re-visit.

The work revolved around framing the trunk movement and shortening / compacting the lower branch. Most of that was accomplished with a handful of guy wires and standard wiring.

Not the neatest job on the planet but as the new needles were still a little delicate i left more on than i otherwise might in case i damaged some during the styling. All in all i am pretty happy with the results and will begin hunting a new pot for this coming re-potting season. (probably means i will have to dig through all the boxed up supplies….)
Another in the series of updates i will be posting over the next few weeks. The tree in question in this post is a japanese black pine that was originally a demonstration tree styled as part of the Central Coast bonsai societies Touch of Japan festival back in 2017.
I ended up liking the tree and purchased it post demo.

A year or so later a friend drove it from Sydney back to Victoria where it sat on my benches and it slowly deteriorated. The tree was in a plastic grow bag and on further inspection the root ball consisted of a sticky clay bulk that had been top dressed with good bonsai soil. I had assumed that the bonsai soil went the whole way through the bag but it didn’t and as a result a large percentage of the root mass had rotted off. I did an emergency repot into better soil and a smaller pot and soon the tree showed signs of growth and recovery. The tree continued to gain health and was re-styled as per below:


And now the tree has grown out for a full season without candle pruning to build strength, needles are a touch on the long side but i am happy with the level of back budding and strength the tree is showing considering it was on deaths door a couple of years ago.
Looking at the above image there is certainly room for fine tuning, but i will likely do that towards the end of Autumn / early winter while i am doing pine needlework.
The below pine is one I’ve had for a number of years.
It started it’s life as a much taller formal upright but by the time I took over the care of it, the upper portions had developed severe wire scarring and ugly lumps. It was restyled using only one branch, and so a formal upright became a semi-cascade.
The tree grew in this form for a number of years and slowly developed and filled in. I’d never really been very attached to the tree and I could never really put my finger on quite what it was that annoyed me about it.
I like the bark, the jin up top, and semi-cascades generally, but for what ever reason the tree never spoke to me. (yes I know, trees can’t speak)
At one stage I had Evan Marsh staying with me and I gave him a shot at styling it. He wired it up and did the much needed task of breaking up some large areas of foliage into individual pads.
I didn’t mind Evans styling but as soon as the tree grew out it again began to annoy me. It became a giant pom pom of foliage and had run out of room for additional ramification.

At some point I re-potted it into a lovely pot I was gifted (or perhaps traded for a gyoza dinner?) from Luke at Adelaide Bonsai Pottery (check him out, he does some very nice containers)
The pot suited the tree much more from both a size and style perspective and it made me think a bit more about the tree. The thinking didn’t go on for too long as I cut off a couple of branches to create some space in the canopy and put it back on the benches.
Which basically gets us to the starting off point of its most recent revisit.
While I liked the pot and the removed branches were an improvement, it was still not a tree I really liked.
I had been putting off working the tree for a while and had planned to simply remove the wire that was on it and pull some needles to prevent too much wire scaring. Like what often happens however, when you start working on a tree, (often during standard maintenance procedures), you make new discoveries and or see things from new angles (often literally).

I cut off a couple more branches. As they came off, it revealed some lines and movement in the upper sections that I thought were worth showing off some more. So out came the wire and I begun fully restyle the tree.

I wired it up and sat back and looked at where I had got to. I had compacted the head and brought it lower by bending the branch supporting the apex down somewhat to make the apex jin more prominent.
But there was still something bugging me about the composition.
The lower foliage was all forming one visual lump. I decided to test what it might look like with another branch removed. Out came an oily rag that had been wrapping an old motorbike carburettor and I tested to see how it would look.

I made the cut and a couple of small adjustments and this is where I finished up.
We are still a season or two away from being exhibition ready but at least now the bones (branches?) I will be building upon are ones I am much more happy with.
I think I will stare at this one on the benches for the next little while and decide where to from here. Maybe a trial run on a display stand… ooooh the possibilities!
What do you think? have you had trees that have undergone similar transformations: from unloved bench space occupier to something that might get a run at a show?
In the coming weeks I have a number of other pines that I need to get around to working (tis the season for pulling needles) so they will form the basis of the next few posts.
If it’s pine content you are after or have questions you want answered (life, pine related or otherwise) chuck them in the comments below and I’ll see if I can answer them in coming posts.
Until the net one……….
