
I recently was gifted a number of very nice small trees from a close friend. They were all trees we had been working on together and that had got to a pretty nice point in their development.
One of the trees was this black pine.

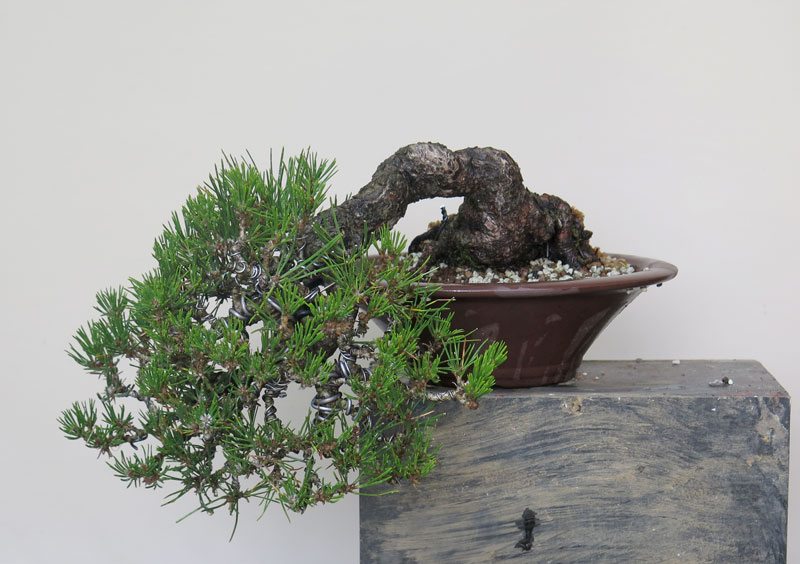
Above: the tree as i received it.
We had previously worked this tree and during its last re-potting we have moved it into this semi-cascade position from a more upright posture.
After staring at it for a while i started to wonder if i could get some more out of it, so out came the plastic pot and I tested a few new potential angles.

Option 01: Use the rear as the front and tilt the tree. I felt this kind of straightened out the trunk (even if a little lumpy) and elongated it a little so I wasn’t completely convinced.

Option 02: the original front but a slight rotation and a decent tilt to the left. I liked this option as it shortened the trunk a little and added what looked like another bend in the trunk’s length.

Above: I only had a couple of pots available for the re-pot. A flared sided round pot and the original banded round one.
I ended up using the flared pot. I liked the flared side as it helped lighten the visual weight of the pot. It also will give some extra clearance for branches which i may want to place close in to the container.
Above: the tree all potted up. I couldn’t quite get the full rotation and as a result the top section of trunk is a little parallel to the pot edge. While it doesn’t bother me too much at this stage, I will likely try to get this further down in the next re-pot.
Of course with an angle change like this there will always be foliage that needs re-styling.

Above: you can see from the angle of the shoots just how much the angle of the tree has changed.
Surprisingly the roots were fairly easy to adjust to get to suit the new angle, with only a couple of finer ones ending up above the new surface level. For those i dressed them with a layer of sphagnum moss to keep things moist while the slowly adjust to their new position.

Above: Sphagnum moss covering a couple of exposed roots.
All in All a successful re-pot and angle change. Once the tree recovers and grows out, i will start to think about part 2 of this process and restyle and re-shape the foliage mass to suit the new angle.

3 comments
Comments feed for this article
September 16, 2024 at 8:29 AM
John Marsh
Great progression.
September 16, 2024 at 10:49 AM
bonsaijapan
Thanks John, I’m hoping to get it all wired up after it recovers from the re-pot. Hope you’re well, Joe.
October 14, 2024 at 8:17 AM
New black pine. Part 2 – Re-styling. | Nichigo Bonsai
[…] steps i went through when styling this tree. I had previously adjusted the planting angle in the last post and now had to adjust the foliage mass in reaction to this. I’ve done my best to explain the […]